
Table of Contents
Requirements
- Proximis version 4.19 or higher.
- Php version 7.4 or higher.
Installation
Register the plugin.
php bin/change.phar change:register-plugin --type=module --vendor=Project Axepta
Install the plugin.
php bin/change.phar change:install-plugin --type=module --vendor=Project Axepta
In your project configuration, make sure to have the logger by service to see this module logs in log/proximis.axepta.log
"Logger": {
      "Writer": {
	"fileByService": true
	}
    },
Configuration
Create the connector from the back office. /admin.php/Rbs/Commerce/Connector/
General properties tab :
The field titre sur le site will be visible by the customer, the label, only in the backoffice.
The field code is used to identify the connector in the code base.
The field description can contain formatted text, images and links.
The field visuel allows the display of an image next to the titre sur le site.
The field critère d’application allows setting specific rules to display the connector.
The field instruction de paiement can contain formatted text, images and links.

Technical properties tab:
Select for the connector type : Connecteur de paiement Axepta
![]()
Some information about your current environnement is displayed. Make sure to use the appropriate configuration keys.
![]()
- Configuration keys : This information is provided by BNP.

- Connector Options : Select your options for this connector.

- Currencies : Select allowed currencies for this connector.
- Payment methods : Select allowed payment modes for this connector.
To have this payment mode available in the checkout, you need to add it to the checkout process. /admin.php/Rbs/Commerce/Process/
![]()
You can create multiple connectors with a different configuration. You can have a connector dedicated to one payment mode for example.
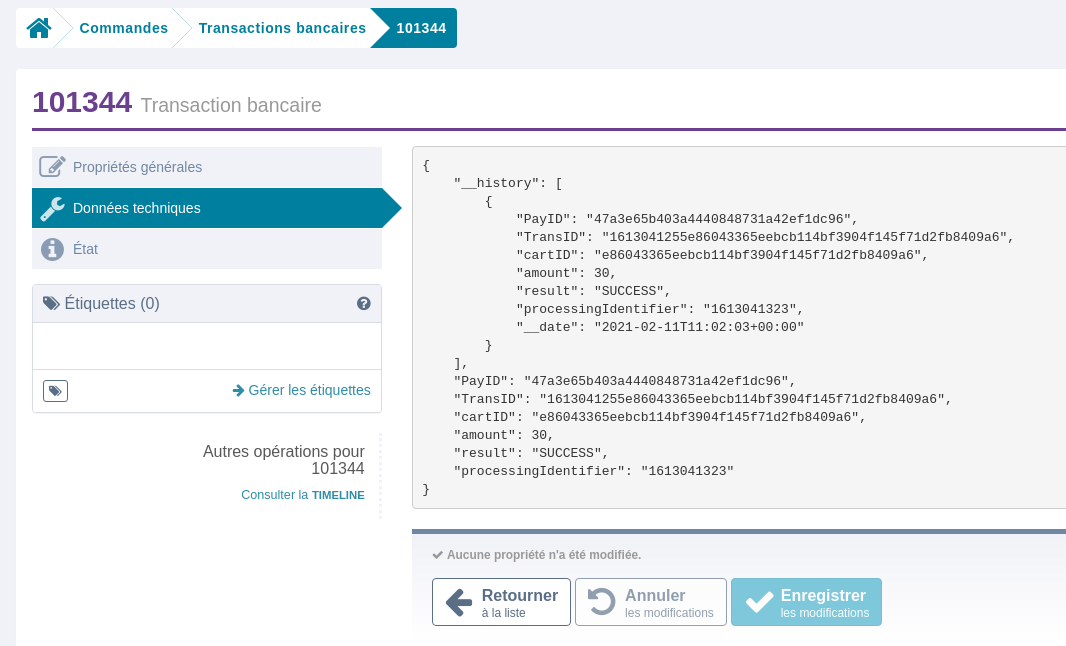
Transactions listing
From the url admin.php/Rbs/Order/Transaction/ select a transaction to see it’s technical details.
Refunds
When an order is cancelled, it is eligible for a refund.
From the url ua.php/financial/ in the refund detail page, select the action ‘traiter’ and confirm.
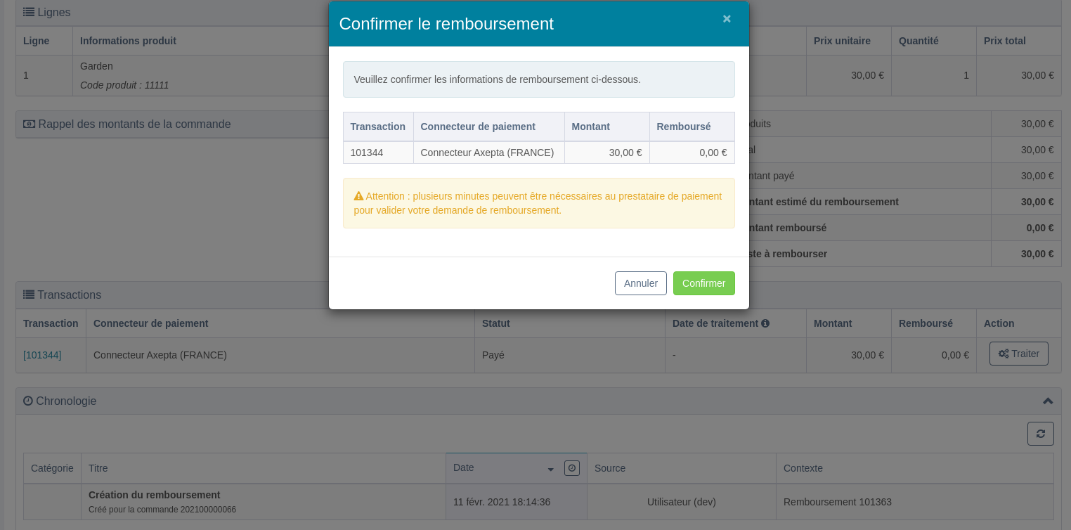
The query is sent to Axepta and the operation result can be found in the timeline section.
If an error occurs, a message will be displayed.
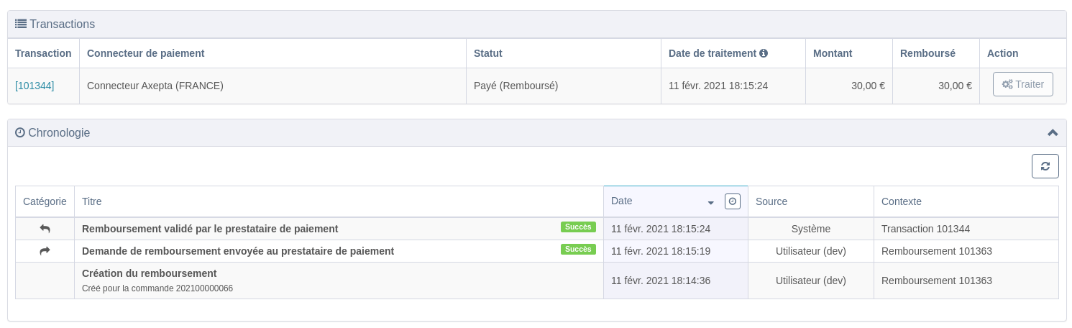
If the refund is accepted, you can validate it by selecting ‘traitement manuel’
![]()
How to customize the front template
You can edit the twig file App/Modules/Project/Axepta/Assets/Theme/ng-template/project-axepta-payment.twig to remove the inline style and declare your own CSS rules.

How to declare new translations
Right now the module is shipped with the fr_FR locale. But you can create a new folder for any locale. Take exemple on the files inside te folder App/Modules/Project/Axepta/Assets/I18n
You can always edit the translated strings from the translation manager.ua.php/lmsManager/Plugin/m.project.axepta

Available payment methods
PayPal testing
If you would like to test PayPal in a test environnent, please follow the instructions in order to activate the Sandbox.
Developer Documentation
How to add a new Payment mode.
The documentation of alternative payment modes are available in the following page.
https://docs.axepta.bnpparibas/display/DOCBNP/Alternative+payment+methods+Integration
You should take exemple on already implemented payment mode.
- Add a new class for each payment mode you want to add in App/Modules/Project/Axepta/PaymentModes.
This class will need to extend the PaymentModeBase and declare the buildDeportedPageQuery method.
public static function buildDeportedPageQuery(\Rbs\Payment\Documents\Transaction $transaction, $connectorId, \Rbs\Website\Documents\Website $website, \Project\Axepta\Events\Documents\AxeptaEngine $engine): string { $paymentRequest = parent::prepareDefaultPaymentRequest($transaction, $connectorId, $website, $engine); // PAYMENT_URL is specific to the payment mode and available in the documentation. $paymentRequest->setUrl(self::PAYMENT_URL); return parent::validateAndBuildQueryString($paymentRequest, $engine, $transaction, $website); }
Depending on the payment mode required parameters you will need to add them to the $paymentRequest. (ie $paymentRequest->setAccOwner($accountOwner);)
- Add your payment trigram inside showPaymentModes() in the file App/Modules/Project/Axepta/Assets/Admin/directives.js
- Add your payment trigram inside getEnabledPaymentModes() in the file App/Modules/Project/Axepta/Events/Documents/AxeptaEngine.php
and to getDeportedPageQuery() in the file App/Modules/Project/Axepta/Http/Ajax/DeportedPageQuery.php
- Add the logo of the payment mode in the folder App/Modules/Project/Axepta/Assets/Theme/img/logos
The logo must be named after the trigram and the extension must be .png