
Last connector version: 1.7.0
#### V1.7.0
- Create a new transaction when receiving a successful IPN for a previously failed transaction
- Verify PayId mismatch before sending duplicate payment notification
#### V1.6.0
- Add EtiId on surveys/reverse/credit operations
- Add email alert
- Added a manual capture function
- Update php requirement from 7.4 to >7.4 to allow V6 compatibility
Functional coverage
- Card payment with 3DSV2
- Alternative payments (ALI, WEC, UPI, BAN, PAL)
- Choice of integration in remote page or via an iframe
- Refund management
- Personalization via template
- Personalization via 'custom' fields
Requirements
- Proximis version 5.13 or higher.
- Php version 7.4 or higher.
Installation
The Module is now moved to a composer third-party Plugin.
If you installed the module with an archive, you need to uninstall it with the following command. php bin/change.phar proximis:plugins -v disable module_Project_Axepta
Add the third-party Clever Age repository by adding the following to your composer.json
{ "type": "composer", "url": "https://nexus-production.tools-services-1.omn.proximis.com/repository/cleverage-axepta/" }
Add the module in the require part of your composer.json
{"require": { "cleverage/axepta": "^1" }}
Then run your update.bash script.
Install the plugin. php bin/change.phar proximis:plugins -v enable CleverAge_Axepta
In your project configuration, make sure to have the logger by service to see this module logs in log/proximis.axepta.log
"Logger": { "Writer": { "fileByService": true } },
Configuration
Create the connector from the back office. /admin.php/Rbs/Commerce/Connector/
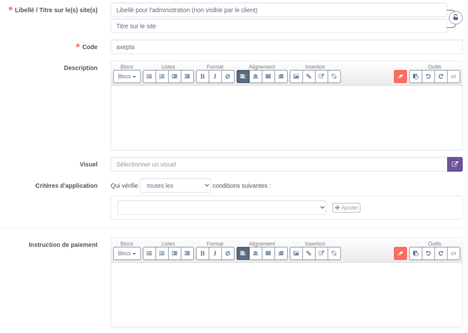
General properties tab.
The field titre sur le site will be visible by the customer, the label, only in the backoffice.
The field code is used to identify the connector in the code base.
The field description can contain formatted text, images and links.
The field visuel allows the display of an image next to the titre sur le site.
The field critère d’application allows setting specific rules to display the connector.
The field instruction de paiement can contain formatted text, images and links.
Technical properties tab.
Select for the connector type : Connecteur de paiement Axepta
![]()
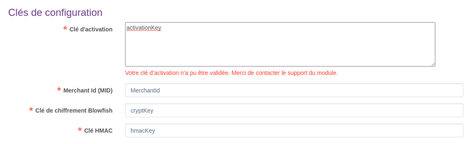
Some information about your current environnement is displayed. Make sure to use the appropriate configuration keys.
![]()
- Configuration keys : This information is provided by BNP.
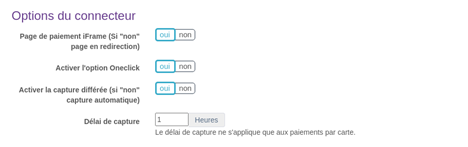
- Connector Options : Select your options for this connector.
- Template personnalisé
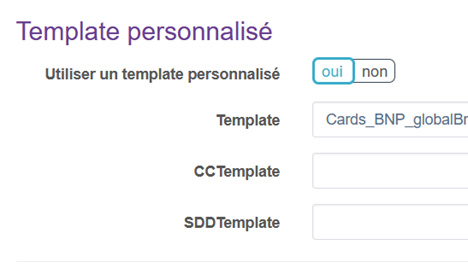
Allow to use Axepta custom page, see : https://docs.axepta.bnpparibas/pages/viewpage.action?pageId=6914816#Pagedepaiement-Pagedepaiementducommer%C3%A7ant
“Template”, “CCTemplate” et SDDTemplate” parameters are available.
- Currencies : Select allowed currencies for this connector.
- Payment modes : Select allowed payment modes for this connector.
To have this payment mode available in the checkout, you need to add it to the checkout process. /admin.php/Rbs/Commerce/Process/
You can create multiple connectors with a different configuration. You can have a connector dedicated to one payment mode for example.
![]()
You can create multiple connectors with a different configuration. You can have a connector dedicated to one payment mode for example.
Transactions monitoring
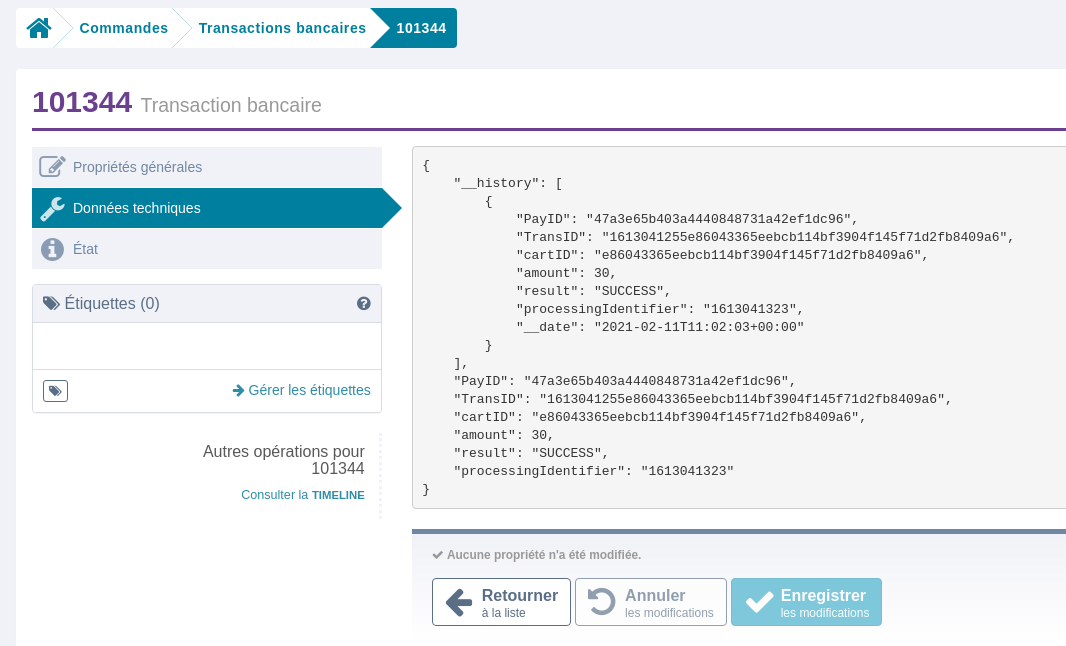
From the url admin.php/Rbs/Order/Transaction/ select a transaction to see it’s technical details.
Refunds management
When an order is cancelled, it is eligible for a refund.
From the url ua.php/financial/ in the refund detail page, select the action ‘traiter’ and confirm.
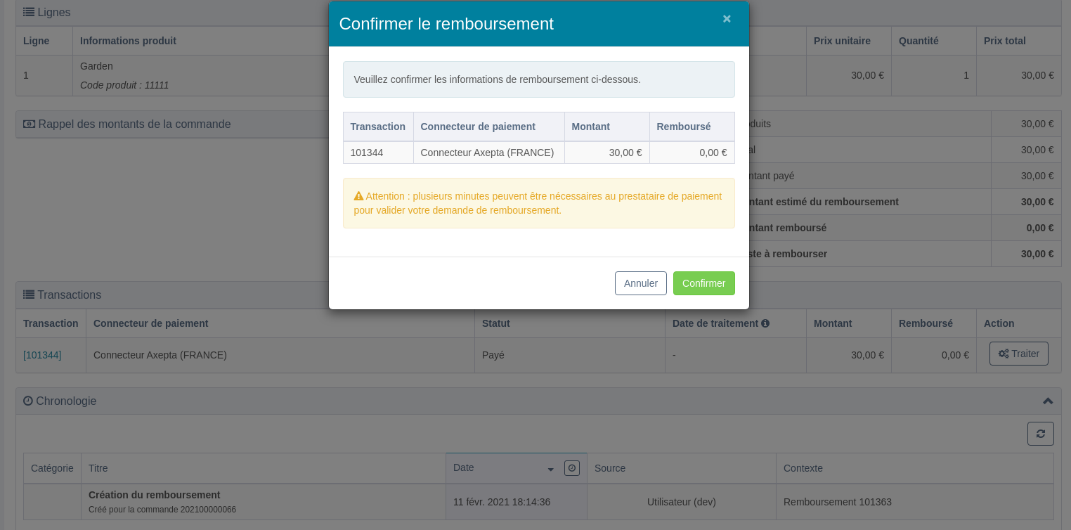
The query is sent to Axepta and the operation result can be found in the timeline section.
If an error occurs, a message will be displayed.
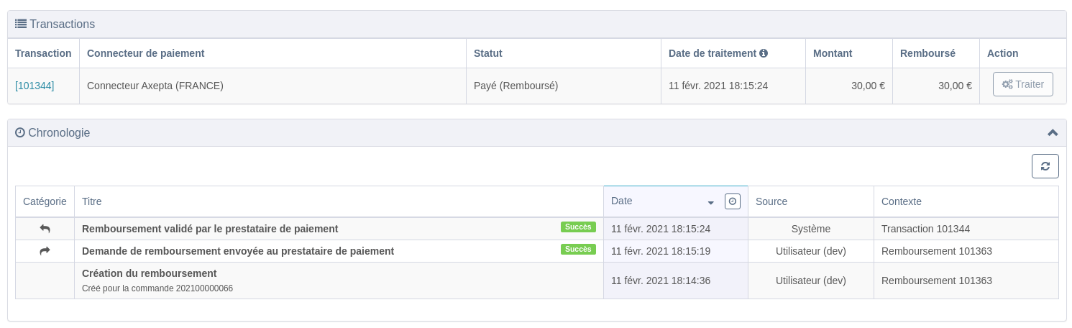
If the refund is accepted, you can validate it by selecting ‘traitement manuel’
![]()
Developer Documentation :
Added a new payment method.
The documentation of alternative payment modes are available in the following page.
https://docs.axepta.bnpparibas/display/DOCBNP/Alternative+payment+methods+Integration
You should take exemple on already implemented payment mode.
- Add a new class for each payment mode you want to add in App/Modules/Project/Axepta/PaymentModes.
This class will need to extend the PaymentModeBase and declare the buildDeportedPageQuery method.
public static function buildDeportedPageQuery(\Rbs\Payment\Documents\Transaction $transaction, $connectorId, \Rbs\Website\Documents\Website $website, \Project\Axepta\Events\Documents\AxeptaEngine $engine): string { $paymentRequest = parent::prepareDefaultPaymentRequest($transaction, $connectorId, $website, $engine); // PAYMENT_URL is specific to the payment mode and available in the documentation. $paymentRequest->setUrl(self::PAYMENT_URL); return parent::validateAndBuildQueryString($paymentRequest, $engine, $transaction, $website); }
Depending on the payment mode required parameters you will need to add them to the $paymentRequest. (ie $paymentRequest→setAccOwner($accountOwner);)
2. Add your payment trigram inside showPaymentModes() in the file App/Modules/Project/Axepta/Assets/Admin/directives.js
3. Add your payment trigram inside getEnabledPaymentModes() in the file App/Modules/Project/Axepta/Events/Documents/AxeptaEngine.php
and to getDeportedPageQuery() in the file App/Modules/Project/Axepta/Http/Ajax/DeportedPageQuery.php
4. Add the logo of the payment mode in the folder App/Modules/Project/Axepta/Assets/Theme/img/logos
The logo must be named after the trigram and the extension must be .png
Add of the FLOA Pay payment method
Add the connector
To make FLOA payment methods (Deferred/ 3X/ 4X) available to your customers, you must configure a new connector from your BO at/admin.php/Rbs/Commerce/Connector/ and add it to the payment methods available in your payment process.
In the activation key section use the following key :
FLO;EUR; hkZCG0Jgh+faBBsTCMpG2O4eq3IGuBI7JwsKSxnYbjcmFw0fvS5LQTxyobBXwB3JZJ3rHLCy 8N9p8Ne/nZwLju8qUE1xkbSXPw6rpYRjmFxsT8sDyMgexiaw7GUK05tK886562Ph4neoZ9kppgbZu8n 6ia5E3509vLKaHkovoqY= |
|---|
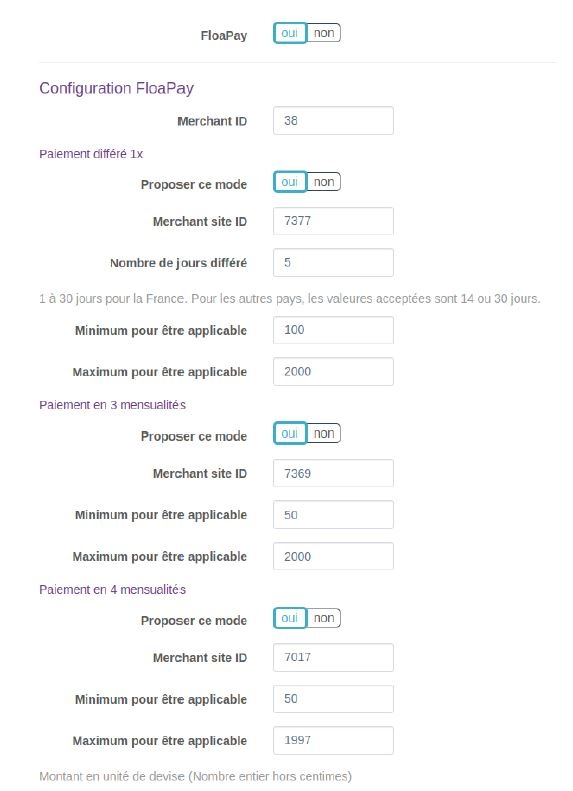
Connector configuration
Here is an example configuration with the test values provided by Floa :
Connector display with compatible modes
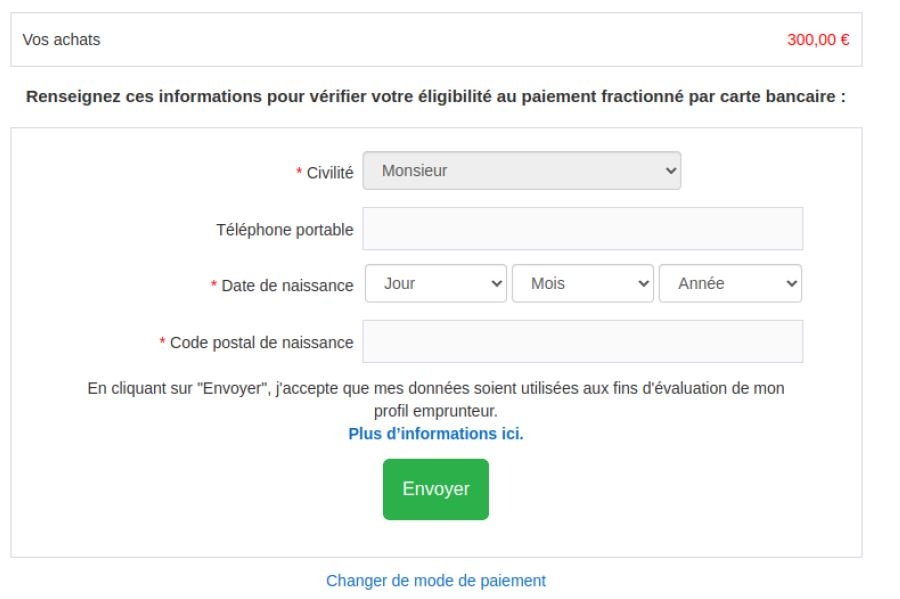
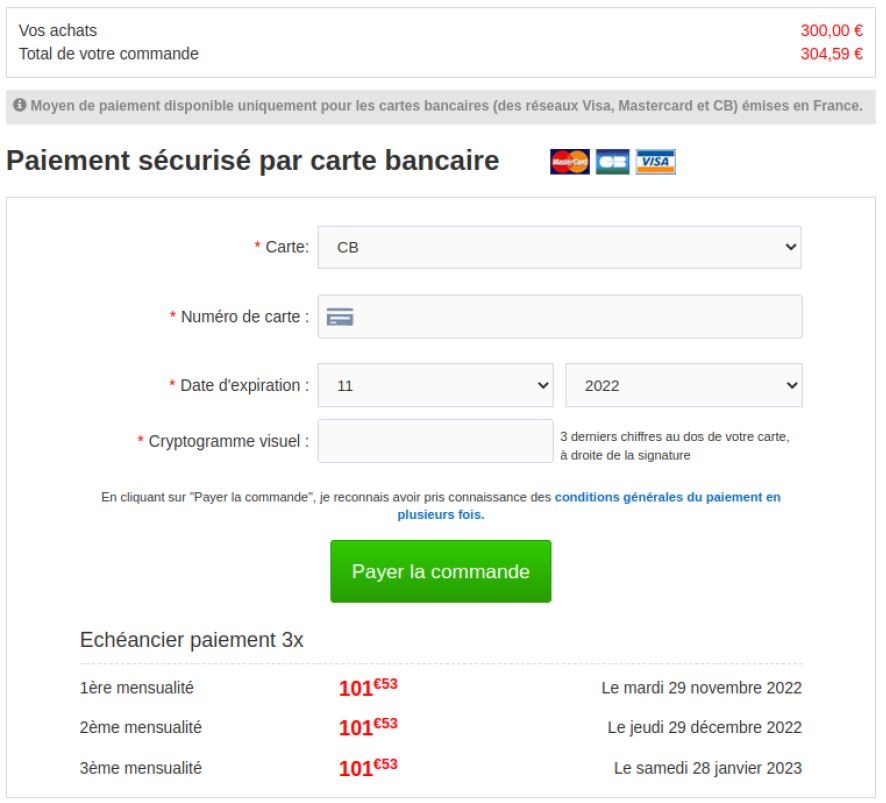
Once configured, the connector will display with the others. FLOA buttons will display based on the min/max thresholds configured.
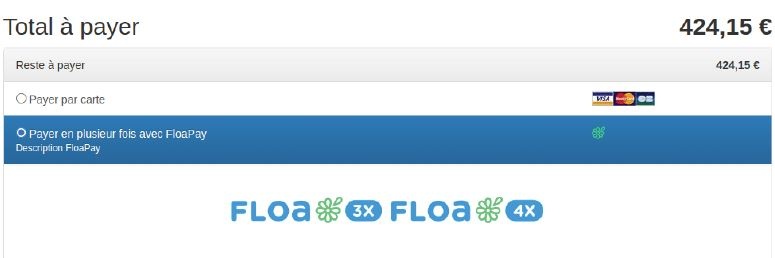
![]() When clicking on a Floa logo, the user is redirected to a remote page. Fill in the information for an eligibility result (display page) then in the second step, the card information n(payment page)
When clicking on a Floa logo, the user is redirected to a remote page. Fill in the information for an eligibility result (display page) then in the second step, the card information n(payment page)
File page
Payment page
Test cards are available at : https://floapay.readme.io/reference/test-card-numbers
Add of the Apple Pay payment method
- Apple Pay configuration
Apple Pay is not supported by all devices and browsers, the list of supports is available here https://developer.apple.com/documentation/apple_pay_on_the_web/#2978468 (use of Apple Pay JS).
Here is what is implemented for the Axepta - Proximis connector :
| Devices | minimal version | browsers |
|---|---|---|
| Mac | macOS 10.12 | All |
| i Phone | iOS 10 | All |
- Connector configuration
To integrate with Apple Pay, two certificates are required, the merchant identification certificate and the payment processing certificate.
Apple Pay side
Merchant identifier
Create an Apple Pay merchant ID by following the Apple documentation https://developer.apple.com/help/account/configure-app-capabilities/configure-apple-pay-on-the-web
Payment Processing Certificate
Axepta BNP Paribas Support starts the configuration and sends the CSR (Certificate Signing Request) by email to the technical contact identified during the integration phase. It is thus requested the Apple developper Merchant Id of the customer, which must be provided to its responsible business.
- Axepta BNP Paribas support generates the . csr for the merchant
- Using this . csr, generate the file apple-developer-merchantid-domain-association.txt which will identify the merchant on the site
- Send your integrator the file apple-developer-merchantid-domain-association.txt obtained during the generation of your merchant ID so that it deposits it in the App/Config/.well-known . This will allow in your next deployment to place this file at the root of your site in order to have it verified by Apple.
Merchant Identification Certificate
This certificate is different from the files obtained in the previous step. For the second certificate, do not use the . csr generated by Axepta BNP Paribas support, but create a new one from a MAC, as indicated in the Apple documentation mentioned above.
- Generate on a Mac a file a file. csr
- From your Apple Developer Admin account generate a . cer certificate from the . csr file.
- Retrieve this certificate. cer on the Mac and group it with the key to the . csr file in your keychain.
- From this grouping in your keychain create a file. p12
- Then use this file. p12 to generate an ApplePay.crt.pem certificate file and a second file for the associated ApplePay.key.pem key (the file nomenclature must be respected).
- Open the terminal and run the commands below to split the. p12 in key and certificate, where ApplePayMerchantID_and_privatekey.p12 is the name of your file. p12
openssl pkcs12 -in ApplePayMerchantID_and_privatekey.p12 -out ApplePay.crt.pem -clcerts -nokeys |
|---|
openssl pkcs12 -in ApplePayMerchantIdentity_and_privatekey.p12 -out ApplePay.key.pem -nocerts |
|---|
- Drop these two . pem files in the App/Config/ApplePay directory of your project.
We recommend using a passphrase when generating the file pair. pem, it will have to be entered in the connector configuration in the Proximis Back-Office.
Make sure you have given the read access rights of these files to the server by changing their permissions
Proximis side
Payment connector
To allow your customers to pay via Apple Pay, you must activate the payment method in the connector configuration in Proximis :

You can then specify the different settings associated with Apple Pay:
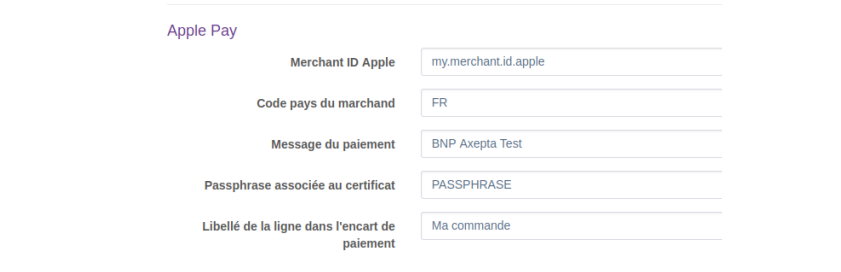
| Settings | Expected value |
|---|---|
| Merchant ID Apple | your merchant ID Apple Pay |
| Merchant country code | Merchant country code in ISO 3166 format (e.g. FR). This code is used to log in to payment. Associated Apple documentation https://developer.apple.com/documentation/apple_pay_on_the_web/applepaypaymentrequest/1916117-countrycode |
| Payment message | Label displayed in Apple Pay payment sheet to describe the user’s payment. Associated Apple documentation https://developer.apple.com/documentation/apple_pay_on_the_web/applepaypaymentrequest/1916117-countrycode |
| Passphrase associated with the certificate | Passphrase associated with the Payment Processing Certificate . pem file pair. To indicate if a passphrase was used during the generation of these files. |
| Line label in the payment insert |
Apple Pay SDK Statement
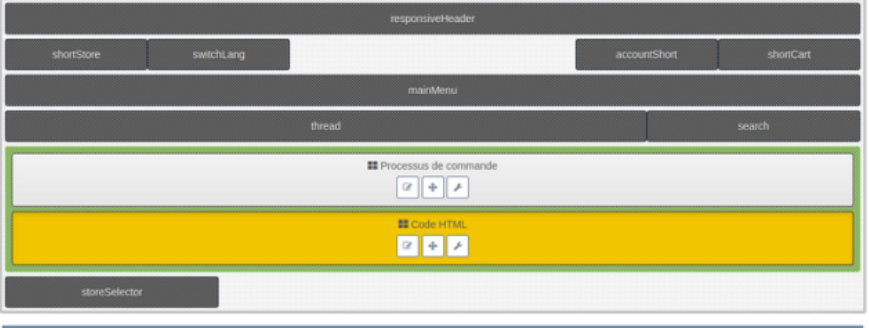
In the Proximis BO go to “Settings > Common > HTML Code” and click on the “Add HTML code” button :

Then declare the Apple Pay SDK in your document : https://applepay.cdn-apple.com/jsapi/v1/apple-pay-sdk.js

Save your document:

Then go to the configuration of your payment page in the Proximis BO and declare a new block of type “HTML code” then fill in the previously created document containing the SDK as a parameter.
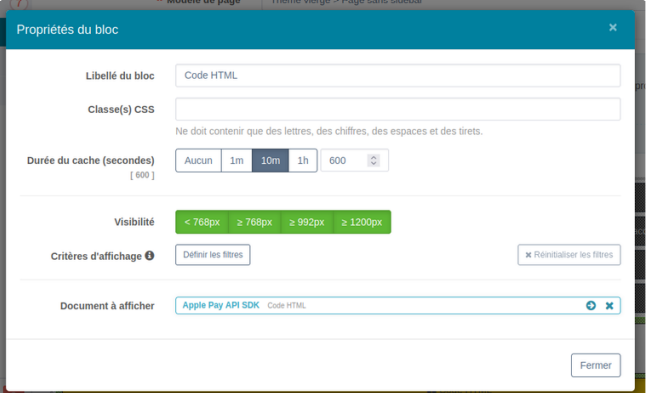
Make this contribution in all the translations of the payment page so that Apple Pay is available on each of them.
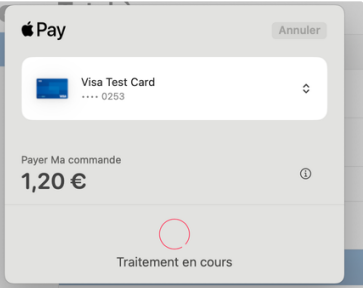
Payment front
Payment via Apple Pay is then available on your front connector :

When the Apple Pay button is clicked, the payment sheet will open :
How to customize the front template.
You can edit the twig file App/Modules/Project/Axepta/Assets/Theme/ng-template/project-axepta-payment.twig to remove the inline style and declare your own CSS rules.
How to declare new translations.
Right now the module is shipped with the fr_FR locale. But you can create a new folder for any locale. Take exemple on the files inside te folder App/Modules/Project/Axepta/Assets/I18n
You can always edit the translated strings from the translation manager.ua.php/lmsManager/Plugin/m.project.axepta
PayPal testing
If you would like to test PayPal in a test environnent, please follow the instructions in order to activate the Sandbox.
Description of available methods of payment
| Logo | Nom | Catégorie | Région d'émission | Pays | Devises |
|---|---|---|---|---|---|
| American Express | Carte | International | France ; Italie ; Belgique ; Luxembourg ; Royaume-Uni ; Irlande ; Pays-Bas ; Espagne ; Allemagne ; Portugal ; Suisse ; Autriche ; Slovaquie ; Slovénie ; Suède ; Danemark ; Norvège ; Finlande ; Estonie ; Lituanie ; Lettonie ; Grèce | EUR ; GBP ; CHF ; USD ; AUD ; CAD ; DKK ; JPY ; NOK ; PLN ; SEK |
| Apple Pay | Wallet | International | France ; Italie ; Belgique ; Luxembourg ; Royaume-Uni ; Irlande ; Pays-Bas ; Espagne ; Allemagne ; Portugal ; Suisse ; Autriche ; Slovaquie ; Slovénie ; Suède ; Danemark ; Norvège ; Finlande ; Estonie ; Lituanie ; Lettonie ; Grèce | EUR ; GBP ; CHF ; DKK ; USD ; CAD ; JPY ; NOK ; SEK ; PLN ; AUD |
| CB | Carte | France | France | EUR |
| FLOA | BNPL | Europe | France ; Italie ; Belgique ; Espagne ; Allemagne ; Portugal | EUR |
| Mastercard | Carte | International | France ; Italie ; Belgique ; Luxembourg ; Royaume-Uni ; Irlande ; Pays-Bas ; Espagne ; Allemagne ; Portugal ; Suisse ; Autriche ; Slovaquie ; Slovénie ; Suède ; Danemark ; Norvège ; Finlande ; Estonie ; Lituanie ; Lettonie ; Grèce | EUR ; GBP ; CHF ; DKK ; USD ; CAD ; JPY ; NOK ; SEK ; PLN ; AUD |
| Paypal | Wallet | International | France ; Italie ; Belgique ; Luxembourg ; Royaume-Uni ; Irlande ; Pays-Bas ; Espagne ; Allemagne ; Portugal ; Suisse ; Autriche ; Slovaquie ; Slovénie ; Suède ; Danemark ; Norvège ; Finlande ; Estonie ; Lituanie ; Lettonie ; Grèce | EUR ; GBP ; USD ; CAD |
| Visa | Carte | International | France ; Italie ; Belgique ; Luxembourg ; Royaume-Uni ; Irlande ; Pays-Bas ; Espagne ; Allemagne ; Portugal ; Suisse ; Autriche ; Slovaquie ; Slovénie ; Suède ; Danemark ; Norvège ; Finlande ; Estonie ; Lituanie ; Lettonie ; Grèce | EUR ; GBP ; CHF ; DKK ; USD ; CAD ; JPY ; NOK ; SEK ; PLN ; AUD |


Using CustomFields
Calls to the remote page are enriched with customFields :
1 | CustomField1 | Dynamic Currency + amount |
2 | CustomField2 | Dynamic Order Number The order number is not available until the payment is returned. Therefore, this field should not be sent |
3 | CustomField3 | Manual Merchant Logo Free text field |
4 | CustomField4 | Dynamic Label of all products in the basket, with options and axes of variation |
5 | CustomField5 | Dynamic Buyer Details:
|
6 | CustomField6 | Dynamic
|
7 | CustomField7 | Dynamic
|
8 | CustomField8 | Manual
|
9 | CustomField9 | Manual
|
- a yes/no toggle allows the merchant to choose whether or not to send a customField.
- if one of the fields is blank, it is not sent
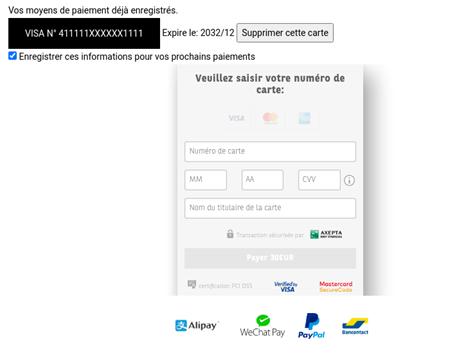
User Saved Cards Block
This block allows the user to manage the payment cards they have saved on the different Axepta payment connectors of your site via the OneClick. You can set up this block on one of your pages or on a specific page that the user can access.
Block Contribution
Add the block “Registered user cards”

This block does not require the configuration of any particular parameters.
Block Rendering

This is the default rendition of the block.
As a native Proximis block this block is customizable (template Cleverage/Axepta/Assets/Theme/Blocks/user-saved-cards.twig).
Checkout V2
Compatible from V2 checkout version 2.1.1.
In order to use the Axepta payment connector on the Proximis V2 payment tunnel, the property “Connector used on the V2 checkout” must be changed to yes in the connector configuration:

This will allow access to the connector from the V2 payment tunnel.
A connector that has the checkout property V2 to yes will not be able to be used on the checkout V1 and vice versa. Each configured Axepta connector can only be compatible with a control process
The payment methods available on checkout V2 are:
- Payment by card
- Paypal
- FloaPay
The use of the registered cards is not yet available on the V2 checkout.
An AxeptaManager and an AxeptaService have been set up.
The AxeptaService allows you to serve the AxeptaManager which allows you to retrieve the template of the payment method selection form and the associated JS script file.
Both files are located in the directory Plugins/Modules/Cleverage/Axepta/Assets/NewCheckout under the name form.twig and script.js .
If you want to overload the template of the payment method selection form, you can log in to the event getCheckoutV2Html the AxeptaManager to specify your specific template.