Version upgrades
We strive to bring the best quality to our modules and we invite you to use the latest version to benefit from it.
| CMS versions | Module version |
|---|---|
| 2.3 to 2.4.8 | 1.5.6 |
Latest changelogs :
24/07/2024 : Updates with fixes and new features have been made to the latest version of the Magento2 module for Axepta BNP Paribas
Introduction
AXEPTA BNP Paribas allows you to accept payments using different payment methods. Each of them offers different possibilities, through an e-commerce platform, such as:
- One-off payment
- One-click payment
- Recurring payment.
Prerequisites
Compatibility with PHP versions :
The plugin supports versions from 2.3.X to 2.4.8

NB: please note that the plugin is not compatible with Magento Cloud.
Installation of the plugin
To install the plugin, you need to follow the following steps: Download the zip file and extract it.
- Go to the root file of your website.
- Create the following new folders:
app/code/Bnpparibas
app/code/Bnpparibas/Axepta
- Copy all the content of the extracted file in the folder:“app/code/Bnpparibas/Axepta”.
- Go back to the root file of your website and launch the following commands:
php bin/magento setup:upgrade
php bin/magento cache:clean
php bin/magento cache:flush
Global configuration of the plugin
The different functionnalities of the plugin are displayed on the left side of the backoffice. To start the configuration of the module, you need to click on "AXEPTA".

To create the configuration of a new account, click on the link“Axepta Payments configuration BNP Paribas” :


Then, click on the button “Add new Merchant Account” to add information about the new merchant.
You also need to import the XML file (that you will find in the .zip file downloaded) by clicking on the "import XML" button.

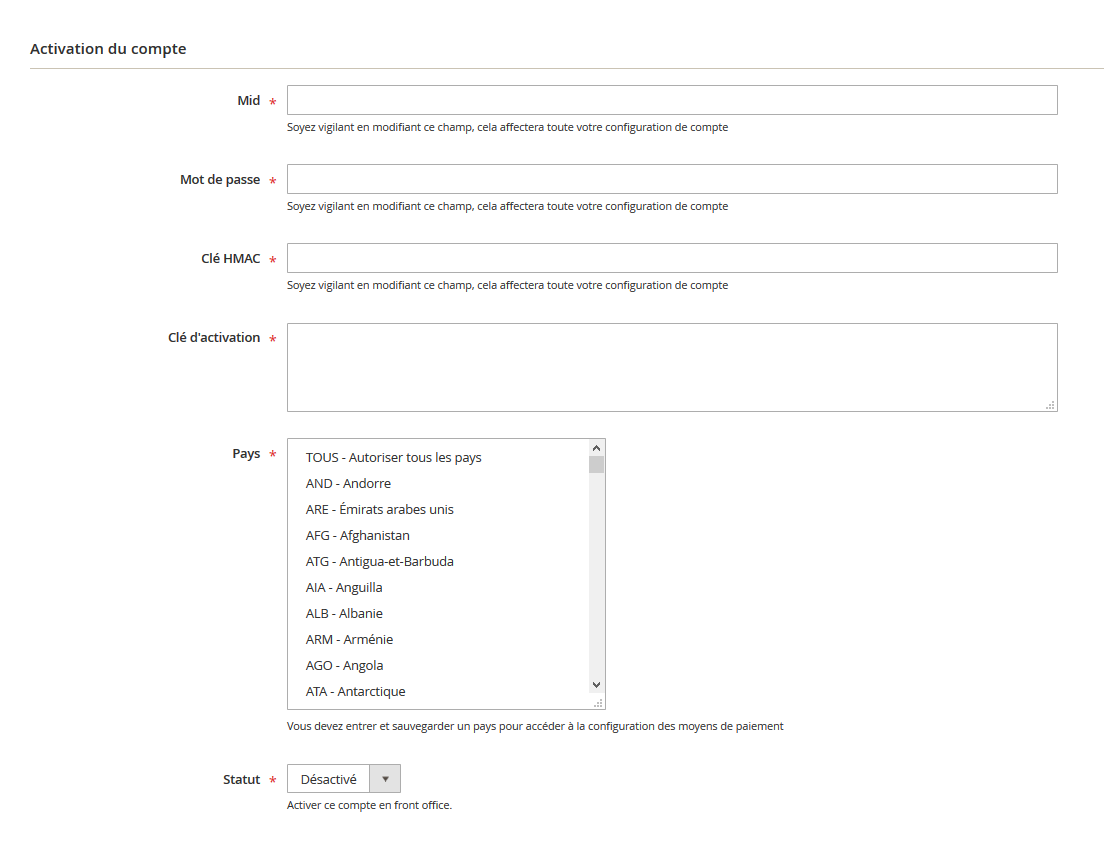
Fulfill the following fields of the form with the information provided by mail:
1 - Front office label : this represents the field you want to customize for your customers to pay. Example : "Pay with AXEPTA BNP Paribas"
2 - MID (Merchant ID) : Sent by BNP Paribas assistance.
3 - Password : Sent by BNP Paribas assistance.
4 – Hmac key : Sent by BNP Paribas assistance.
5 – Activation key : Sent by BNP Paribas assistance after the receiving the merchant's plugin invoice.
6 – Authorized countries
7 - Enable / disable account
8 – Default shop


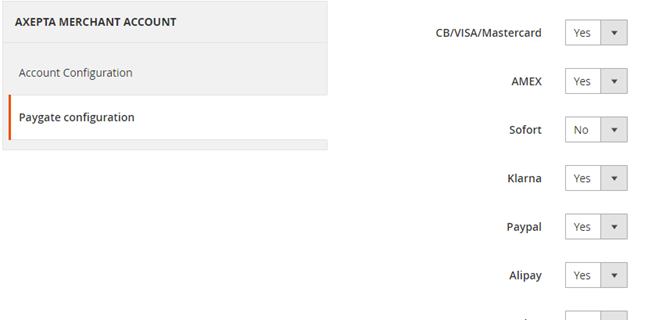
You can, now, choose the different payment methods you would like to allow in your shop.
The tab “Paygate Configuration” will appear on the left side of the screen below "Account configuration".

The payment methods which are displayed are the ones corresponding to your activation key.
Payment methods which are in grey don't belong to your offer, you can visualize your complete offer to see what does your e-commerce platform features.
Some payment methods can be disabled when the countries where they are authorized are not enabled in the backoffice. To enable one or many countries, you should click on the tab “Stores” > “Configuration” > “General” and enable the needed countries by selecting them.

You will have to use the "Axepta" button to go back to the payment methods configurations.
You can now configure other account options:
Currency :
The currency is provided by the activation key. This data can’t be modified. It appears only as an information for the account management.
You should enable the currency in advance in the backoffice. To do so, you need to go to the menu “Stores” > “Configuration” > “Currency Setup” and enable the preferred currencies by selecting them.
Display mode :
Displaying the payment page can be done in two ways :
- Redirection => External redirection of the user towards the payment page.
- IFrame => Displaying the payment page on an iFrame.
3DSecure and exemption management :
The 3DSecure is still activated on your store, you can nevertheless activate the "Exemption request" option which will allow you to request an authentication exemption for the cardholder during a simple payment on your merchant site.
To enable exemption requests, please select "Yes" in the "Exemption request" box to disable please select "No"
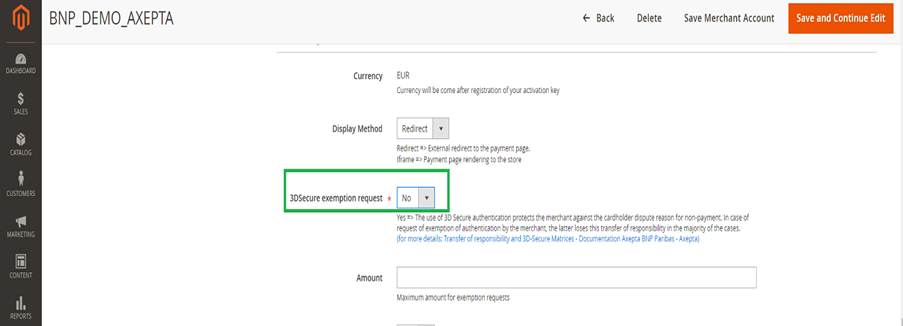
If you wish to activate exemption requests you must then fill in the "Amount" box which corresponds to the maximum amount that will trigger an exemption request. Above this amount, the exemption request will not be triggered.
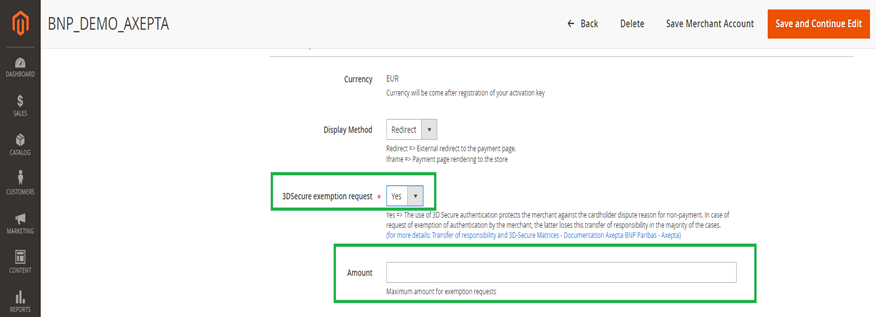
Attention : Please note that the use of 3D Secure authentication protects the merchant against the reason for unpaid invoices "holder dispute". In the event of a request for exemption from authentication by the merchant, the latter loses this transfer of responsibility in the majority of cases (For more details: Liability shift and 3DS Matrix - Documentation Axepta BNP Paribas - Axepta). This is a request for exemption, this does not mean that it will be granted systematically by the issuer of the cardholder's card. Exemption requests only work with transactions paid in Euro.
incomplete PSD2 checkout page exemple

Known error: Since switching to 3DSV2, it is imperative to send the parameter "BillingAddress" to Axepta to make a payment.
This parameter contains the following data:
- City
- Country
- Billing Address 1
- Postal Code
These fields are mandatory for the module to function properly and must be present in the payment form:
One click payment:
This option enables one click payment by saving the payment methods data in the user's account.
Subscription :
This option enables the subscription payment.
Capture methods
This option allows you to choose the capture mode you prefer :
- Automatic => Capture at the end of the day
- deffered => After a defined time. If you choose this option you can also define the time limit before the capture (time limit in hours : number between 1 and 696)
- Manual capture : Follow the detailed explanations below
Enabling Manual Capture
From the merchant configuration menu, scroll down to the “Capture” field and select “Manual Capture”.
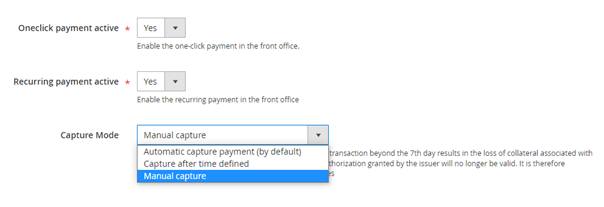
Attention : Without action of the merchant, the transaction will not be returned to the bank. Capturing a transaction beyond the 7th day results in loss of collateral associated with 3DSecure. After the 29th day the authorization granted by the issuer will no longer be valid. It is therefore preferable to capture operations before these deadlines.
Changing the display of the control orders :
Two columns have been added in the command table: one to know what type of capture was used for the command (automatic, manual or deferred), and another to know if the payment was captured from the Magento back office. A capture made on the Axepta back-office does not result in the update of this command panel but an alert is proposed in the event of an attempt on a transaction already captured (see alert notification).
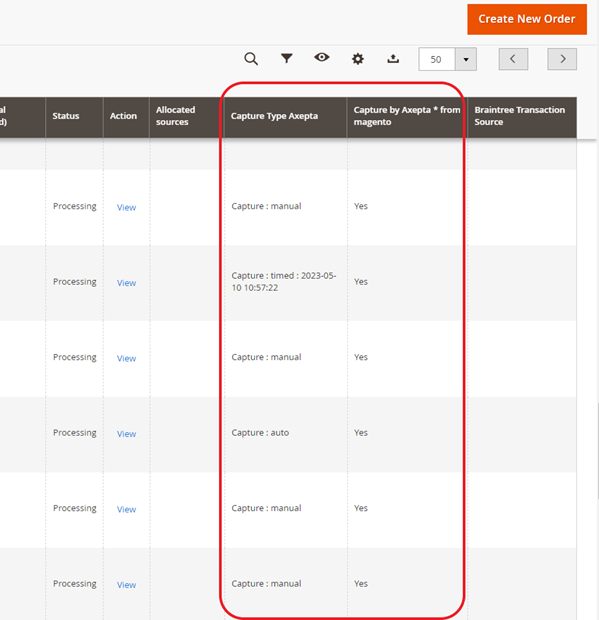
Deferred captures are marked “Capture: timed” followed by the date and time the capture was made.
To capture manually your transaction :
To capture a payment manually, the order must be billed. Go to the page of an order to be billed and click on “Invoice”.

Then select “Capture online” to manually capture the order when the invoice is issued.
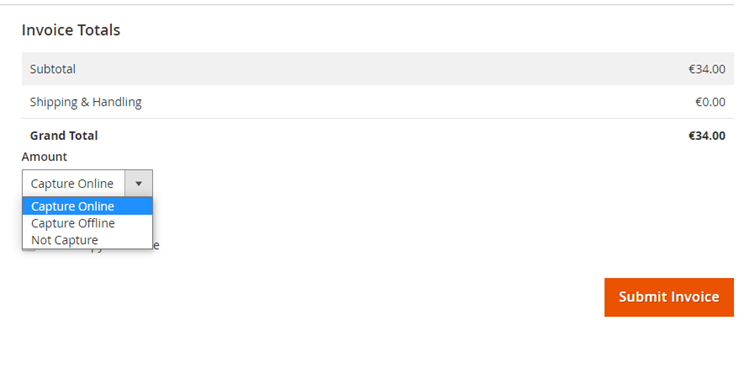
Capture online : The online capture from the Magento 2 back office will connect to the axepta back office. The status of the transaction is automatically synchronized between the two back offices.
Offline capture : Offline capture will simply generate the invoice and mark the order being processed, which means that the amount has been received manually.
Not capture : It is there for information purposes to indicate that there was no capture on the order. This can be used in the case of non "capturable" orders for free orders or paid by check.
Partial Capture :
You can capture only part of the order if it has multiple items by changing the quantities in the column. In this case, delivery charges will always be captured on the first invoice. For the next payment catches of this same order, delivery costs will not be counted.
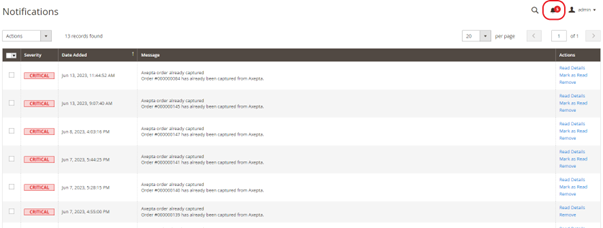
Alert Messages :
If attempting to bill an order where payment has already been captured, an alert message “Order has already been captured” will appear at the top of the page as follows :

Notifications have also been added when the capture has already been completed, as well as when a payment has not been captured for more than 7 days. The update is done once a day.
These notifications are visible by clicking on the icon at the top right of the screen :
Logs :
This option enables logs in order to share data with the support in case of issues.

Your account is now configured.
You can configure as many accounts as your contract allows you to.
To add another account, you need to go to “Axepta payment configuration” and do the exact same manipulations.
The list of accounts will be updated after every new entry.
The render of the checkout page
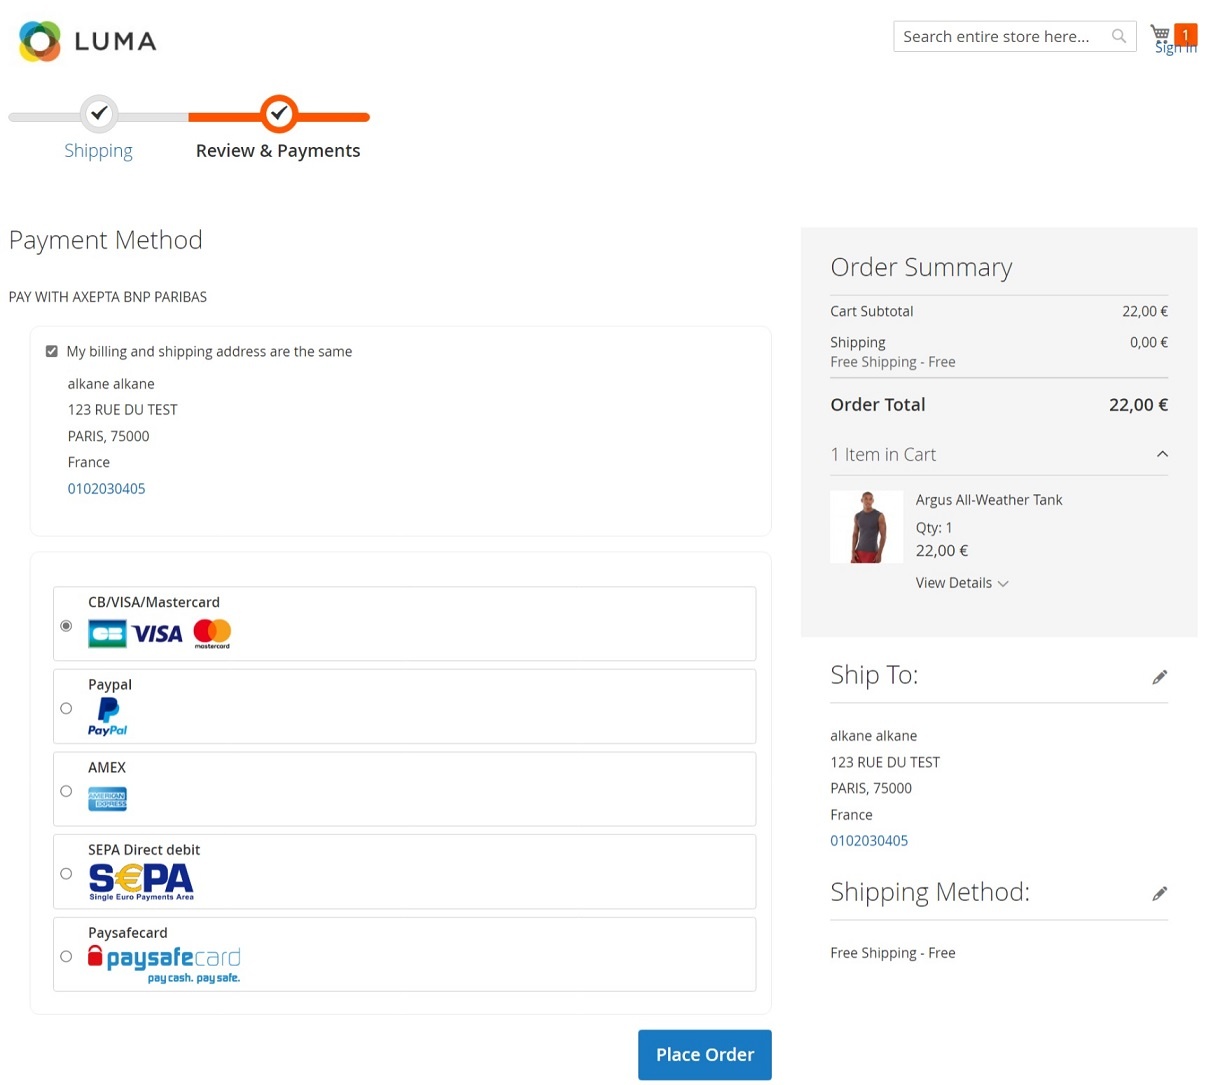
Payment methods are displayed on a framework for 6 proposals. Additional payment methods can be accessed by selecting "More payment options", which only appears if necessary. The "One-click" option is activated here to offer the registration of the card of the user.
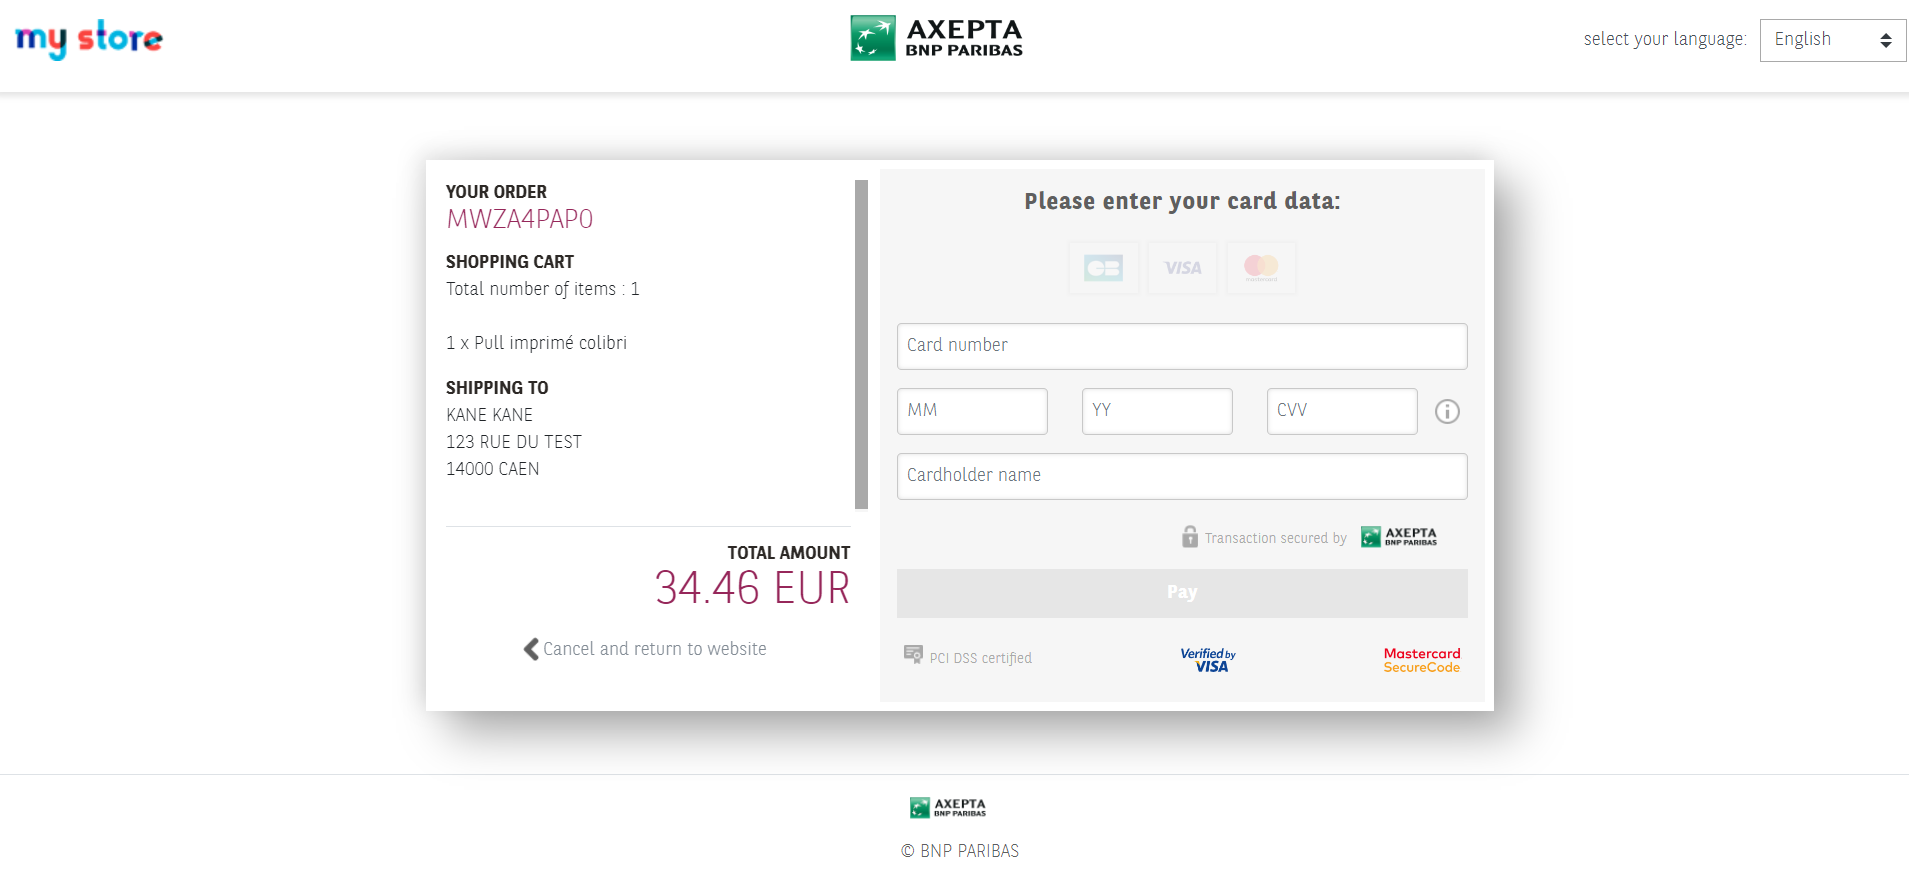
The rendering of a redirected payment page
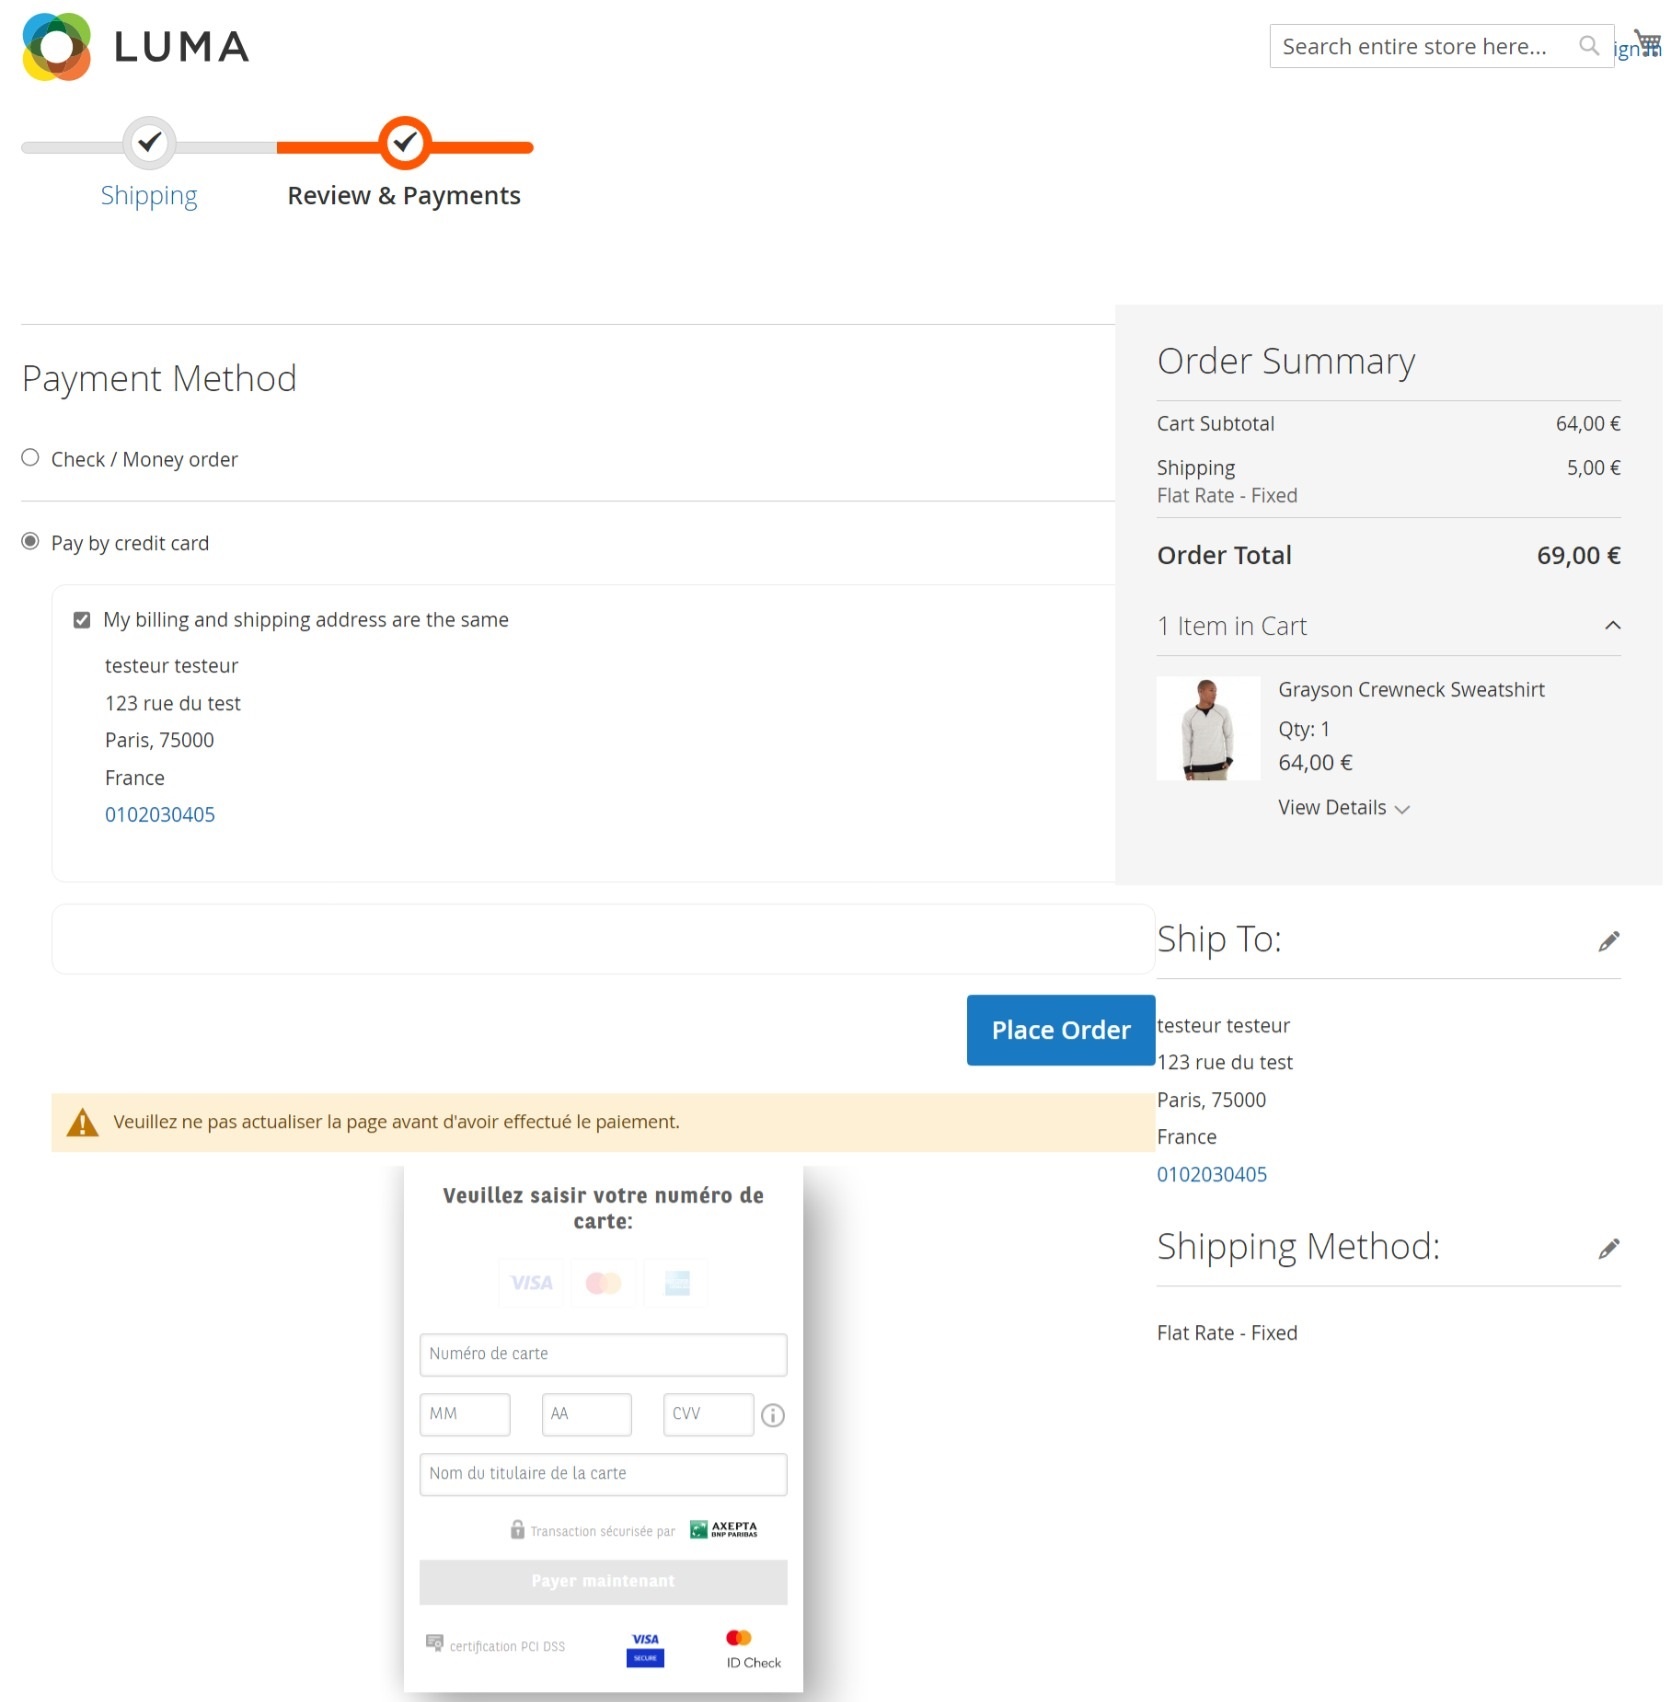
The rendering of an iFrame payment page
Payment modes configuration
One-off payment
To enable the one-off payment, go to “Stores" > "Configuration" > "Sales" > "Payment Methods" > "Axepta” and check “Yes” button.

One-click payment
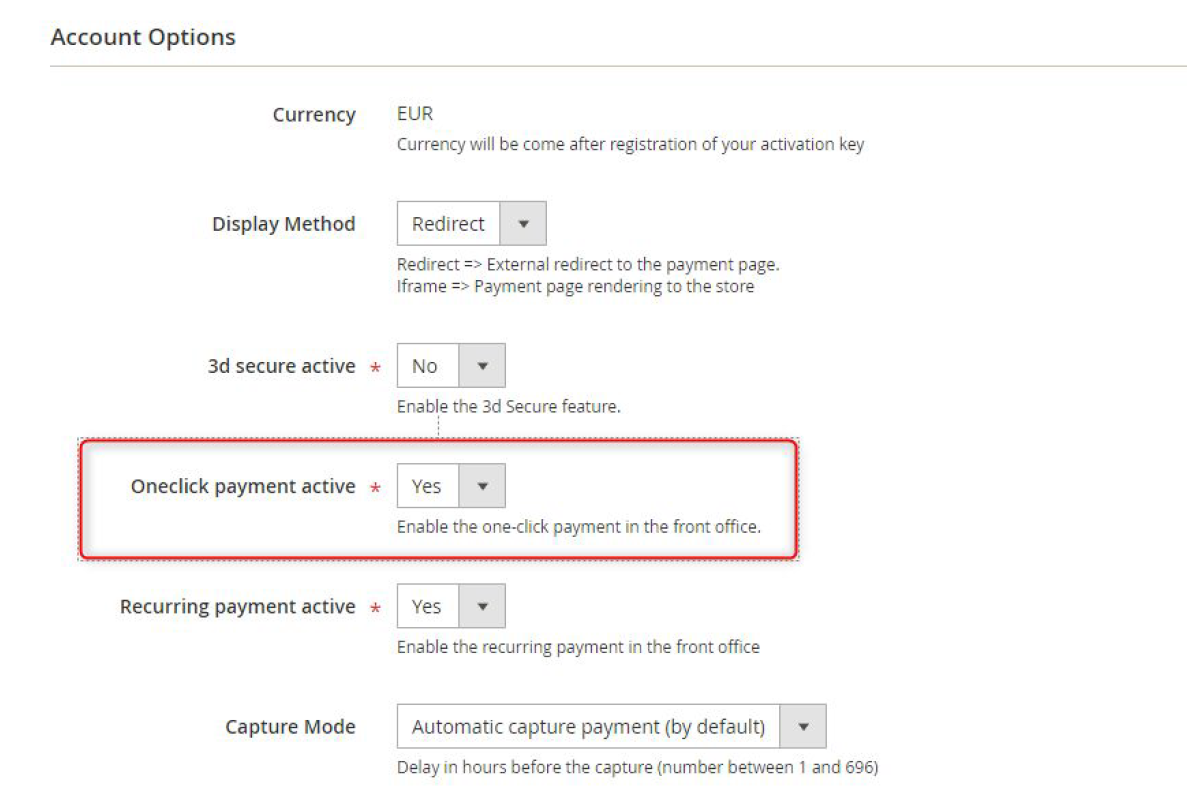
This functionnality allows your customers to save their payment methods data so that they can pay faster the next time.
You need to make sure that this functionnality is enabled in your account configurations, to do so, go to "Axepta" > "Axepta Payments configuration BNP Paribas" > Select your MID and click on "Edit" in the "Action" column. > "check the « Oneclick payment active » button
The user will be able to manage his cards in his personal account via “My saved cards” (Front-office view)
Subscription
Enable/disable subscriptions
Go to "Axepta" > "Axepta Payments configuration BNP Paribas" > Select your MID and click on "Edit" in the "Action" column. > "check the « » button

Configuration
When the « Subscription » option is enabled, it’s possible to configure items which will be paid by subscription.
To do so, you will need to configure every item that accepts subscriptions: Go to « Catalogue » > « Products » > Search by name of the item that you would like to configure as subscription by clicking on its name.
To pay for a subscription product, it is mandatory to have a customer account. For guest mode customers who have a subscription product in their cart, the creation of a customer account is requested before making the payment.
On the product sheet, you need to go to “Axepta recurring data options” and fulfill the different fields :
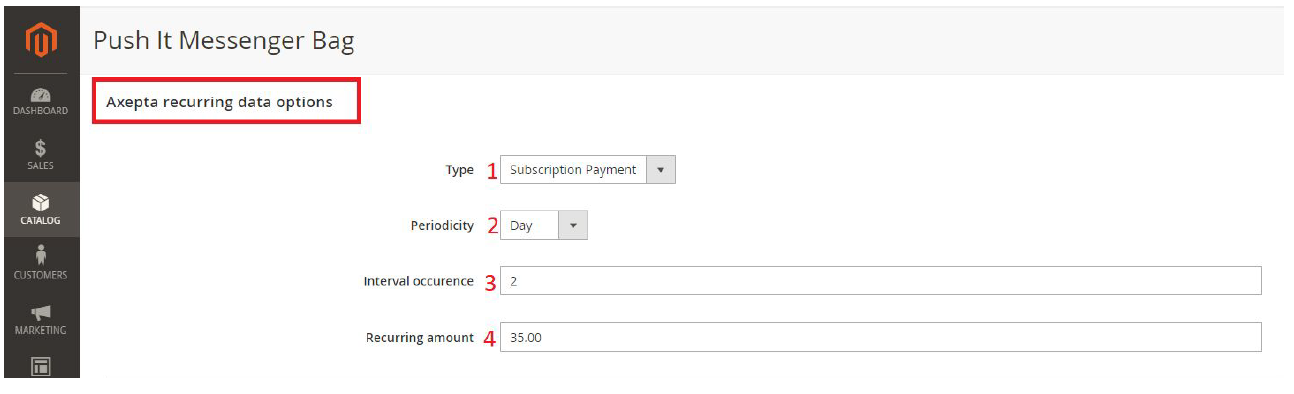
You can now configure the item :
- Type : indicates if the item will be paid by subscription or standard payment.
- Periodicity : indicated the type of subscription (monthly or daily)
- Interval occurrence : Number of times that the payment will be proceeded. If this value is not filled, the occurrence is unlimited.
- Recurring amount : Indicated the amount of the item in subscription, so this value can be different from the initial price of the item. This value represents the value that will be withdrawn in the future transactions.
Subscriptions management
You can preview all the subscriptions in the tab “Axepta" > "Manage Recurring Payment List »

You will find the following data for every transaction:
- Subscription ID
- Order ID
- Client ID du client
- Product ID
- Associated transaction ID
- Subscription status
- Periodicity
- Date of the last payment proceeded
- Date of the next payment
- Subscription amount
- Action column
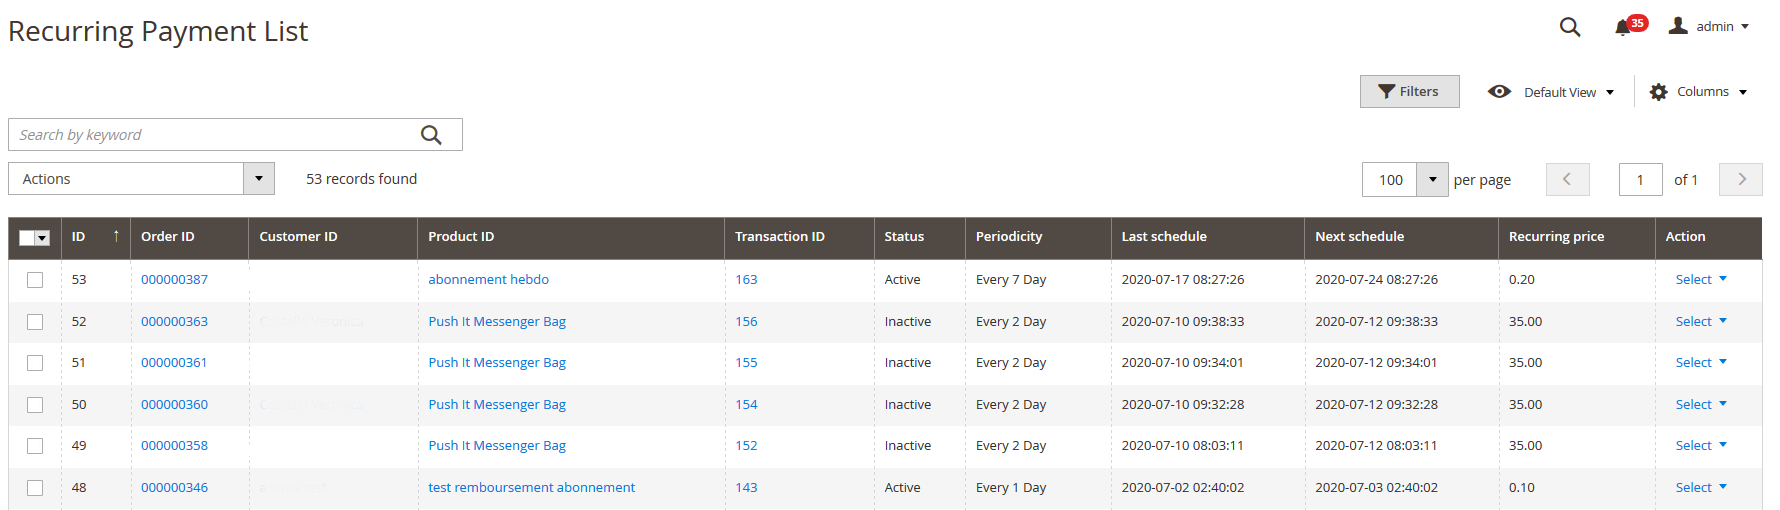
Among the available actions, you can :
- Enable a subscription.
- Disable a subscription.
- Delete a subscription.
Subscriptions management (front office view)
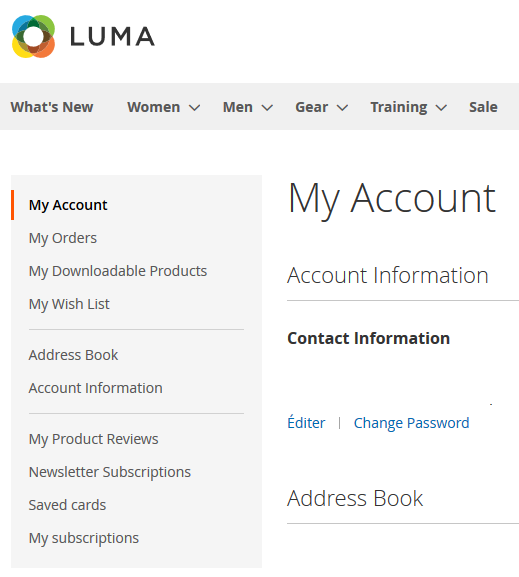
The user is able to manage his own subscriptions in his personal account > "My subscriptions" section.
The user can also disable a subscription using the "disable" button.
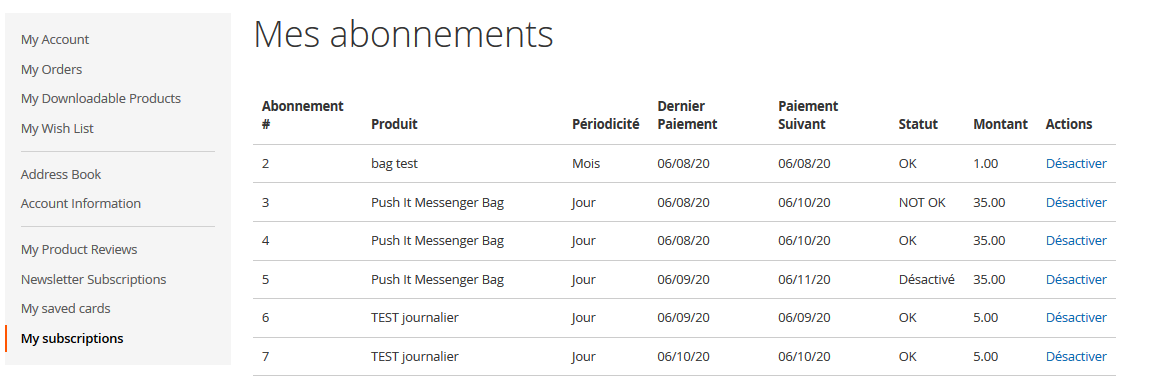
The status of subscriptions will be updated automatically in the backoffice.
Transactions management
The complete list of transactions using the different payment methods is available in the section : “Axepta" > "Transaction”.

You will get the details for every transaction :
- Transaction ID
- Amount
- Merchant ID
- Date
- Order ID
- Order reference
- Response code
- Status (success, failure, authorization in progress...)
- Description
- Transaction type (one-off payment, cancellation, refund, recurring payment...)
In the view section, you will get more details about each transaction
You will find more details about the selected transaction like the PayID (regularly asked by the support in case of issue with a transaction)

Refund / cancellation
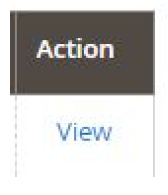
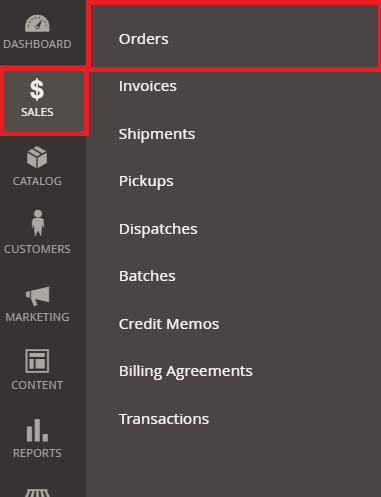
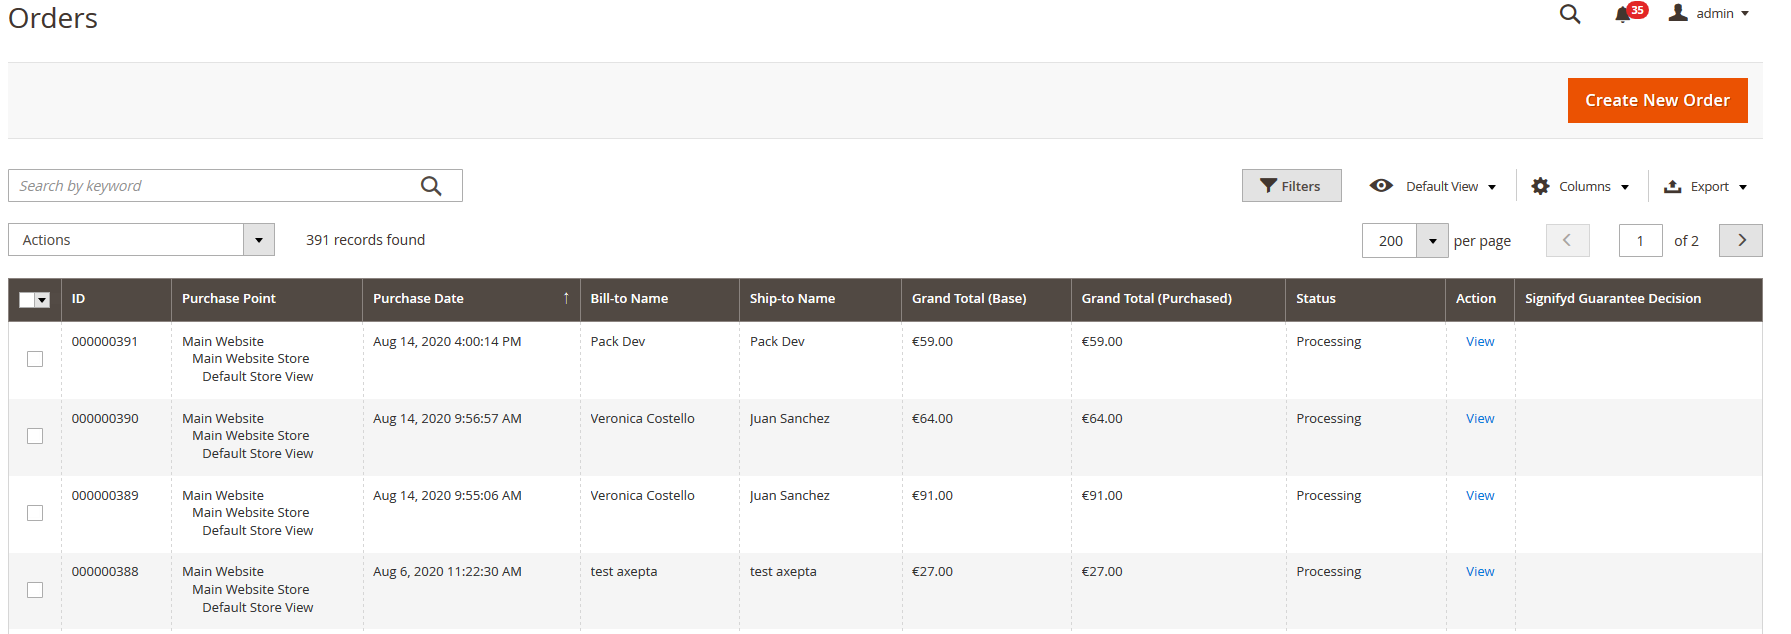
To make a refund or a cancellation (if possible), you will need to go to the tab "Sales" > "Orders" to visualize details about the orders.
- Choose an order among the list then click on “view” to visualize the details about the order.
2. Go to "Invoices” from the same menu and select the invoice that was created automatically for the order.

3. Click on « Credit Memo ». You will get all the information about the order and on the bottom side of he page, the information about the refund.

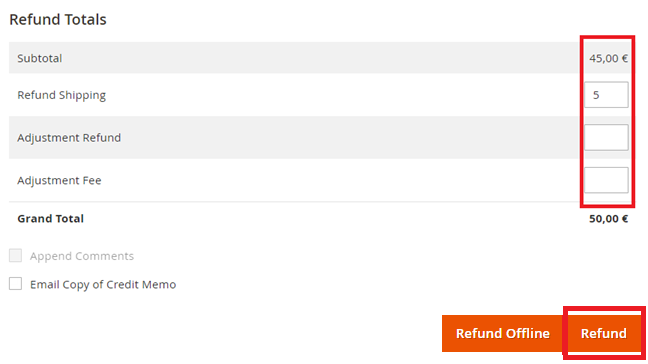
Global refund
you can only keep the values by default and validate. For a partial refund, you can adjust the amounts.
Ajustement Fee
The "Ajustement Fee" field allows you to set a specific amount you would like to refund.
For example : Subtotal = 45, Ajustement Fee = 15, when you click on “Update Totals” you will get 30 as refund for the customer.
If the order was placed via a one-off payment, a refund will be issued directly to the buyer.
For orders via subscriptions, no refunds are possible.
When it comes to a refund of the total amount of an order, the choice of a refund or a cancellation will be made automatically according to the banking status of the current order. Cancellation will be preferred if possible.
To find out if the order has been cancelled or fully refunded, go to "Axepta" > "Transaction" to see the list of transactions, as below :
The "Type" column will show if the transaction was paid, cancelled or refunded.

Description of payment methods
| Logo | Nom | Catégorie | Région d'émission | Pays | Devises |
|---|---|---|---|---|---|
| Alipay | Wallet | APAC | France ; Italie ; Belgique ; Luxembourg ; Royaume-Uni ; Irlande ; Pays-Bas ; Espagne ; Allemagne ; Portugal ; Suisse ; Autriche ; Slovaquie ; Slovénie ; Suède ; Danemark ; Norvège ; Finlande ; Estonie ; Lituanie ; Lettonie ; Grèce | AUD ; CAD ; EUR ; GBP ; HKD ; SGD ; USD |
| American Express | Carte | International | France ; Italie ; Belgique ; Luxembourg ; Royaume-Uni ; Irlande ; Pays-Bas ; Espagne ; Allemagne ; Portugal ; Suisse ; Autriche ; Slovaquie ; Slovénie ; Suède ; Danemark ; Norvège ; Finlande ; Estonie ; Lituanie ; Lettonie ; Grèce | EUR ; GBP ; CHF ; USD ; AUD ; CAD ; DKK ; JPY ; NOK ; PLN ; SEK |
| Bancontact | Carte | Europe | Belgique | EUR |
| CB | Carte | France | France | EUR |
| Cetelem Full CB | BNPL | Europe | France | EUR |
| Cetelem Presto | BNPL | Europe | France | EUR |
| EPS | Virement | Europe | Autriche | EUR |
| Finnish Online Banking | Virement | Europe | Finlande | EUR |
| Giropay | Virement | Europe | Allemagne | EUR |
| IDEAL | Virement | Europe | Pays-Bas | EUR |
| Mastercard | Carte | International | France ; Italie ; Belgique ; Luxembourg ; Royaume-Uni ; Irlande ; Pays-Bas ; Espagne ; Allemagne ; Portugal ; Suisse ; Autriche ; Slovaquie ; Slovénie ; Suède ; Danemark ; Norvège ; Finlande ; Estonie ; Lituanie ; Lettonie ; Grèce | EUR ; GBP ; CHF ; DKK ; USD ; CAD ; JPY ; NOK ; SEK ; PLN ; AUD |
| Multibanco | Virement | Europe | Portugal | EUR |
| MyBank | Virement | Europe | Italie | EUR |
| Paypal | Wallet | International | France ; Italie ; Belgique ; Luxembourg ; Royaume-Uni ; Irlande ; Pays-Bas ; Espagne ; Allemagne ; Portugal ; Suisse ; Autriche ; Slovaquie ; Slovénie ; Suède ; Danemark ; Norvège ; Finlande ; Estonie ; Lituanie ; Lettonie ; Grèce | EUR ; GBP ; USD ; CAD |
| Paysafecard | Prépayé | International | France ; Italie ; Belgique ; Luxembourg ; Royaume-Uni ; Irlande ; Pays-Bas ; Espagne ; Allemagne ; Portugal ; Suisse ; Autriche ; Slovaquie ; Slovénie ; Suède ; Danemark ; Norvège ; Finlande ; Estonie ; Lituanie ; Lettonie ; Grèce | AUD ; CAD ; CHF ; EUR ; GBP ; NOK ; PLN ; RON ; SEK ; USD |
| Przelewy24 | Virement | Europe | Pologne | PLN |
| Visa | Carte | International | France ; Italie ; Belgique ; Luxembourg ; Royaume-Uni ; Irlande ; Pays-Bas ; Espagne ; Allemagne ; Portugal ; Suisse ; Autriche ; Slovaquie ; Slovénie ; Suède ; Danemark ; Norvège ; Finlande ; Estonie ; Lituanie ; Lettonie ; Grèce | EUR ; GBP ; CHF ; DKK ; USD ; CAD ; JPY ; NOK ; SEK ; PLN ; AUD |
| WeChat Pay | Wallet | APAC | France ; Italie ; Belgique ; Luxembourg ; Royaume-Uni ; Irlande ; Pays-Bas ; Espagne ; Allemagne ; Portugal ; Suisse ; Autriche ; Slovaquie ; Slovénie ; Suède ; Danemark ; Norvège ; Finlande ; Estonie ; Lituanie ; Lettonie ; Grèce | EUR ; GBP ; USD |