
| Info |
|---|
Thisdocumentationallowsyoutocreateanduseacustompaymentpagetemplate. |
Summary
| Table of Contents |
|---|
Context
AXEPTA provides merchants with the templates of the payment pages. These can be customized by adding graphic elements or texts.
Once the custom Template is created, it must be uploaded via the Back-Office in the Template Manager tab.
At the end of this step, the merchant can specify, in the payment request ("Template" parameter), the custom Template he wants to display to his customer.
On each payment page, a template
There are 2 types of AXEPTA payment pages
| Name | Endpoints | Expectation | Templates Standard AXEPTA | Custom merchant templates (e.g. BNP_DEMO_AXEPTA) |
|---|---|---|---|---|
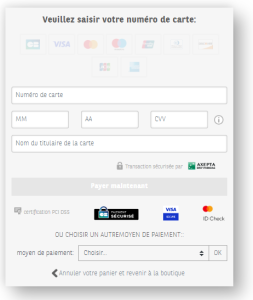
Form for choosing payment methods | paymentpage.aspx |
| PaymentPageLogos_BNP_v1 | In coming |
| PaymentPageDropDown_BNP_v1 | In coming | ||
Card payment form | payssl.aspx | 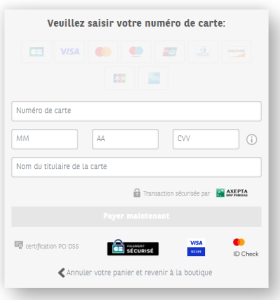 | Cards_BNP_V1 | In coming |

Templates for merchants (archive)
The following Templates can be downloaded and will serve as a customization base for merchants.
In coming
Contents Template archive
Composition at the root
File organization and naming are the same for PaymentPage and PaySSL.
| Info |
|---|
The files are named such as:
Note XML and XSL files have the same name |
| Tip | ||
|---|---|---|
| ||
In our example, this gives:
At the template root BNP_DEMO_AXEPTA :
|
Composing the Pictures folder
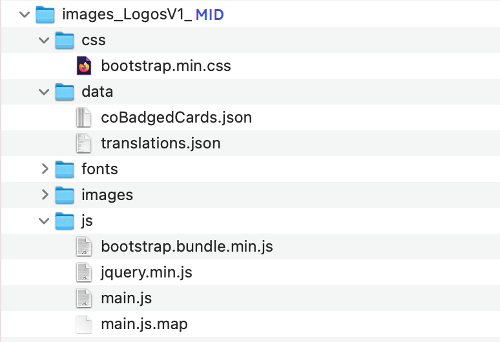
The image folder must contain the following directories & files:
- css: Contains the project's CSS file
- data: this contains the files:
- coBadgedCards.json file: contains information for the proper functioning of the card payment form.
- File: translations.json: Contains all translations
- fonts: Contains font files
- images: Contains images
- js: Contains JS files
Update MerchandID (MID)
In order to modify the MerchandID and TemplateName, it is necessary to rename the files/folders as follows:
XML : {MerchantID}_{TemplateName}_{TemplateType}
XLS : {MerchantID}_{TemplateName}_{TemplateType}
Image : images_{TemplateName}_{MerchantID}
Once the file names have been changed, it is necessary to modify the links using these files.
They are present in the files :
XML
XLS
Image/js/main.js
The easiest way to update the paths present in these files is to search/replace in a text editor.
| Warning |
|---|
Template Security – Permitted Links & Prohibited ElementsFor security reasons, the only permitted links redirect to specific websites (e.g. to refer to terms and conditions, ...): and the following elements are to be avoided in XML & XSL pages:
|
Create a Template Archive
In order to upload the template via the Template Manager, it is necessary to create an archive containing the three elements (XML, XLS and image folder) at the root.
Be careful, you must archive the three elements by selecting them when creating the archive and not archive the parent folder.
This archive should be named as follows: TemplateYYYYMMDD001MerchandID:
- Template: Allows you to indicate that it is a template
- YYYYMMDD: The date of the day of upload
- 001: The version number. This must be incremented with each new upload for a given day
- MerchandID: The merchant's ID.
Exemple : Template20220624003BNP_DEMO_AXEPTA.zip
Testing template
Once the archive is created, the merchant can test the display of the Template:
- Upload of the Template archive in the Template Manager of the Axepta Back-Office - cf. Template Manager.
- Calling the Template in payment requests via paymentpage.aspx or payssl.aspx
- Using the Template parameter: Template={MerchantID}_{TemplateName}
| Tip | ||
|---|---|---|
| ||
https://paymentpage.axepta.bnpparibas/payssl.aspx?MerchantID=BNP_DEMO_AXEPTA&Len=291&DATA=43ad07f58ff6a5f9ebbdd42e361d2c85ce4ad41fcd63c697c9ca59076fb5cb782237a2e862a97bb24d949911bb701d698dfed6901f1bcb92404f53b8f5336525167ac5b8a9b89c5fb88d79967366e99e59d95f3f3f0c37126a52495115e28f938e76748a5dc703f7ccbda6ccb4fc253b255c06e0df990fdd94f4313ec2b94142f9978adb9d1079a36a9dbb83e9638e3e58a124d532ece1b7bc175fa340bd0c73c33d4f78374420091e90735bb014a5163d86bfe38795decacf0358075a85c0fbf80c5535046e7f8df64d204c7a4755e07700d4d17c9ef0bdc6e8bbd9c377e3ee0493a0ad2d3a9a624d693d04fe0bdfb3ebb2ef5badb63291ab8d7ad29b4f19b2b0f87dbc0bdb38f282816fe694ac2d512ba741d76a830b2083232246763aa006472661aeb2acf126&Template={MerchantID}_{TemplateName} |
Customization steps
Customization is done in several steps:
- Creating customization add-on files:
- Design & Features: CSS & javascript
- Images, fonts...
- Adding files to the 'images' directory
- Adding references (paths) to the XML file in the Template folder
- Update of the MID and the name of the template that will be used when calling the payment page
- Creating the Template archive
- Test the Template
- Use the Template in payment requests
| Tip |
|---|
The creation of a custom template can be done by a web integrator, a web agency or an IT department. |
Questions
| Question | Answer |
|---|---|
Is it possible to upload several templates? | The merchant can have several active Templates at the same time. |
Can I use the Template parameter when using the POST method when calling paymentpage.aspx or payssl.aspx? | Yes, the Template parameter can be used (unencrypted). |
Is it possible to use customFields and a custom template? | Yes, if the merchant does not remove the functionality of the template. |