
Defining filters for search
When starting to search for operations (payments) you first have to select the payments you would like to see:
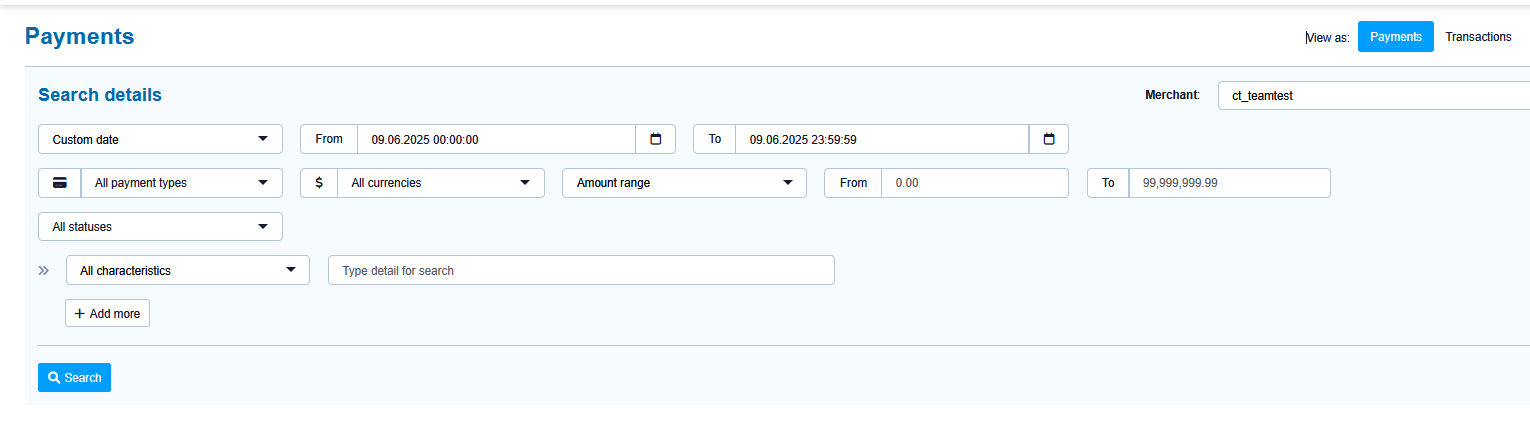
Viewing as Payment or Transactions
You can choose to view data in two different formats:
1. Payment View
Provides a collective overview of all related transactions within a single payment process.
Displays summary data including:
Amount authorized
Amount captured
Amount credited
Shows the overall status of the payment.
2. Transaction View
Displays each individual transaction (e.g., authorization, capture, refund) separately.
Each transaction includes:
The specific amount processed
The individual status and response code
Merchant Selection
If your user account is linked to multiple Merchant IDs (e.g. by branch or country), you can:
Select a specific Merchant ID
Or choose to search across all available Merchant IDs
Period Filter (Date/Time)
You can filter transactions based on the date and time by selecting:
A custom date range: specify start and end date/time
A predefined time frame, such as:
Last hour
Last 6 hours
Today, this week, this month
Previous month
Filters for Payment Type, Currency, and Amount
You can refine your search using:
Payment types (e.g., credit card brands, direct debit, PayPal)
Currency
Amount filter:
Exact amount
Amount range (from – to)
Status Filters
Filter options vary depending on your selected view:
Operation (Payment) View
Filter by payment status, such as:
OK
Failed
Pending
Transaction View
First, select a transaction type (e.g., capture, refund)
Then filter by transaction status, such as:
OK
Failed
Pending
Characteristics Search
Use characteristics to search for specific values, such as:
Your payment reference number
A specific Computop Paygate response code
Additional options like email address or approval code (for credit card transactions) will be available soon.
The "Search in all characteristics" option allows you to search across all supported fields.
Use "Add more" to include up to three custom search characteristics — all of which must match for a result to appear.
Search-Button
After defining all search filters finally click on "Search" to start search of payment operations / transactions.
A list of matching payments is then shown below.
![]() Number of search results is limited to 10.000 payments / transactions. If your result list is larger than this, please be more specific in your search criterias (period, payment type, characteristics, ...).
Number of search results is limited to 10.000 payments / transactions. If your result list is larger than this, please be more specific in your search criterias (period, payment type, characteristics, ...).
Show result list
After search has been finished the list of search results is shown like this:

Search Results Overview
Number of Results & Results per Page
The total number of matching payments or transactions is displayed at the top of the results area.
You can define how many rows are shown per page.
The default number of results per page can be configured in your user profile settings.
Define Displayed Columns
You can customize which columns are displayed in the results table.
The order of the columns can also be adjusted to suit your preferences.
Pagination Controls
Navigate through the results using the previous/next page buttons or by selecting a specific page number.
Search Results Area
This section displays the results that match your defined search criteria.
You can modify the columns and their order as described above to better suit your workflow.
Select columns and order
You may define – separately – columns that shall be displayed for viewing payment operations and payment transactions.
After clicking on ![]() a new selection box will popup like this:
a new selection box will popup like this:

Configuring Visible Columns
Visible Column Order
The list of currently selected columns is displayed in this section.
You can reorder columns using drag-and-drop:
Click and hold a column, then move it up or down to change its display order.To remove a column, click the "X" icon next to it. It will no longer appear in the results view.
Select Columns to Add
Columns already in use are marked with a checkmark.
You can select additional columns to include in the results.
Newly added columns will appear in the list on the left.
Save or Cancel Setup
After configuring your column preferences, you can save your setup or cancel your changes.
Note: Column configurations are stored separately for:
Payment Operations View
Payment Transactions View
This allows you to define different layouts tailored to each purpose.