
...
| Tip |
|---|
...
|
...
Introduction
AXEPTA BNP Paribas allows you to accept payments using different payment methods. Each of them offers different possibilities, through an e-commerce platform, such as:
- Standard payment
- One click payment
- Recurring payment.
Prerequisites
Required php version of the server should be minimum 7.1
Installation of the plugin
The installation of the plugin requires the following steps :
1) Go to the "Extensions" tab from the left side of the backoffice and click on « Add »

On the next screen, click on "Upload an extension" and upload the plugin. Once uploaded, click on "install".

Once the plugin installed, you can disable or delete it.
2) Back to "Extensions" > "Installed extensions" from the menu on the left of the screen, find the "Axepta Online BNP Paribas" plugin by scrolling through the list or searching for "Axepta" on the search bar.

Global configuration of the plugin
To create a new configuration, go to the tab "WooCommerce" > "Configurations" on the left side of the screen.
Click on the tab “Axepta configuration” to display the list of all your configured accounts and add others.

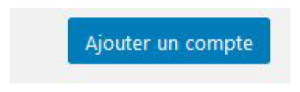
To add a new account, click on the "Add account" button
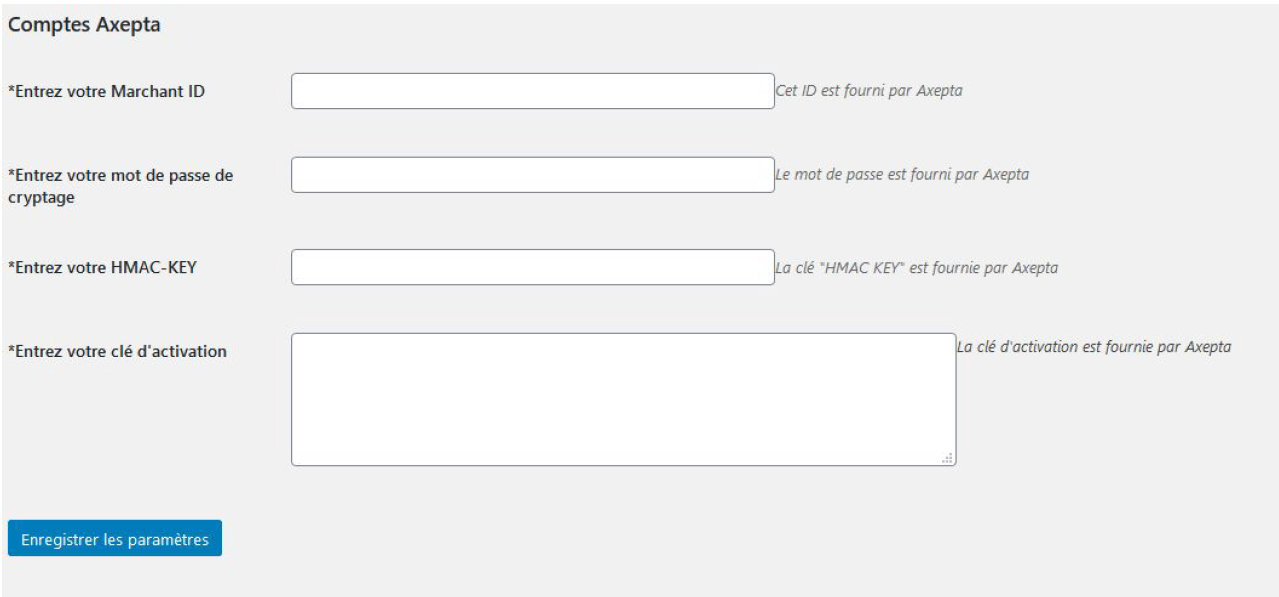
You should, then, fill the required data provided by BNP Paribas and click on "Save".
Une fois la configuration ajoutée, vous pouvez cliquer sur le bouton "configurer" pour passer à la configuration des moyens de paiement et des fonctionnalités à activer (options de paiement).
Once the configuration saved, you can click on "configure" to manage the different payment methods and functionalities you would like to activate on your shop.
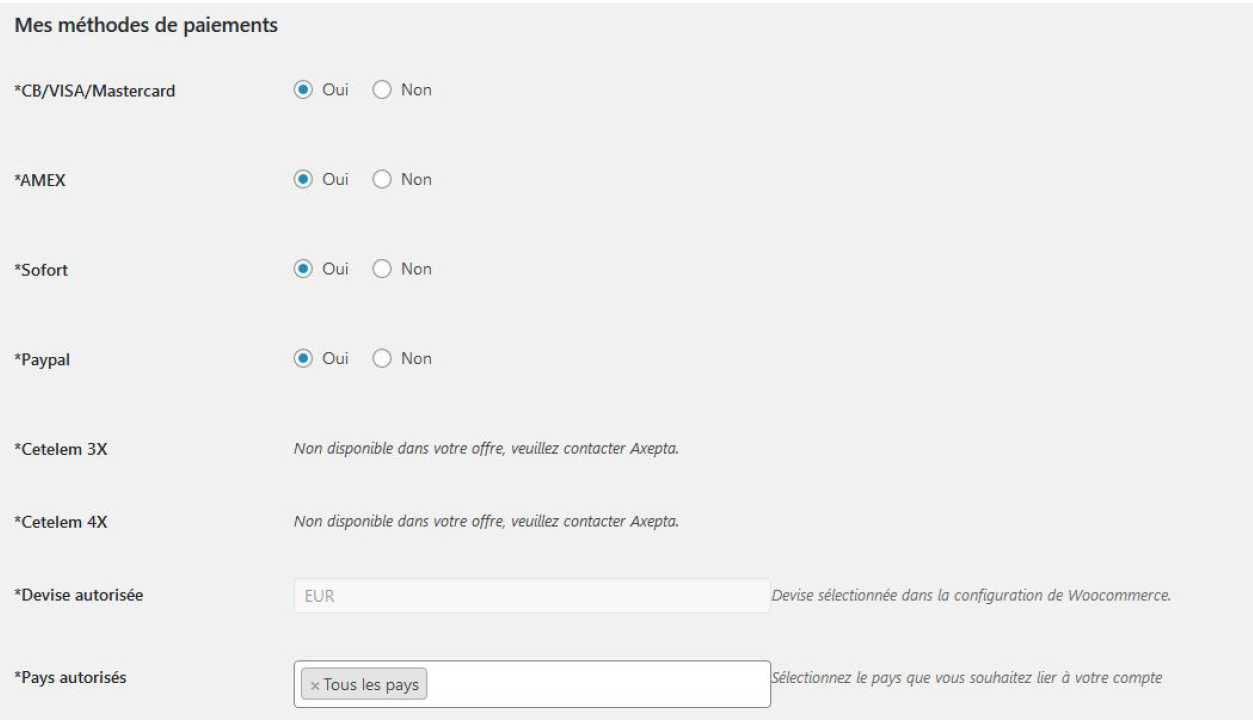
The payment methods that are displayed are the ones corresponding to your activation key.
The payment methods in grey correspond to those that are not part of your offer. You have the possibility to visualize the complete offer in order to see everything that the Axepta module proposes.
You can now configure your account options.
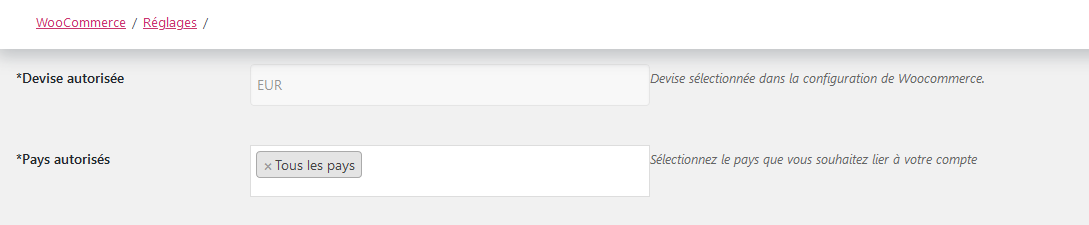
Currency :
The currency indicated is the currency of your activation key. This data cannot be modified, it is only shown as an indication for the management of the account.
Please note that you must activate the currency beforehand in the woocommerce backoffice. To do this, go to "WooCommerce" > “General” and find the tab "Currencies options' .

Country :
You can choose to activate the account either in all countries or in manually selected countries by holding down the ctrl key.
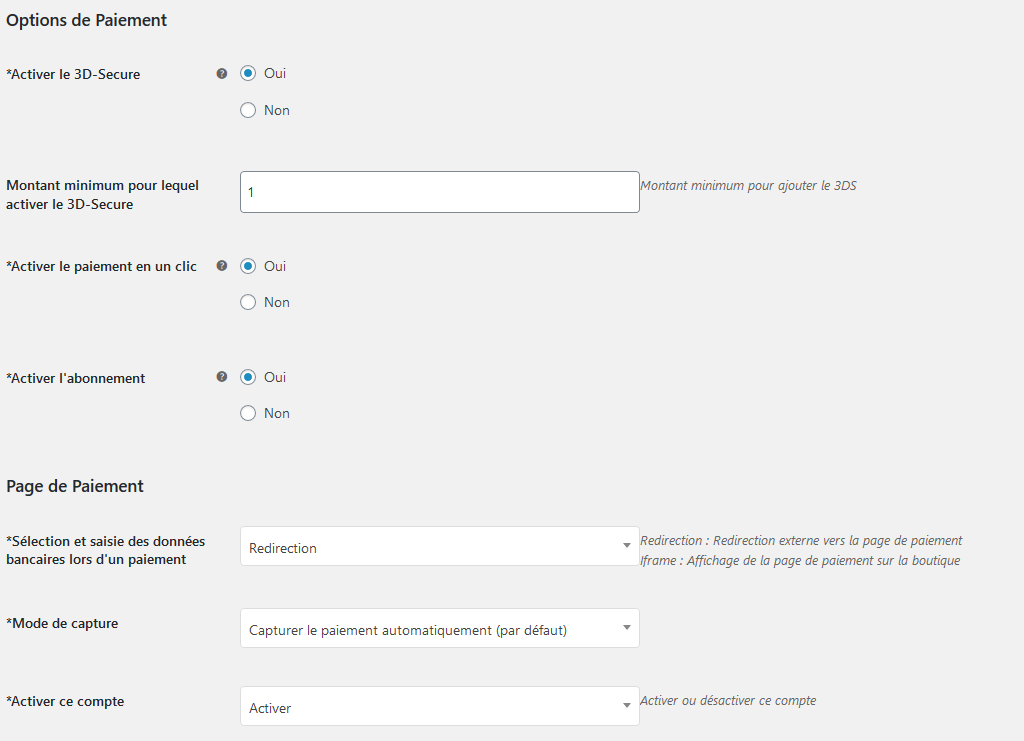
3DS :
This option allows you to activate 3DS authentication and indicate the minimum amount for 3DS transactions.
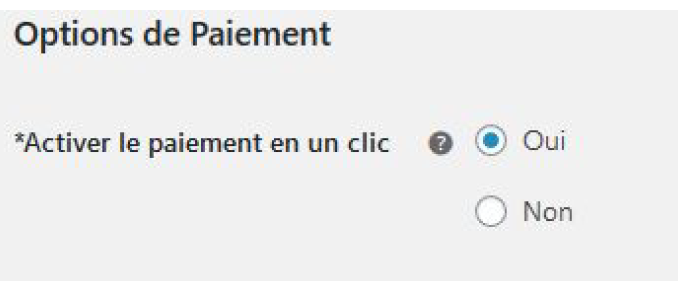
One-click payment :
This option allows you to activate the oneclick payment via registration of the payment method by the user in his customer account.
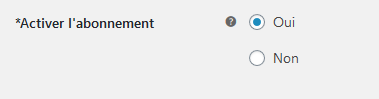
Subscription :
This option allows you to activate the subscription payment on the shop.
Rendering mode :
The display of the payment page is possible in 2 ways with the plugin:
- Redirection => External redirection of the user to the payment page
- iFrame => Displaying the payment page on the shop in an iFrame
Capture method :
This option allows you to choose the payment capture method:
- Automatic => The capture will be done automatically in the night.
- Manual => After a defined time, you can choose just after choosing this option the delay before the capture (Delay in hours before capture (integer between 1 and 696)).
Your account is now configured.
You can configure as many accounts as your BNP Paribas contract allows. To add an account, you must go to "Axepta payment configuration" and do the same operations. The list of accounts will be updated with each new registration.
You can also disable a configuration.
Payment modes configuration
One-off payment
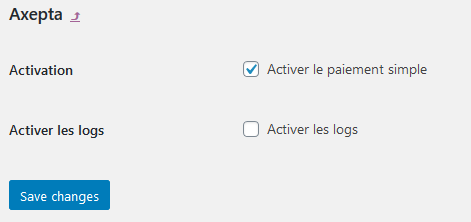
To activate the one-off payment, you must go to "WooCommerce" > "Payments" on the left side of the screen, and check "Axepta".

When you click on the button on the right side, you can configure the payment by checking the "activation" box.
You can also enable the logs (this can help the support to analyse transactions).

One-click payment
This functionnality allows your customers to save their payment methods data so that they can pay faster the next time.
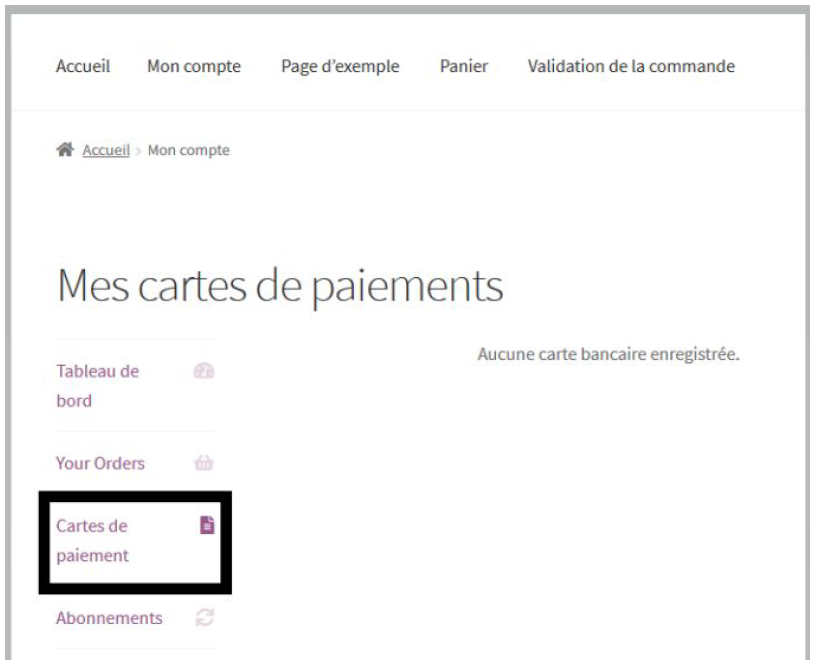
You need to make sure that this option is enabled in your configuration ("WooCommerce" > "Axepta Configuration" > "Configuration" of the MID of your shop.
The customer will be able to manage his saved cards in his personal account in the “My saved cards” tab :
Subscriptions
Enable Subscription
You need to make sure that this option is enabled in your configuration ("WooCommerce" > "Axepta Configuration" > "Configuration" of the MID of your shop.
Configuration
When the subscription functionality is enabled, it's possible to configure items to pay by subscription.
To do so, you should configure every item that can be paid by subscription, individually. Go to the menu on the left side of your screen > "Products" and search for the product you would like to configure by writing its name or scrolling the list.
On the product sheet (when you click on the name of the product), you can go to the "pay by subscription" tab on the bottom right side of the screen.

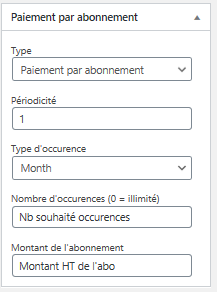
And you can configure the following information:
- Type : indicates if the item will be paid by subscription or standard payment.
- Periodicity : indicated the type of subscription (monthly or daily)
- Interval occurrence : Number of times that the payment will be proceeded. If this value is not filled, the occurrence is unlimited.
- Recurring amount : Indicated the amount of the item in subscription, so this value can be different from the initial price of the item. This value represents the value that will be withdrawn in the future transactions.
Subscriptions management
On the tab "Woocommerce" > "Setup" > "Axepta Subscription list , you can visualize all your subscriptions and have access to the following data :
● Customer name
● Product ordered
● Amount
● Periodicity
● Order date
● Number of payments proceeded
● Subscription status
Available actions in this section are:
● Enable a subscription
● Disable a subscription
● Check détails about an order
● Delete a subscription
Subscription management (user view / Front office)
The customer can also manage his subscriptions in his personnal account via the tab “My payments with subcription".
He can also enable/disable any subscription instantly by clicking on the button in the "Action" column.
The subscription's status will be updated automatically on the backoffice.
Transactions management
The complete list of transactions paid with different payment methods is available on the transactions tab : "Woocommerce" > "Transactions" . You will get, for every transaction, the following information :
● Transaction's date
● Payment method's brand
● Transaction ID
● Order's reference
● Merchant's Id
● Pay ID
● XID
● Amount
● Transaction's type (one-off payment, cancellation, refund, recurring payment...)
● Status(success, failure, authorization... )
● Response code
● Details
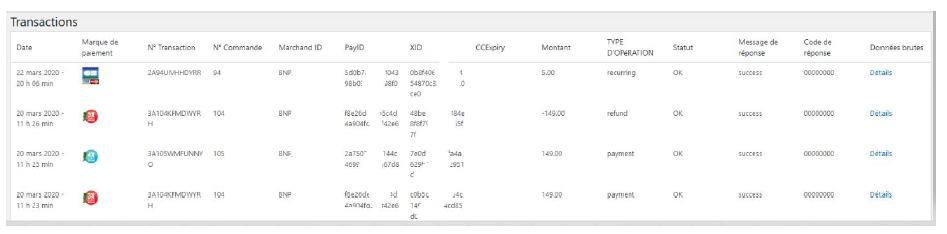
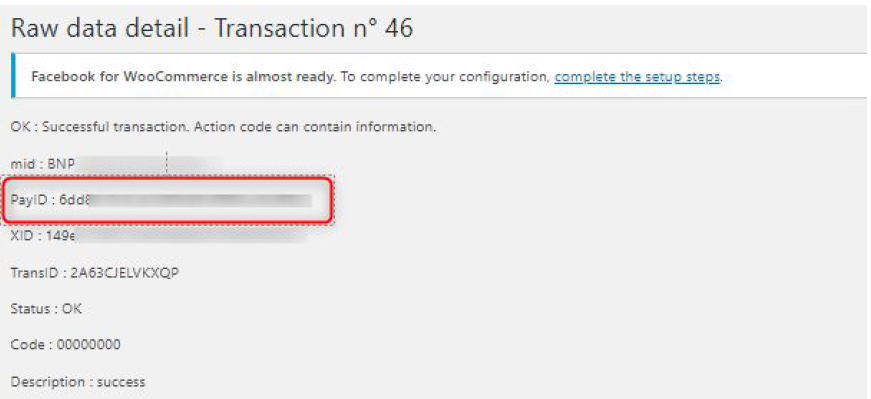
When you click on "Details" you will have additional information about the transaction (useful to analyze a transaction by the support)
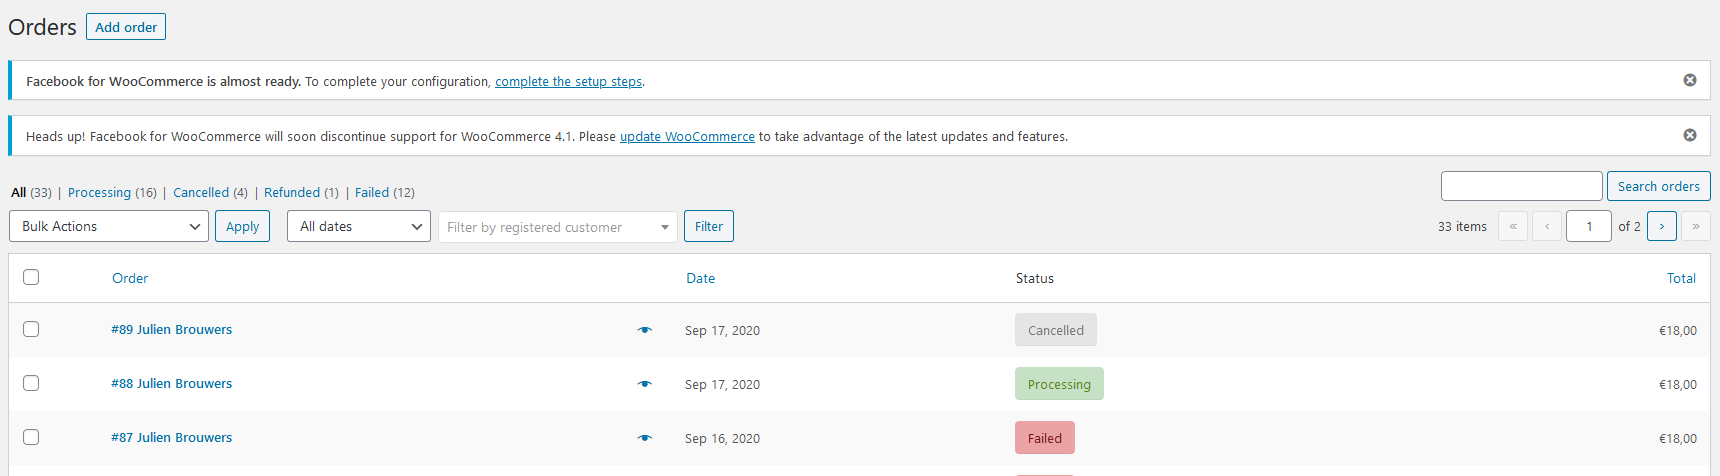
Refund/ cancellation
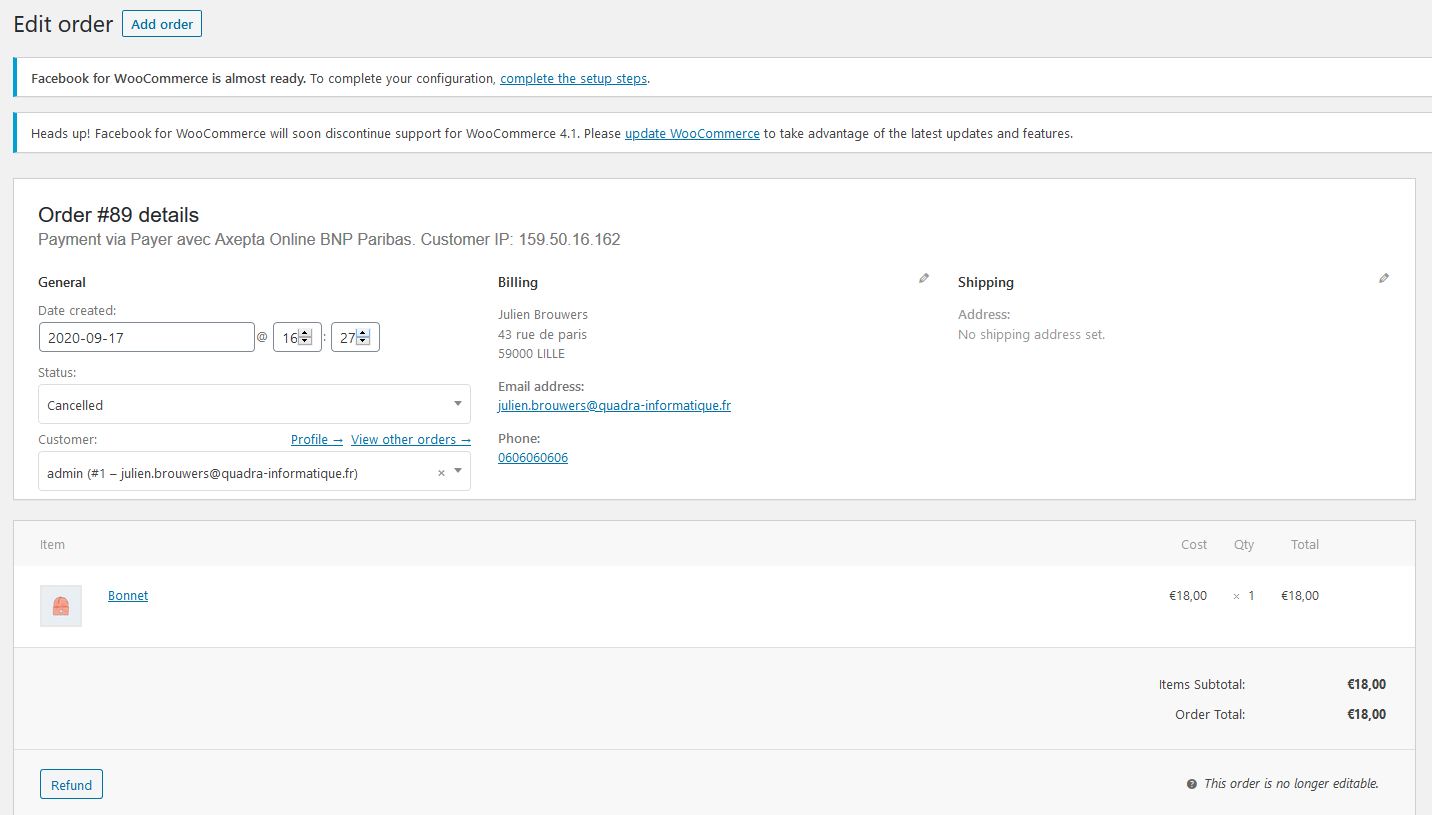
To make a refund, go to "Woocommerce" > "Orders". You will get the complete list of orders. Once you select one order (by clicking on the name), you will get the following screen :

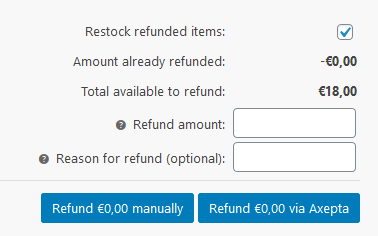
When you click on "Remboursement", a new tab will appear allowing you to fulfill information about the refund :
- Amount : total amount or partial amount to refund. (The amount indicated can't be higher the total amount)
- Reason : this information is optional.

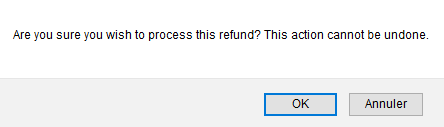
You can now validate the refund.

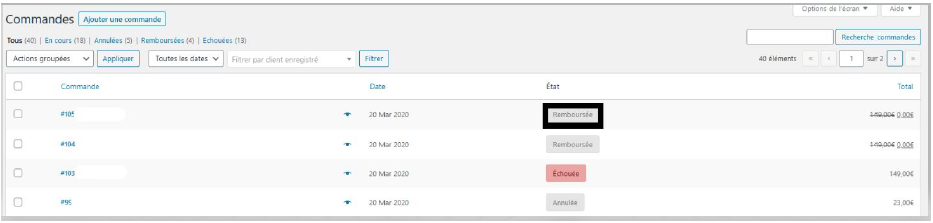
The transaction is now refunded.
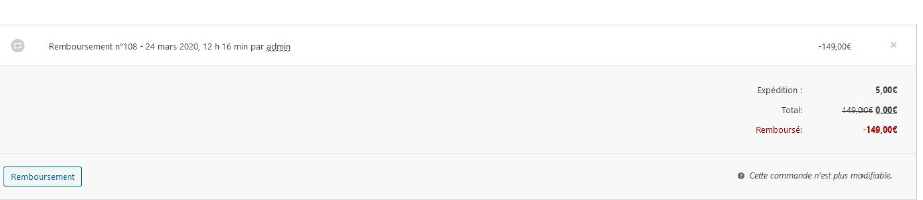
And the status is automatically updated to "remboursée".
Description of payment methods
...
EUR
...
EUR
...
AAT, AU, BE, BG, CA, CH, CY,
CZ, DE, DK, ES, FI, FR, GB,
GE, GI, HR, HU, IE, IT, LI, LT,
LU, MT, MX, NL, NO, NZ, PE,
PL, PT, RO, SE, SI, SK, UY
...
AUD, CAD, CHF, EUR, GBP,
NOK, PLN, RON, SEK, USD
...
AT, BE, BG, CH, CY, CZ, DE,
DK, EE, ES, FI, FR, GB, GR,
HR, HU, IE, IS, IT, LI, LT, LU,
LV, MC, MT, NL, NO, PL, PT,
RO, SE, SI, SK, SM
...
| ||||
We strive to bring the best quality to our modules and we invite you to use the latest version to benefit from it.
Latest changelogs : 18/06/2024: Updates incorporating new features in the latest WooCommerce version for Axepta BNP Paribas. |
| Table of Contents | ||
|---|---|---|
|
Introduction
AXEPTA BNP Paribas allows you to accept payments using different payment methods. Each of them offers different possibilities, through an e-commerce platform, such as:
- Standard payment
- One click payment
- Recurring payment.
Prerequisites
Required php version of the server should be :

The plugin supports versions from 5.7 to 9.0.X
Multi-store or multi-currency configrurations are not possible with this module.
Installation of the plugin
The installation of the plugin requires the following steps :
1) Go to the "Plugins" tab from the left side of the backoffice and click on « Add »
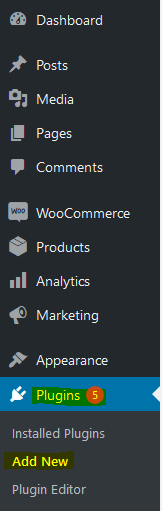
On the next screen, click on "Upload plugin" and upload the plugin. Once uploaded, click on "install now".
Once the plugin installed, you can disable or delete it.
2) Back to "Plugins" > "Installed plugins" from the menu on the left of the screen, find the "Axepta Online BNP Paribas" plugin by scrolling through the list or searching for "Axepta" on the search bar.
Global configuration of the plugin
To create a new configuration, go to the tab "WooCommerce" > "Settings" on the left side of the screen.
Click on the tab “Axepta configuration” to display the list of all your configured accounts and add others.

To add a new account, click on the "Add account" button (Ajouter un compte)
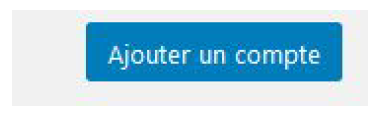
You should, then, fill the required data provided by BNP Paribas and click on "Save".
Once the configuration saved, you can click on "configuration" to manage the different payment methods and functionalities you would like to activate on your shop.
The payment methods that are displayed are the ones corresponding to your activation key.
The payment methods in grey correspond to those that are not part of your offer. You have the possibility to visualize the complete offer in order to see everything that the Axepta module proposes.
You can now configure your account options.
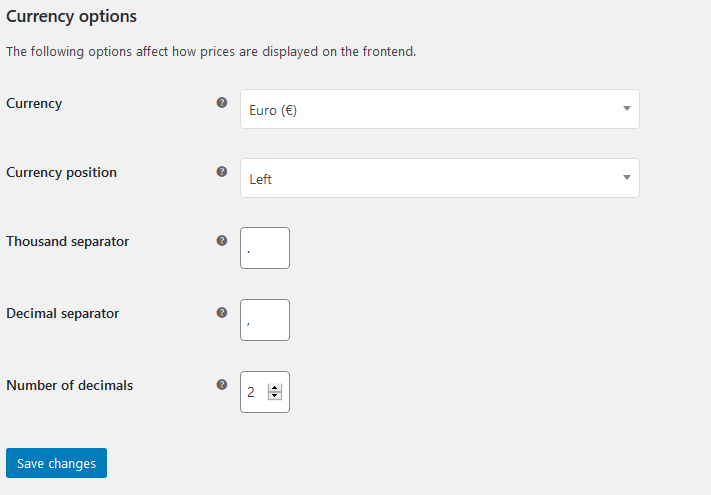
Currency :
The currency indicated is the currency of your activation key. This data cannot be modified, it is only shown as an indication for the management of the account.
Please note that you must activate the currency beforehand in the woocommerce backoffice. To do this, go to "WooCommerce" > “Settings” > "General" and find the tab "Currency options' .
Country :
You can choose to activate the account either in all countries or in manually selected countries by holding down the ctrl key.
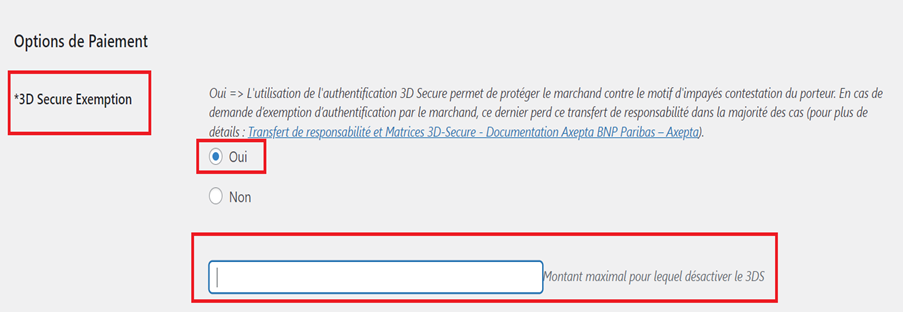
3DSecure and exemption management :
The 3DSecure is still activated on your store, you can nevertheless activate the "Exemption request" option which will allow you to request an authentication exemption for the cardholder during a simple payment on your merchant site.
To enable exemption requests, please select "Yes" in the "Exemption request" box to disable please select "No"
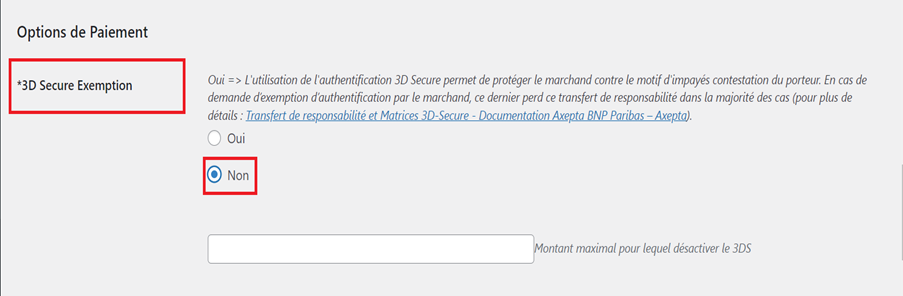
If you wish to activate exemption requests you must then fill in the "Amount" box which corresponds to the maximum amount that will trigger an exemption request. Above this amount, the exemption request will not be triggered.
Attention : Please note that the use of 3D Secure authentication protects the merchant against the reason for unpaid invoices "holder dispute". In the event of a request for exemption from authentication by the merchant, the latter loses this transfer of responsibility in the majority of cases (For more details: Liability shift and 3DS Matrix - Documentation Axepta BNP Paribas - Axepta). This is a request for exemption, this does not mean that it will be granted systematically by the issuer of the cardholder's card. Exemption requests only work with transactions paid in Euro.
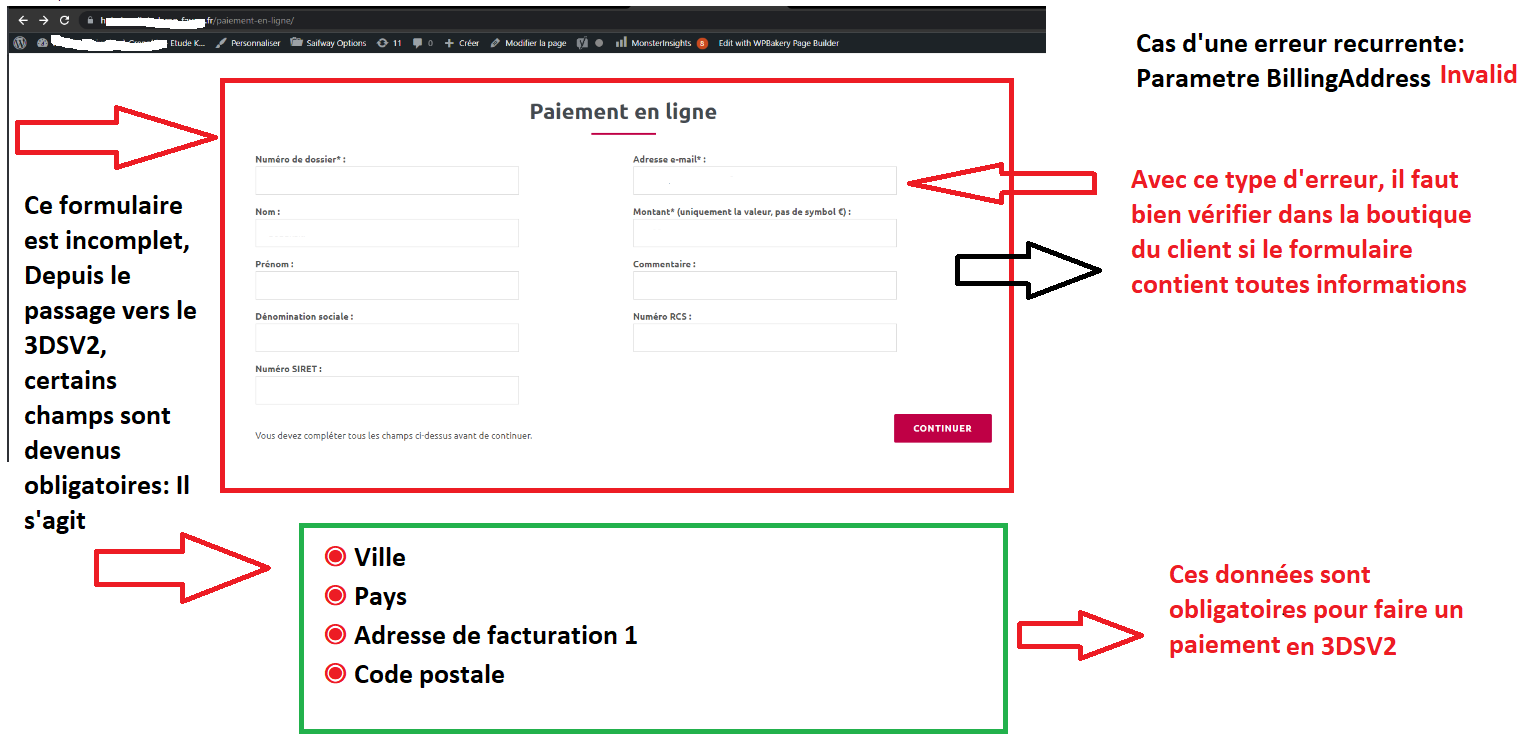
Known error: Since switching to 3DSV2, it is imperative to send the parameter "BillingAddress" to Axepta to make a payment.
This parameter contains the following data:
- City
- Country
- Billing Address 1
- Postal Code
These fields are mandatory for the module to function properly and must be present in the payment form:
One-click payment :
This option allows you to activate the oneclick payment via registration of the payment method by the user in his customer account.
Subscription :
This option allows you to activate the subscription payment on the shop.
Rendering mode :
The display of the payment page is possible in 2 ways with the plugin:
- Redirection => External redirection of the user to the payment page
- iFrame => Displaying the payment page on the shop in an iFrame
Capture method :
This option allows you to choose the payment capture method:
- Automatic => The capture will be done automatically in the night.
- Manual => After a defined time, you can choose just after choosing this option the delay before the capture (Delay in hours before capture (integer between 1 and 696)).
Your account is now configured.
You can configure as many accounts as your BNP Paribas contract allows. To add an account, you must go to "Axepta payment configuration" and do the same operations. The list of accounts will be updated with each new registration.
You can also disable a configuration.
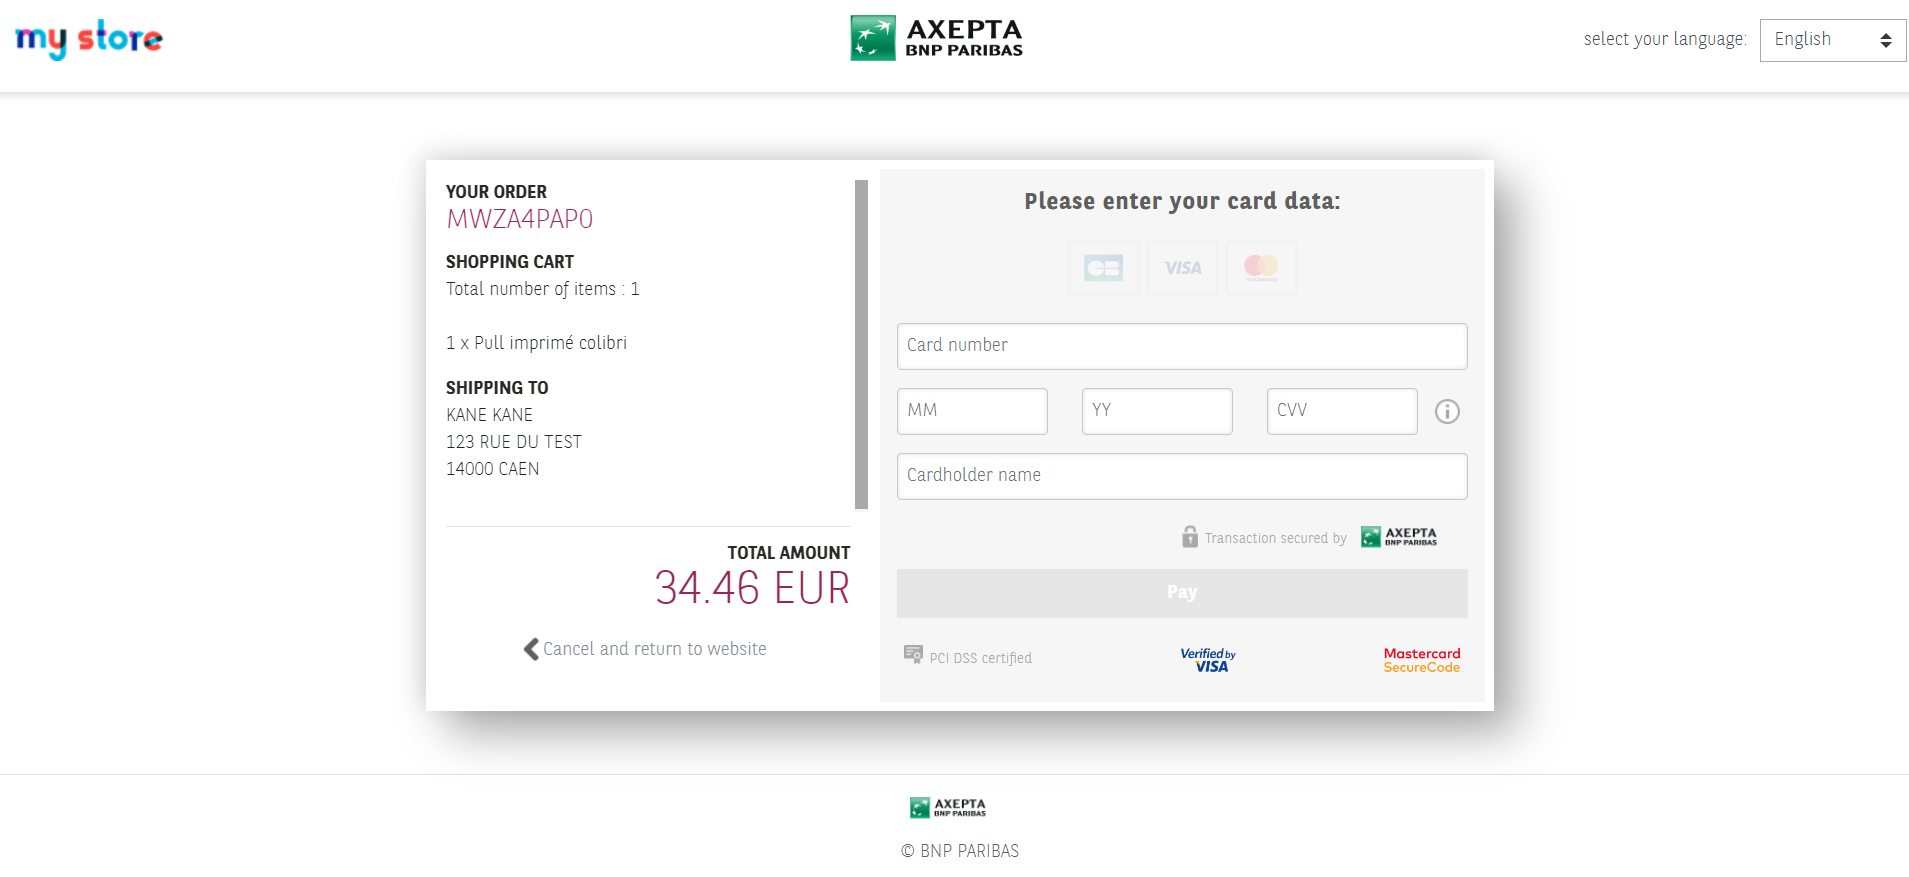
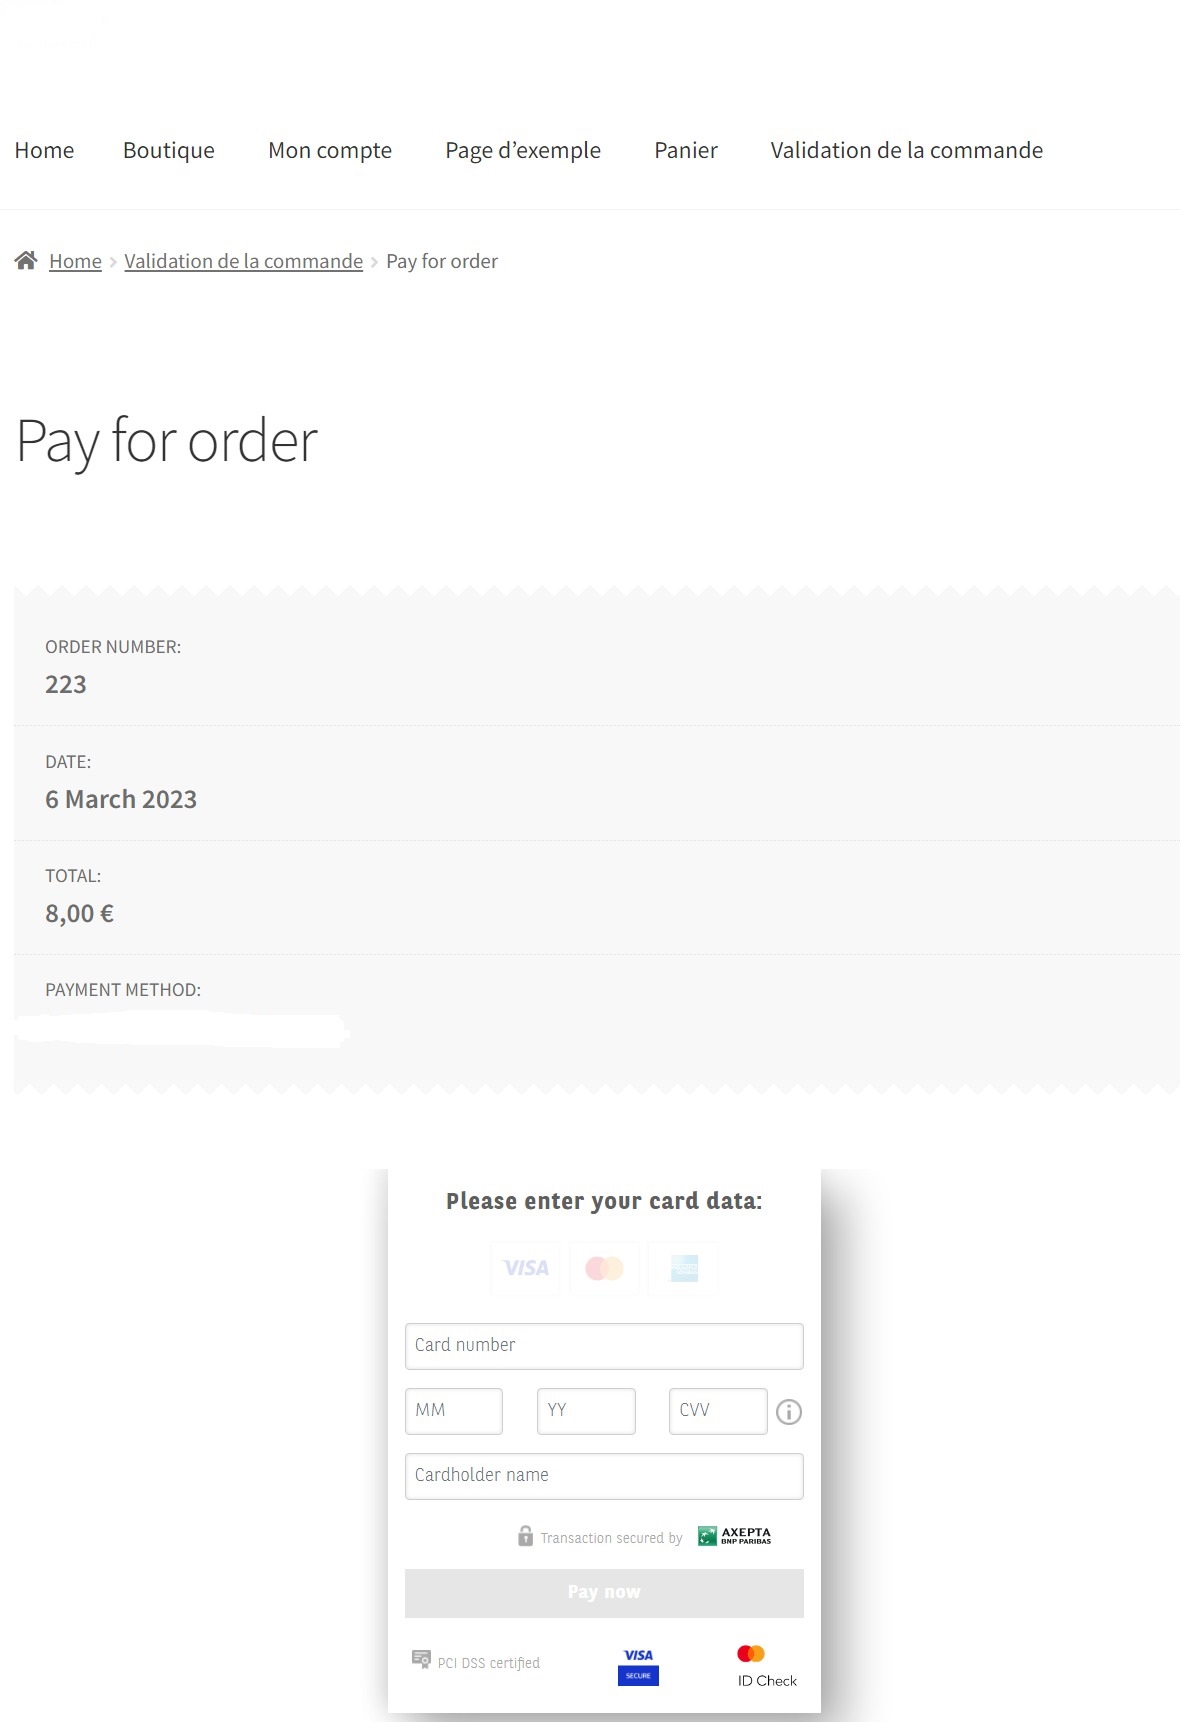
The render of the checkout page
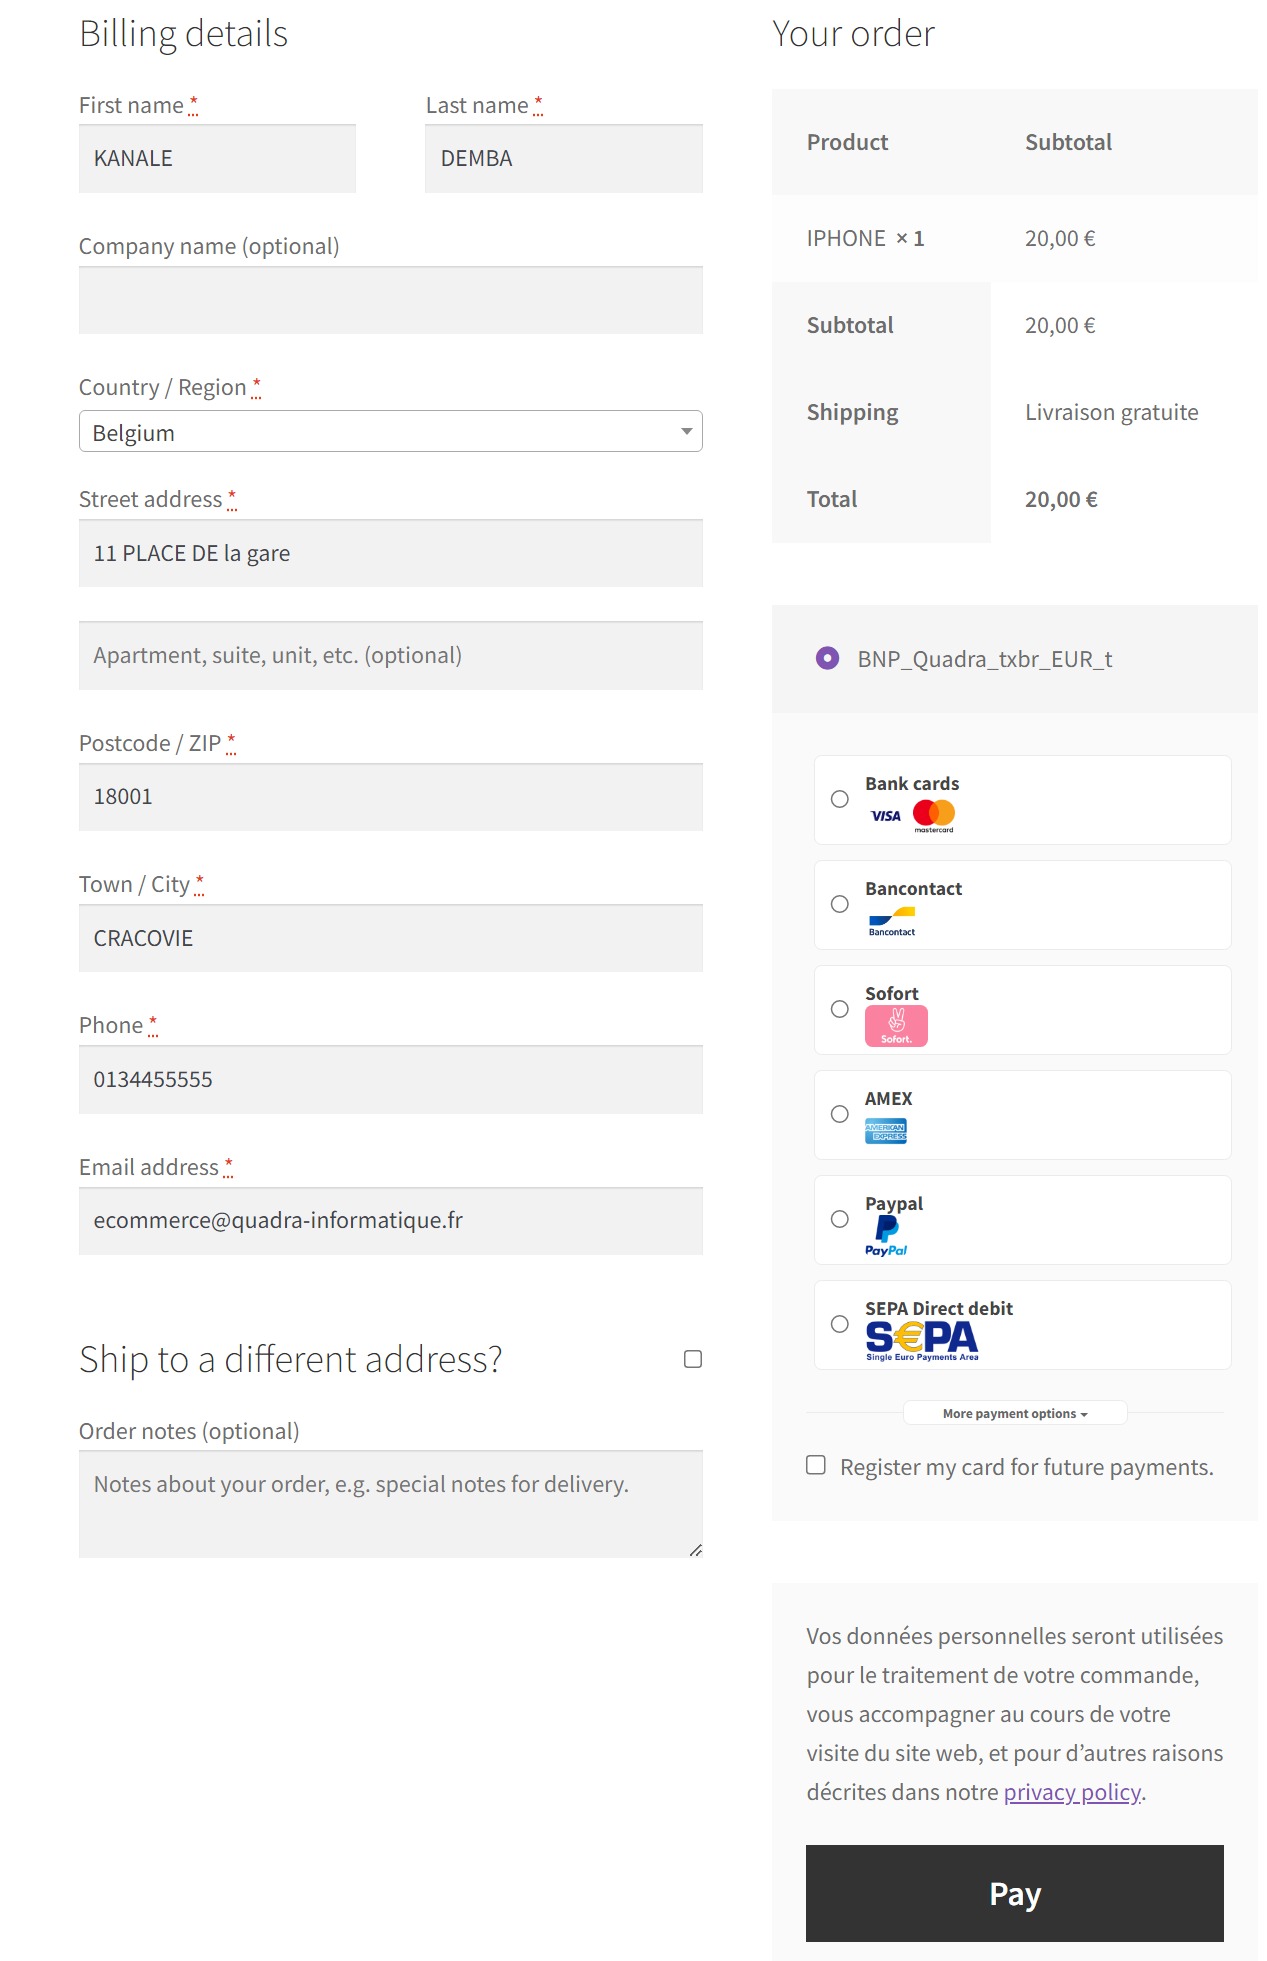
Payment methods are displayed on a framework for 6 proposals. Additional payment methods can be accessed by selecting "More payment options", which only appears if necessary. The "One-click" option is activated here to offer the registration of the card of the user.
The rendering of a redirected payment page
The rendering of an iFrame payment page
Payment modes configuration
One-off payment
To activate the one-off payment, you must go to "WooCommerce" > "Settings" > "Payments" on the left side of the screen, and check "Axepta".
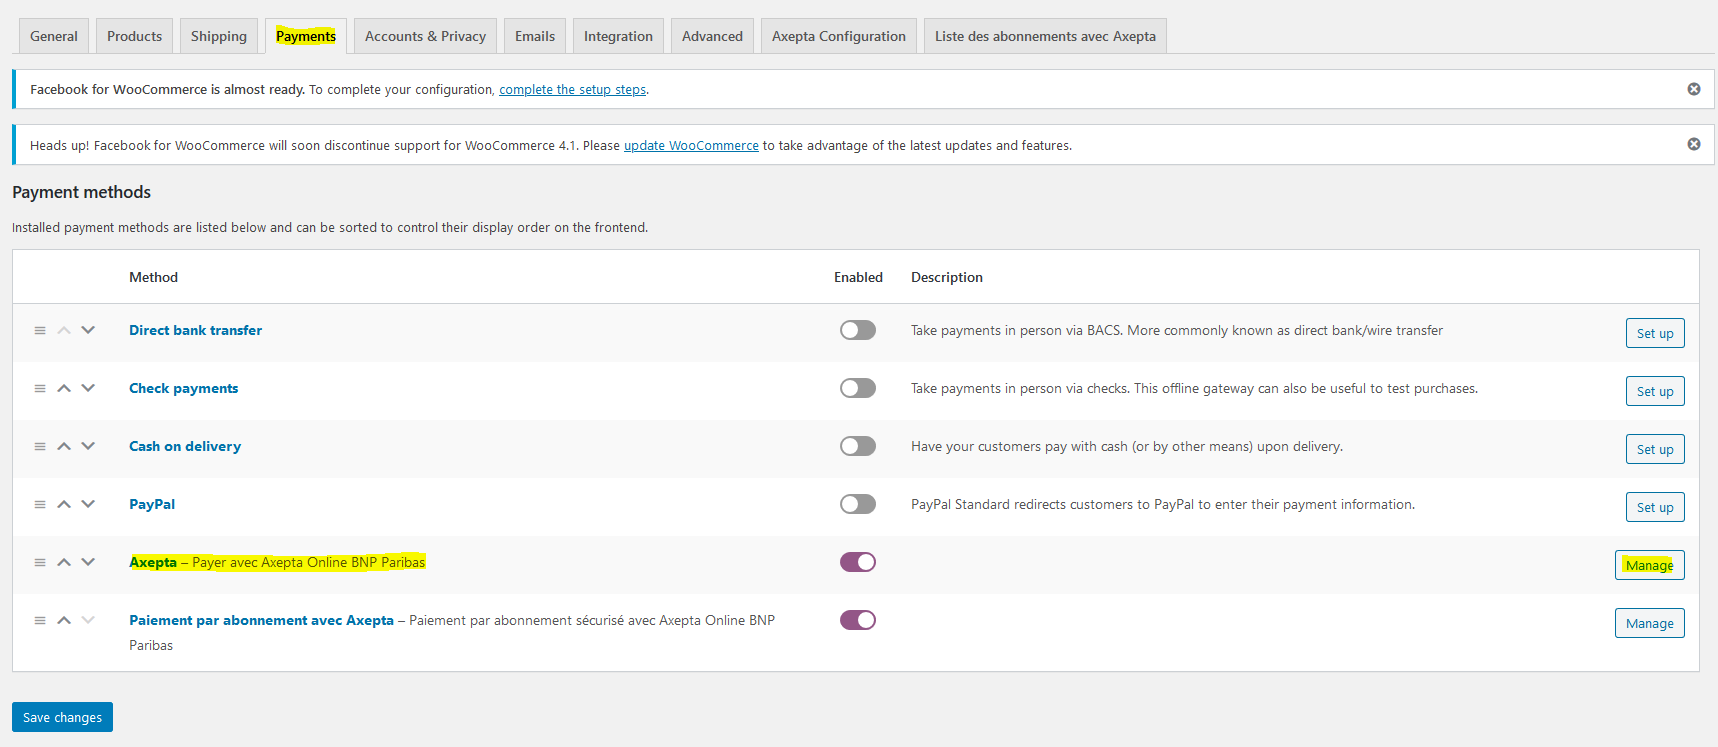
When you click on the button on the right side, you can configure the payment by checking the "activation" box.
You can also enable the logs (this can help the support to analyse transactions).
One-click payment
This functionnality allows your customers to save their payment methods data so that they can pay faster the next time.
You need to make sure that this option is enabled in your configuration ("WooCommerce" > "Axepta Configuration" > "Configuration" of the MID of your shop.
The customer will be able to manage his saved cards in his personal account in the “My saved cards” tab :
Subscriptions
Enable Subscription
You need to make sure that this option is enabled in your configuration ("WooCommerce" > "Axepta Configuration" > "Configuration" of the MID of your shop.
Configuration
When the subscription functionality is enabled, it's possible to configure items to pay by subscription.
To do so, you should configure every item that can be paid by subscription, individually. Go to the menu on the left side of your screen > "Products" and search for the product you would like to configure by writing its name or scrolling the list.
To pay for a subscription product, it is mandatory to have a customer account. For guest mode customers who have a subscription product in their cart, the creation of a customer account is requested before making the payment.
On the product sheet (when you click on the name of the product), you can go to the "pay by subscription" tab on the bottom right side of the screen.
And you can configure the following information:
- Type : indicates if the item will be paid by subscription or standard payment.
- Periodicity : indicated the type of subscription (monthly or daily)
- Interval occurrence : Number of times that the payment will be proceeded. If this value is not filled, the occurrence is unlimited.
- Recurring amount : Indicated the amount of the item in subscription, so this value can be different from the initial price of the item. This value represents the value that will be withdrawn in the future transactions.

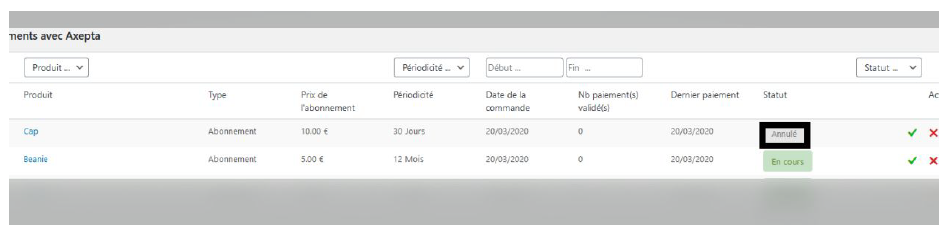
Subscriptions management
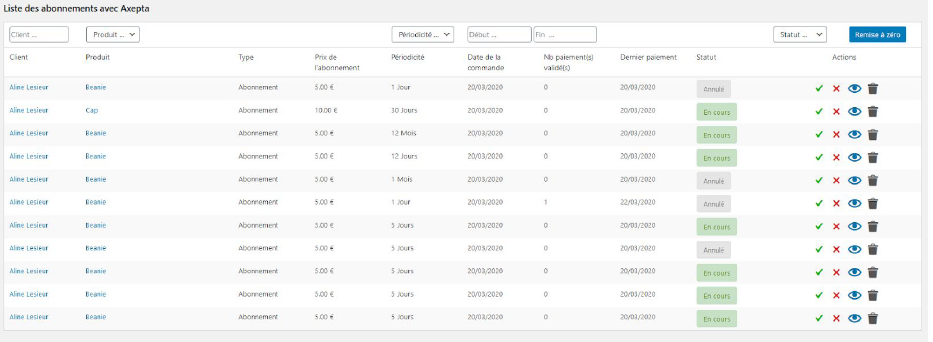
On the tab "Woocommerce" > "Settings" > "Listes des abonnements avec Axepta" , you can visualize all your subscriptions and have access to the following data :
● Customer name
● Product ordered
● Amount
● Periodicity
● Order date
● Number of payments proceeded
● Subscription status
Available actions in this section are:
● Enable a subscription
● Disable a subscription
● Check détails about an order
● Delete a subscription
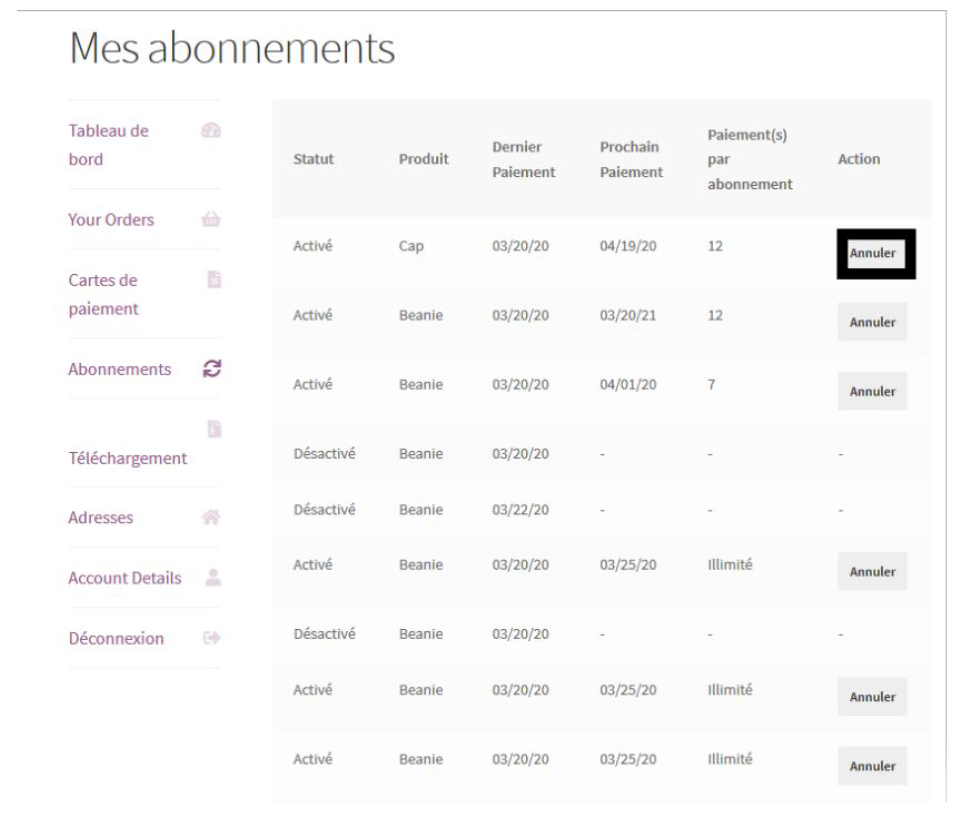
Subscription management (user view / Front office)
The customer can also manage his subscriptions in his personnal account via the tab “My payments with subcription".
He can also enable/disable any subscription instantly by clicking on the button in the "Action" column.
The subscription's status will be updated automatically on the backoffice.
Payment of delivery costs for recurring subscriptions by the Axepta BNP Paribas module
This feature makes it possible to cover delivery or transport costs on recurring subscriptions, taking into account the delivery zones already configured on the store.
Product configuration :
Go to the product page of your subscription: in the right column, in the box «Payment by subscription», a field «Subscription shipping costs» appears. This option is unchecked by default.
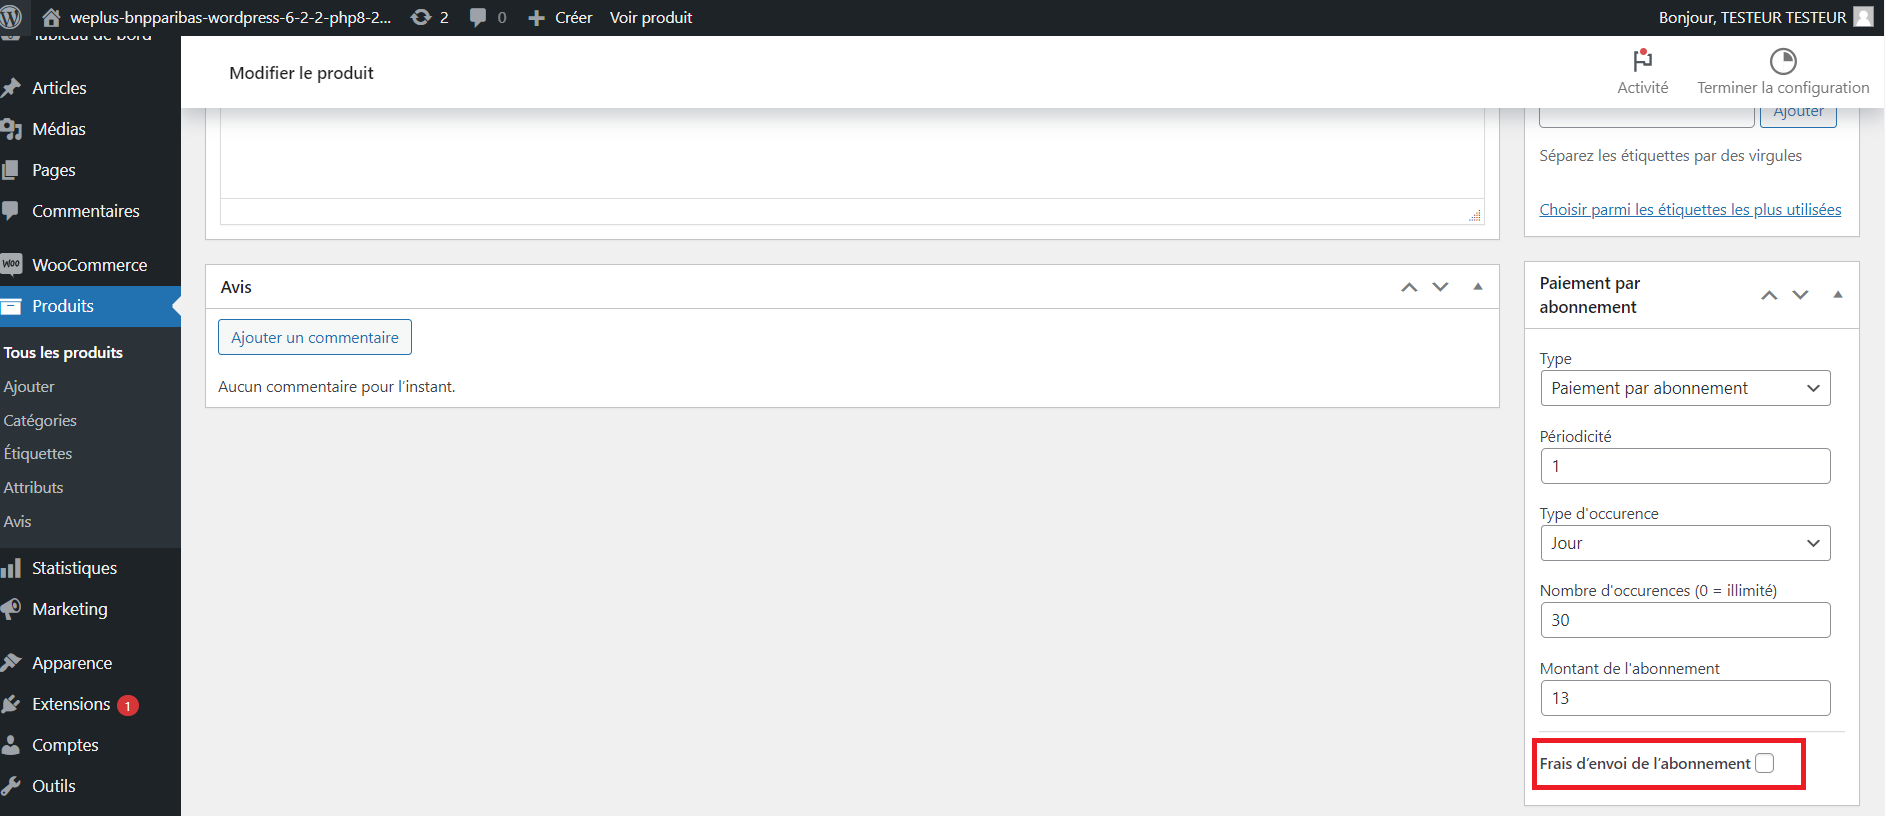
Configuration of delivery rates for recurring subscriptions :
By checking the «Subscription shipping costs» box, several fields appear, depending on the delivery zones configured on the shop. You can set different shipping costs depending on the delivery methods and areas.
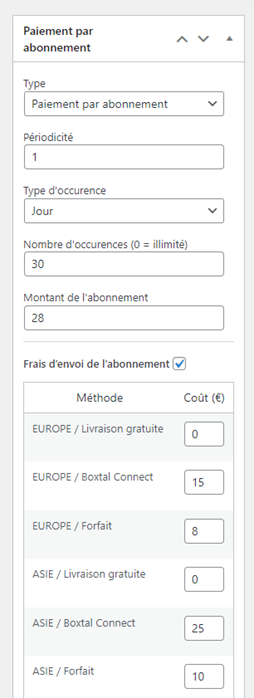
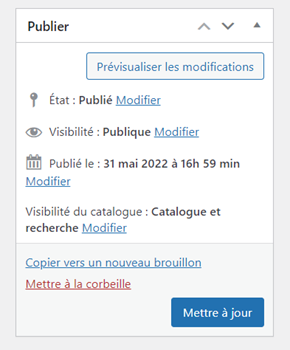
After entering the shipping prices, update the product to save the changes by clicking “Update” in the “Publish” box at the top of the right column.
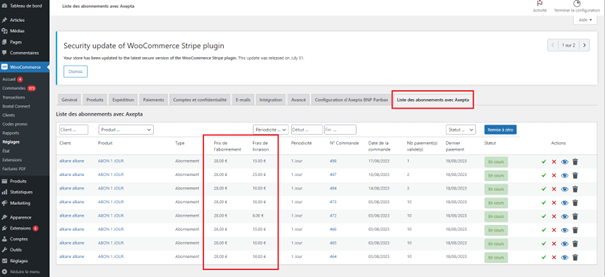
Control of subscriptions :
To check that the shipping costs have been taken into account, go to WooCommerce > Settings > Subscription list with Axepta. A column "Delivery charges" appeared with the corresponding amount.
Transactions management
The complete list of transactions paid with different payment methods is available on the transactions tab : "Woocommerce" > "Transactions" . You will get, for every transaction, the following information :
● Transaction's date
● Payment method's brand
● Transaction ID
● Order's reference
● Merchant's Id
● Pay ID
● XID
● Amount
● Transaction's type (one-off payment, cancellation, refund, recurring payment...)
● Status(success, failure, authorization... )
● Response code
● Details
When you click on "Details" you will have additional information about the transaction (useful to analyze a transaction by the support)
Refund/ cancellation
To make a refund, go to "Woocommerce" > "Orders". You will get the complete list of orders.
Once you select one order (by clicking on the name), you will get the following screen :
When you click on "Refund", a new tab will appear allowing you to fulfill information about the refund :
- Amount : total amount or partial amount to refund. (The amount indicated can't be higher the total amount)
- Reason : this information is optional.
You can now validate the refund.
The transaction is now refunded.
And the status is automatically updated to "remboursée".
Description of payment methods
| Payment methods | Countries | Currencies |
| AMEX | All | All |
| CB/VISA/Mastercard | All | All |
| Cetelem 3X | FR | EUR |
| Cetelem 4X | FR | EUR |
| Cetelem Presto | FR | EUR |
| Mastercard/VISA | All | All |
| Paypal | All | All |
| Sofort Klarna | DE, AT, BE, IT, ES, NL, CH, PL | EUR |
| Alipay | CN | AUD, CAD, EUR, GBP, HKD, NZD, SGD, USD |
| Bancontact | BE | EUR |
| Boleto Bancário | BR | USD |
| eNets | SG | SGD |
| EPS | AT | EUR |
| Giropay | DE | EUR |
| iDeal | NL | EUR |
| Multibanco | PT | EUR |
| MyBank | ES,GR, IT | EUR |
| MyClear FPX | MY | MYR |
| Paysafecard | AAT, AU, BE, BG, CA, CH, CY, CZ, DE, DK, ES, FI, FR, GB, GE, GI, HR, HU, IE, IT, LI, LT, LU, MT, MX, NL, NO, NZ, PE, PL, PT, RO, SE, SI, SK, UY | AUD, CAD, CHF, EUR, GBP, NOK, PLN, RON, SEK, USD |
| POLi | AU | AUD |
| POLi | NZ | NZD |
| Przelewy24 | PL | EUR, PLN |
| RHB Bank | MY | MYR |
| SEPA Direct debit | AT, BE, BG, CH, CY, CZ, DE, DK, EE, ES, FI, FR, GB, GR, HR, HU, IE, IS, IT, LI, LT, LU, LV, MC, MT, NL, NO, PL, PT, RO, SE, SI, SK, SM | EUR |
| TrustPay | CZ | CZK |
| TrustPay | SK | EUR |
| CN | EUR, GBP, USD |
| Table of Contents | ||
|---|---|---|
|
Introduction
AXEPTA BNP Paribas allows you to accept payments using different payment methods. Each of them offers different possibilities, through an e-commerce platform, such as:
- Standard payment
- One click payment
- Recurring payment.
Prerequisites
Required php version of the server should be minimum 7.1
The plugin supports versions from 3.7 to 5.0
Installation of the plugin
The installation of the plugin requires the following steps :
1) Go to the "Plugins" tab from the left side of the backoffice and click on « Add »
On the next screen, click on "Upload plugin" and upload the plugin. Once uploaded, click on "install now".
Once the plugin installed, you can disable or delete it.
2) Back to "Plugins" > "Installed plugins" from the menu on the left of the screen, find the "Axepta Online BNP Paribas" plugin by scrolling through the list or searching for "Axepta" on the search bar.
Global configuration of the plugin
To create a new configuration, go to the tab "WooCommerce" > "Settings" on the left side of the screen.
Click on the tab “Axepta configuration” to display the list of all your configured accounts and add others.
To add a new account, click on the "Add account" button (Ajouter un compte)
You should, then, fill the required data provided by BNP Paribas and click on "Save".
Once the configuration saved, you can click on "configuration" to manage the different payment methods and functionalities you would like to activate on your shop.
The payment methods that are displayed are the ones corresponding to your activation key.
The payment methods in grey correspond to those that are not part of your offer. You have the possibility to visualize the complete offer in order to see everything that the Axepta module proposes.
You can now configure your account options.
Currency :
The currency indicated is the currency of your activation key. This data cannot be modified, it is only shown as an indication for the management of the account.
Please note that you must activate the currency beforehand in the woocommerce backoffice. To do this, go to "WooCommerce" > “Settings” > "General" and find the tab "Currency options' .
Country :
You can choose to activate the account either in all countries or in manually selected countries by holding down the ctrl key.
3DS :
This option allows you to activate 3DS authentication and indicate the minimum amount for 3DS transactions.
One-click payment :
This option allows you to activate the oneclick payment via registration of the payment method by the user in his customer account.
Subscription :
This option allows you to activate the subscription payment on the shop.
Rendering mode :
The display of the payment page is possible in 2 ways with the plugin:
- Redirection => External redirection of the user to the payment page
- iFrame => Displaying the payment page on the shop in an iFrame
Capture method :
This option allows you to choose the payment capture method:
- Automatic => The capture will be done automatically in the night.
- Manual => After a defined time, you can choose just after choosing this option the delay before the capture (Delay in hours before capture (integer between 1 and 696)).
Your account is now configured.
You can configure as many accounts as your BNP Paribas contract allows. To add an account, you must go to "Axepta payment configuration" and do the same operations. The list of accounts will be updated with each new registration.
You can also disable a configuration.
Payment modes configuration
One-off payment
To activate the one-off payment, you must go to "WooCommerce" > "Settings" > "Payments" on the left side of the screen, and check "Axepta".
When you click on the button on the right side, you can configure the payment by checking the "activation" box.
You can also enable the logs (this can help the support to analyse transactions).
One-click payment
This functionnality allows your customers to save their payment methods data so that they can pay faster the next time.
You need to make sure that this option is enabled in your configuration ("WooCommerce" > "Axepta Configuration" > "Configuration" of the MID of your shop.
The customer will be able to manage his saved cards in his personal account in the “My saved cards” tab :
Subscriptions
Enable Subscription
You need to make sure that this option is enabled in your configuration ("WooCommerce" > "Axepta Configuration" > "Configuration" of the MID of your shop.
Configuration
When the subscription functionality is enabled, it's possible to configure items to pay by subscription.
To do so, you should configure every item that can be paid by subscription, individually. Go to the menu on the left side of your screen > "Products" and search for the product you would like to configure by writing its name or scrolling the list.
On the product sheet (when you click on the name of the product), you can go to the "pay by subscription" tab on the bottom right side of the screen.
And you can configure the following information:
- Type : indicates if the item will be paid by subscription or standard payment.
- Periodicity : indicated the type of subscription (monthly or daily)
- Interval occurrence : Number of times that the payment will be proceeded. If this value is not filled, the occurrence is unlimited.
- Recurring amount : Indicated the amount of the item in subscription, so this value can be different from the initial price of the item. This value represents the value that will be withdrawn in the future transactions.
Subscriptions management
On the tab "Woocommerce" > "Settings" > "Listes des abonnements avec Axepta" , you can visualize all your subscriptions and have access to the following data :
● Customer name
● Product ordered
● Amount
● Periodicity
● Order date
● Number of payments proceeded
● Subscription status
Available actions in this section are:
● Enable a subscription
● Disable a subscription
● Check détails about an order
● Delete a subscription
Subscription management (user view / Front office)
The customer can also manage his subscriptions in his personnal account via the tab “My payments with subcription".
He can also enable/disable any subscription instantly by clicking on the button in the "Action" column.
The subscription's status will be updated automatically on the backoffice.
Transactions management
The complete list of transactions paid with different payment methods is available on the transactions tab : "Woocommerce" > "Transactions" . You will get, for every transaction, the following information :
● Transaction's date
● Payment method's brand
● Transaction ID
● Order's reference
● Merchant's Id
● Pay ID
● XID
● Amount
● Transaction's type (one-off payment, cancellation, refund, recurring payment...)
● Status(success, failure, authorization... )
● Response code
● Details
When you click on "Details" you will have additional information about the transaction (useful to analyze a transaction by the support)
Refund/ cancellation
To make a refund, go to "Woocommerce" > "Orders". You will get the complete list of orders.
Once you select one order (by clicking on the name), you will get the following screen :
When you click on "Refund", a new tab will appear allowing you to fulfill information about the refund :
- Amount : total amount or partial amount to refund. (The amount indicated can't be higher the total amount)
- Reason : this information is optional.
You can now validate the refund.
The transaction is now refunded.
And the status is automatically updated to "remboursée".
Description of payment methods
| Table Filter | ||||||||||||||||||||||||||||||||||||||||||||||||||||||||||||||||||||||||||||||||||||||||||||||||||||||||||||||||||||||||
|---|---|---|---|---|---|---|---|---|---|---|---|---|---|---|---|---|---|---|---|---|---|---|---|---|---|---|---|---|---|---|---|---|---|---|---|---|---|---|---|---|---|---|---|---|---|---|---|---|---|---|---|---|---|---|---|---|---|---|---|---|---|---|---|---|---|---|---|---|---|---|---|---|---|---|---|---|---|---|---|---|---|---|---|---|---|---|---|---|---|---|---|---|---|---|---|---|---|---|---|---|---|---|---|---|---|---|---|---|---|---|---|---|---|---|---|---|---|---|---|---|
| ||||||||||||||||||||||||||||||||||||||||||||||||||||||||||||||||||||||||||||||||||||||||||||||||||||||||||||||||||||||||
|


...