
Preamble
By subscribing to the AXEPTA BNP Paribas solution, each merchant will have access to the AXEPTA Back Office. Access as a “super-administrator” is automatically created to a contact defined by the merchant and mentioned in the subscription form. A super-administrator will therefore have all the rights including the right to create other users and assign them rights as well (the exhaustive list will be presented later).
A merchant may have access to one or more MIDs (Merchant IDs).
A MID (Merchant ID) makes it possible to identify a shop (whether it is an online store or nearby).
There are 3 types of MIDs:
- MasterMID: allows you to have a global view of the merchant’s activity on the different shops he owns. The masterMD cannot be used to make transactions.
- Test MID: provides access to transactions made in a test environment (without banking).
- Production MID: provides access to transactions made in a production environment (LIVE environment).
Backoffice presentation
The Axepta Back Office is a web app which offers an overview and control over all transactions of a merchant. The Back Office is compatible with most web browsers; however it is recommended to use Chrome and Firefox (Safari currently not available).
It has 4 main sections presented below and explained afterwards.
The Axepta Back Office is multilingual (German, English, French, Spanish, Italian, Polish, Danish, Swedish and Chinese).
The URL to access this web app is as follows:
https://backoffice.axepta.bnpparibas/
To access the Back Office, the merchant will receive, when subscribing to the solution, their personal access data via a dedicated and encrypted – for safety measures – email:
- Merchant ID
- Username
- Password
To decrypt the email, the merchant will have to use the password received on their cellphone (sent by Axepta BNP Paribas customer support).
He will then be able to access the following authentication page to open a session:
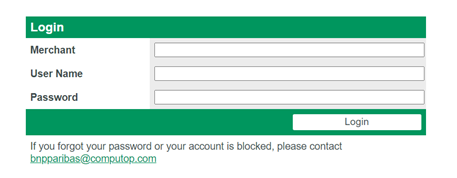
It is mandatory to change the password assigned by BNP Paribas at the first connection, then the password must be changed every 6 weeks for safety measures.
If the password expires after 6 weeks, you can contact BNP Paribas support team.
If the user enters an incorrect password several times (7 times), access is automatically blocked, and the user must contact BNP Paribas support team.
For safety measures the password:
- Must not be used more than once
- Must be between 8 and 20 characters
- Contains at least one number, one special character and one capital letter.

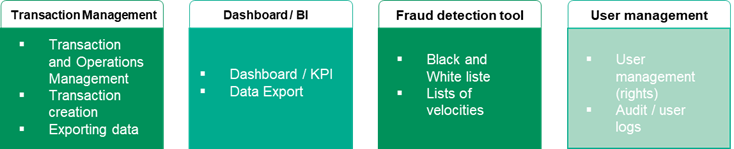
Transaction Management
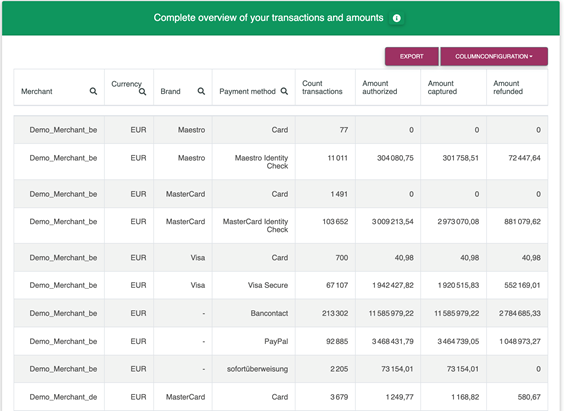
The section “Transactions” allows the merchant to see and manage all their transactions.
Transactions
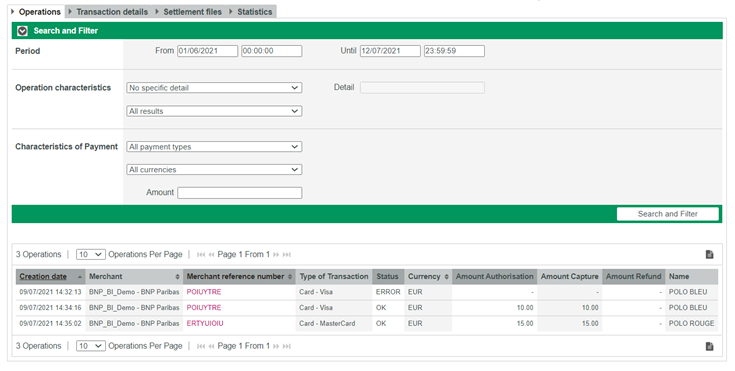
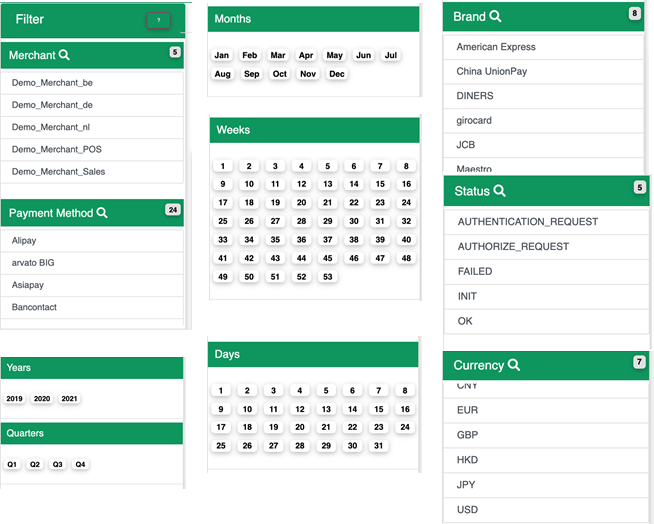
When the merchant wishes to consult their transactions, it is possible to filter them according to different criteria:
- Period that corresponds to the date of the transaction
- Characteristic of a transaction (transaction number defined by the payment solution, card number, token, contract number, IBAN, BIC, transaction number defined by the merchant, error code...)
- Status of a transaction: confirmed transaction, failed, pending.
- Payment means
- Currency used
- Amount
The merchant can choose not to put any filter, he will then see only the transactions of the day.
Search results:
The list of all transactions (filtered or not) is displayed and the information obtained is as follows:
- Date and time the transaction was created
- Merchant name (MID)
- Transaction number (chosen by the merchant)
- Reference number (archiving reference generated by the merchant)
- Type of transaction (payment mean used used)
- Current status of the transaction: Confirmed, waiting (for capture), Error.
- Currency of the transaction
- Authorized amount
- Amount deposited in the bank
- Amount reimbursed, if done.
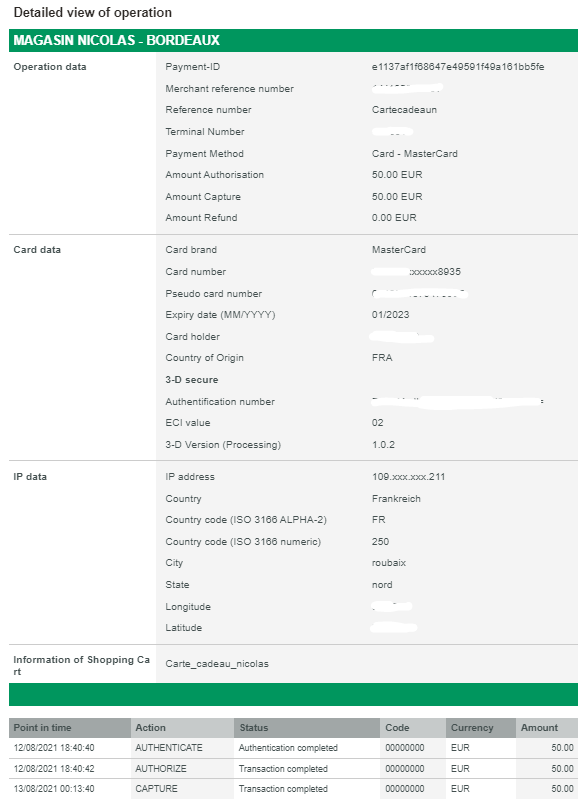
Detailed view of a transaction:
To see the details of a transaction, simply click on the transaction number. An overlay window will appear with all the details:
- Transaction data:
- Transaction number (User ID generated by the Axepta solution)
- Reference number (Merchant-generated archive reference)
- Payment method
- Card data:
- Brand of the card
- Card number (truncated)
- Token (Pseudo Card Number)
- Expiry date
- Country of origin of the card
- Additional 3DS data (authentication number, ECI value, 3DS version).
- IP data:
- IP address (truncated)
- Country
- Country code (letters and numbers)
- Locality
- Federal State
- Longitude
- Latitude
- Shopping cart information.
- Operations carried out on this transaction (authorization, capture, reimbursement…)
Transaction's response code :
Response codes are 8 digits and are constructed accordering to the syntax described below.
Format: N8, (
              N
              NNNNNNN
)
N (status)
NNN (category)
-
NNNN (detail)
Example :
              2
              206
              0203
                  2


                Error
206 3DS credit card adapater for authorization protocol GICC0203 Card brand does not support 3DS
The complete list of response codes is available via this link.
Global view of the transactions of all my MIDs:
To display the complete list of transactions when the merchant owns several stores, simply authenticate with the MasterID access data (data received by the Axepta support team when sbuscribing) and select “all merchants” from the list of MIDs.
Note that the MasterID cannot be used to carry out transactions but only to visualize the global activity of the merchant
![]()
Details of operations (refund, cancellation, capture...)
Inside “Transaction details “, the merchant will have a more complete visibility on his transactions with additional columns such as:
- Action on a transaction (authentication, authorization, capture, refund…)
- Date of the last action on the transaction
- Return code
- Description of the return code

Action on a transaction:
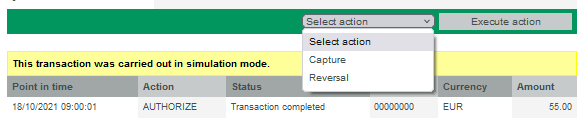
The merchant can manually perform on a given transaction, such as cancellation, capture or refund.
Depending on the status of the transaction and the rights of the user connected to the back office, a list of operations (actions) will be proposed such as:
- The refund
To refund a payment, simply select a transaction and choose the “credit” action and an input window will appear to enter the refund amount. This amount must not exceed the amount of the payment. The total amount is displayed by default, but the merchant can decide to partially refund a transaction. In this case he will have to enter the new amount (less than the initial amount)
For all amounts containing decimals, please use a comma and not a period. Otherwise the payment will be automatically rejected.

- The cancellation
A transaction that has not been captured yet, can be cancelled via the Axepta Backoffice. To do so, you need to select a transaction and choose the action "Reversal".
- The partial capture
In order to partially capture an amount, the user will have to enter the amount that is to be captured (less than the total amount of the transaction) in the “amount” section and click on “Capture” to partially remit the transaction to the bank.

Settlement file
The settlement file is used to meet merchant’s bank settlement needs. It gathers the data from the various payment service providers or acquires. The file is available and can be downloaded in CSV format (all the values are separated by commas). The file is generated daily (at about 3 PM) unless the file is empty.
The merchant can select a specific period (up to 60 days) in the “settlement file” section, to filter the results.
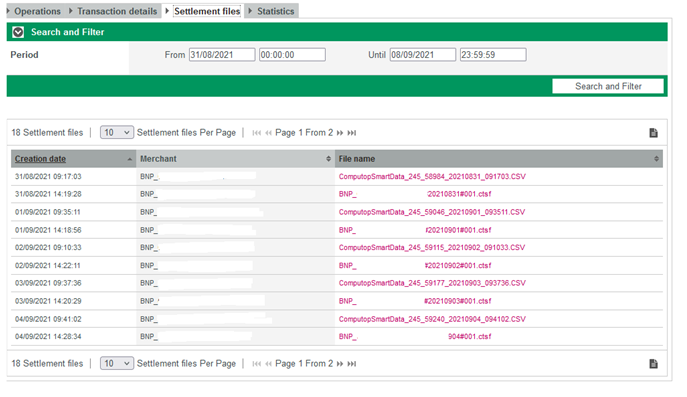
The content and the structure of the file are described in a dedicated document.
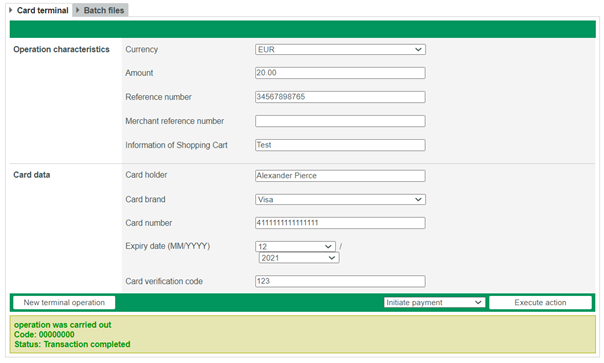
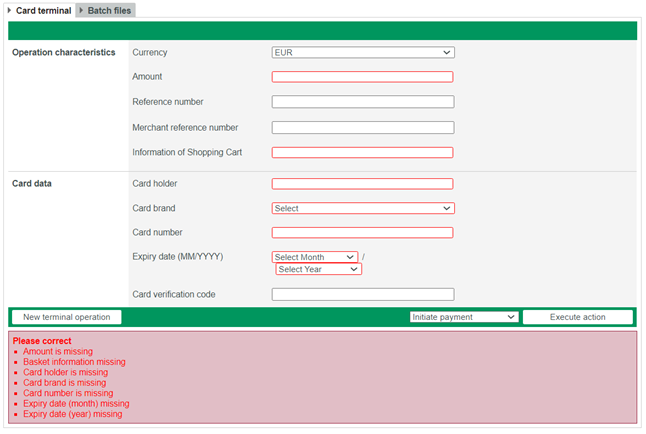
Creation of a transaction
The merchant can manually create a payment from his Back Office (Mail Order Telephone Order = MoTo), he must enter the characteristics of the transaction:
- Currency,
- Amount,
- Reference number (allows to identify the payment): 12 alphanumeric characters max
- Transaction number (identifies the transaction): 64 alphanumeric characters max.
- Shopping cart information (description of the order)
- Card data (first and last name of the owner of the card, the number, the brand and the expiry date, the cryptogram).
Payment creation is possible with cards only (CB, VISA, Mastercard)
To complete the action, the merchant clicks on “initiate payment”.
Please note that some sections are mandatory (sections in red below).
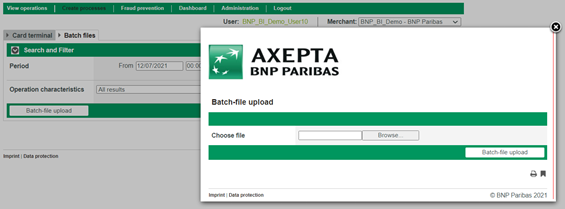
Batch Files
It is possible to manually transmit payment transactions in the form of files.
During the process it is necessary to:
- Enter the transaction data, such as card number, amount and currency, into a processing file in CSV format.
- Transmit the file (via the upload function) in the dedicated section of the Back Office.
- The Axepta BNP Paribas solution executes the payment and saves the transaction status in the return file (which will be transmitted to the merchant)
- After processing, the merchant can retrieve the file containing the details about the status of the transaction and download it.
The structure of the CSV file, which is to be transferred, is the same as for an automatic transfer via FTP (refer to the technical documentation).
In the Back Office, simply go to the “Create transactions” section and then “Batch files”.
Dashboard
The “dashboard” section allows the merchant to analyze their transactions and evaluate their performance in order to improve their conversion rate.
The dashboard is composed of 5 sections:
- Key figures
- Analysis of operations
- Transaction status
- Trend analysis
- Analysis by country
Key figures
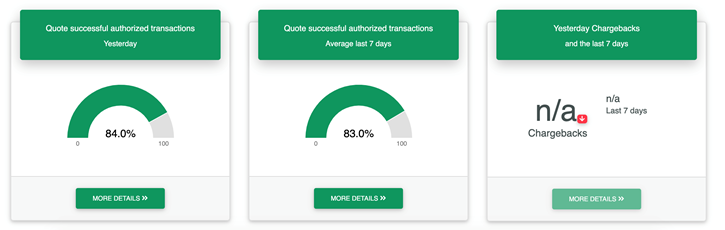
The graphs proposed in this section allow you to visualize the merchant’s performance index (Key Performance Indicator = KPI).
The merchant can instantly follow the evolution of the number of transactions and their revenue according to the different forms of payment he offers.
The previous day’s acceptance rate allows the merchant to view the success rate and the failure rate after each buyer redirect on the page of the chosen payment method. This rate is based on all return codes received by the different forms of payment. The acceptance rate is gross, that is to say if a buyer tries 2 times successively to make a payment and these fail but the 3rd attempt is a success, then the merchant’s acceptance rate will be 33% (a net acceptance rate would have given 100% success since it is the same buyer).
The merchant can also view the average acceptance rate over the last 7 days in this section as well as the number of non-payment (chargebacks) over the last 7 days.
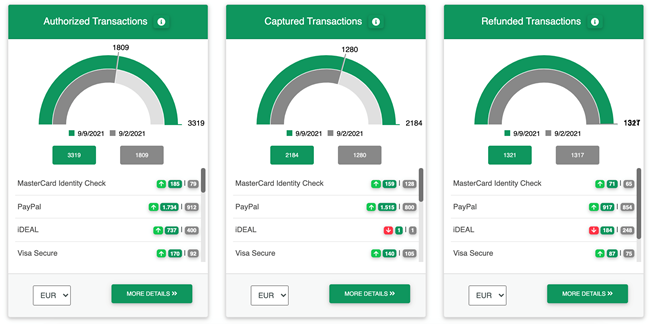
The 3 following graphs show the performance of the previous day with the distribution between the different operations (authorized, captured, reimbursed) according to the forms of payment.
In addition, this section draws a comparison between the operations of the previous day and those carried out on the same day of last week .This makes it possible to visualize the trend on the same day at a one-week interval (upward or downward trend) regarding the number of transactions per forms of payment.
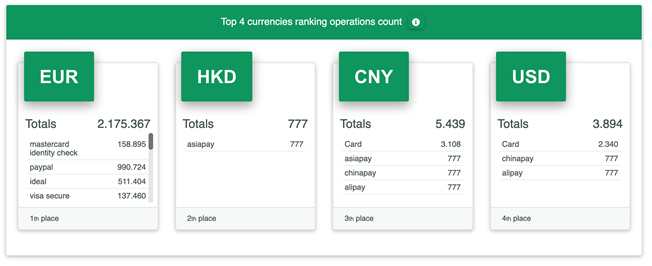
The merchant sees the ranking of the number of transactions by currency and payment method.
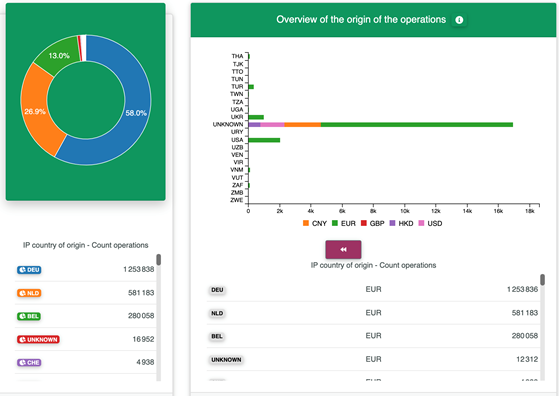
The merchant can also consult an overview of the geographical origin of his transaction in a dynamic map (it is possible to define the criteria of origin: IP address and country of issue of the card).

Analysis of operations
This section goes through the breakdown of the merchant’s operations by payment method for a given currency.
The merchant can also apply a filter or export the data to an Excel file.
Filters (also applicable for the next sections)
Filters are available to the merchant to refine his searches and obtain personalized results.
breakdown of the number of transactions
The breakdown of the amount of transactions by currency and method of payment is as follows:
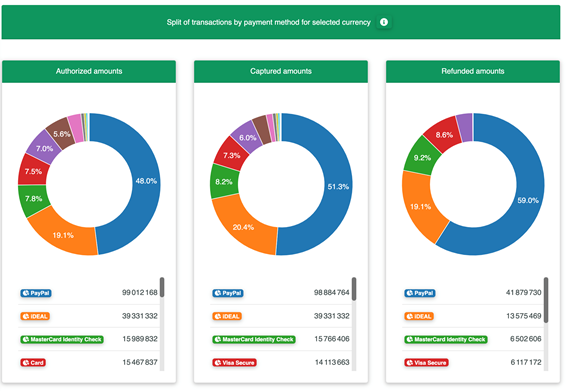
To consult more details about the transactions, the merchant can choose the columns of the data he wants to see and can export the obtained result.
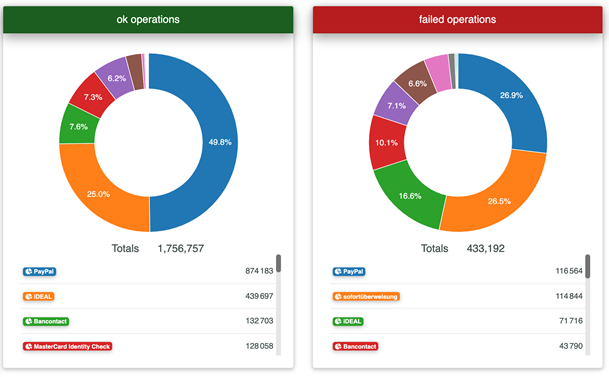
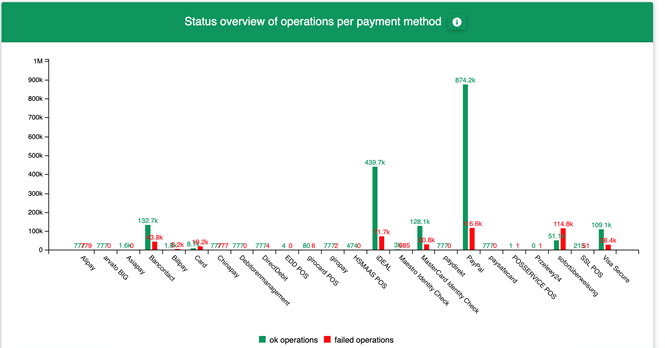
Transaction status
This section shows the number of transactions according to the statuses (success / fail) and according to the form of payment. The merchant can also analyze the rejections with the associated return codes (time out/ invalid value/ invalid card/ amount mistmatch/ etc) by transaction and by form of payment.
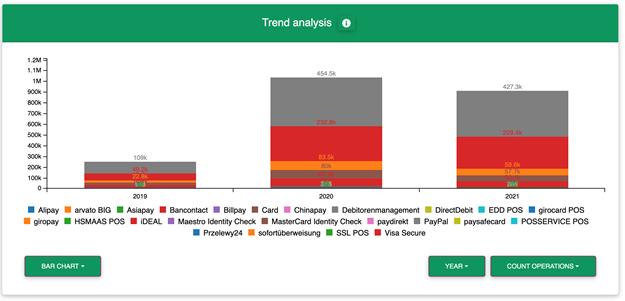
Trend analysis
This overview shows a trend over time about the revenue by form of payment or by currency on a given period. The merchant can use the filters placed on the left to refine this analysis.
Analysis by country
This section details the breakdown of the merchant’s transactions by country and currency.
The merchant can select a country and a currency in the filters under the diagrams.
Fraud prevention
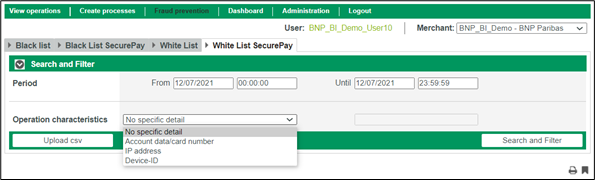
The merchant can go to the “Fraud prevention” section in the Back Office to manually manage the black lists and white lists. That is, the solution allows to block suspicious customers (in a black list) and to list trusted customers (white list).
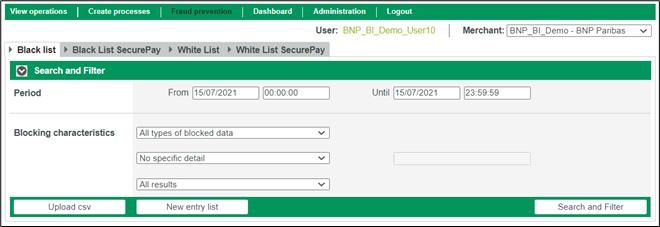
We distinguish lists whose data is manually supplied by the merchant and the lists automatically generated by the payment solution (called SecurePay in the Back Office) according to the criteria defined by the merchant (anti-fraud rules).
Reminder of the anti-fraud rules : (these rules are to be defined during the subscription phase):
- Control of the origin of the card used by the buyer
- Control of the origin of the buyer’s IP address
- Control of the number of card transactions on a defined period of time
- Control of the number of cards for the same IP address on a defined period of time
- Control of the amount of transactions per IP address on a defined period of time
- Control of the number of email address per user account on a defined period of time
- Control of the number of transactions per IP address on a defined period of time
- Consistency check IP origin – card origin
Blac klist/white list | Blac klist/white list SecurePay | |
Supplying the list | · Manual by the merchant. | · Automatic by the Axepta solution according to the criteria predefined by the merchant (anti-fraud rules) |
Action by the merchant | · Adding card number (token), IBAN, device ID… · Adding a CSV file · Removing an entry from the list · Consultation | · Consultation · Disabling/enabling a blocking |
Blacklists
To protect against payments with fraudulent cards, the merchant can add a new card (token), an IBAN or the device ID to the black list to prevent the holder from making a transaction.
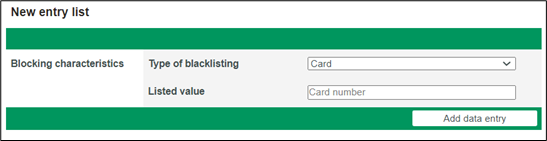
The merchant can also manually manage this list by changing the status of a blocking on a specific card.

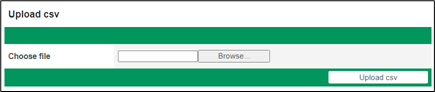
It is also possible for the merchant to add a CSV file (upload function) containing the card data, which is to be added to the black list.
Blacklist SecurePay
The SecurePay is a temporary black list generated by the payment solution according to criteria defined by the merchant such as specifying a maximum number of transactions per day with the same payment card or from the same IP address. When this maximum number is reached, the card number or IP address is automatically placed in the black list SecurePay.
The merchant can only view the full list and remove an entry if he wishes. Therefore, he will not be able to insert entries.

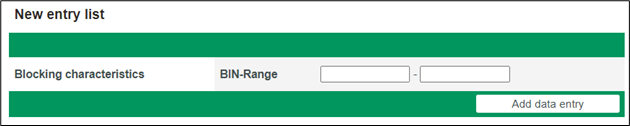
Whitelists
The merchant has the option to add BINs (bank Identification Number) manually in the list. The BIN makes it possible to recognize the customer’s card, their country of origin and their issuing bank. Thus, Fraud controls do not apply to transactions with cards on a white list.
Adding an entry is therefore done manually by entering only a range of BIN or by filling in a CSV file.
Whitelists SecurePay
The merchant can define criteria (anti-fraud rules) that allow customers not to be limited during their payments. Payment data related to these customers will be automatically added to the white list SecurePay.
User management
The user who will receive his access data to the Back Office in the first place (super-administrator) will be responsible for managing the profiles of his employees by assigning them different access rights and passwords.
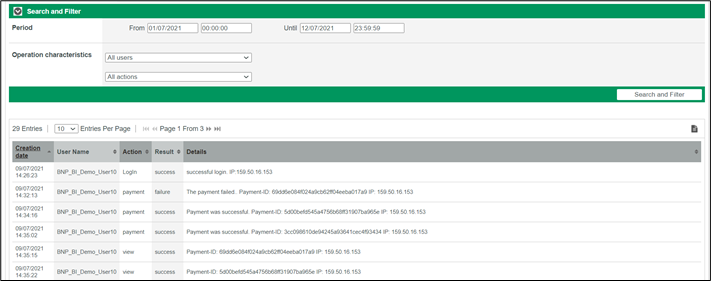
The main administrator can add as many users as they want, edit their information, view the full list of users, and enable/disable a user’s status.
It can also track user activities (in the form of logs).
Users can perform operations according to the rights assigned to them.
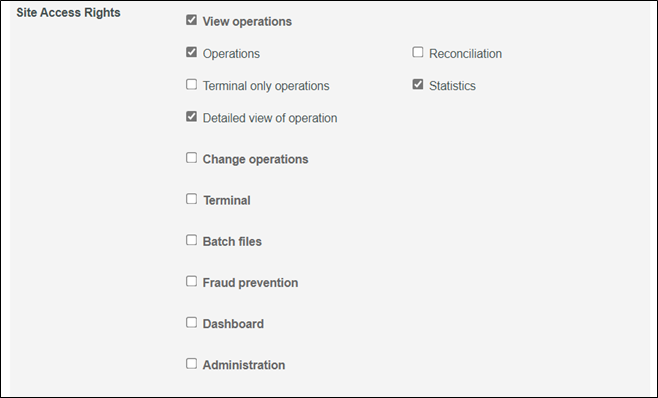
Access rights (divided into groups):
- Visualization: Right to view certain sections
- Modification: Right to execute operations (captures, cancellations, refunds)
- Creating: Manually create a transaction
- File transfer: Right to transfer BATCH files to the payment solution or receive reconciliation files
- Fraud prevention: Right to manage white lists and black lists (add/remove entries)
- Administration: This section needs to be reserved for a single user who will be responsible for managing users’ access rights and tracing their activities.
Create a new user:
The creation of a new user is done at the level of each MID. For the user to to have access to all the merchant’s MIDs, it is necessary to carry out the creation at the mastermind level. If the user is to have access only to a MID of a particular entity, one must log into the MID of the entity in question and follow the steps below for the creation of a user.
To add a user, simply go to the “Administration” tab of the main menu and click on “setup new user profile”.
An interface will appear and will allow you to fill in the information related to this user:
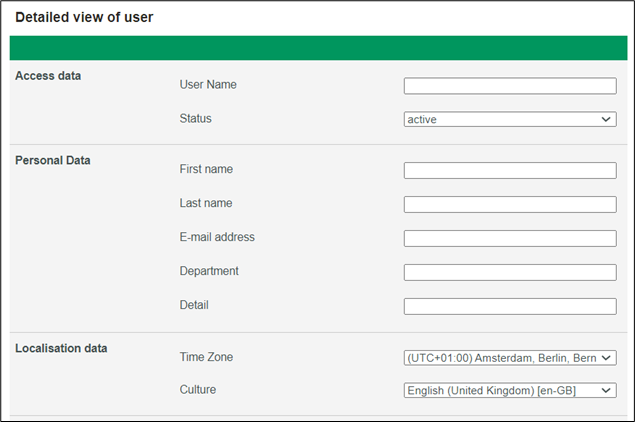
Information such as username, last name, first name, e-mail address is mandatory.
Then it will be necessary to fill in the rights that will be assigned to this user:
And finally, it will be necessary to assign a password to the user. You will have to communicate this password to the person concerned yourself.
A password must contain a capital letter, a special character, a number, and at least 6 characters in total.
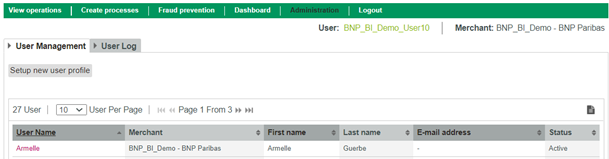
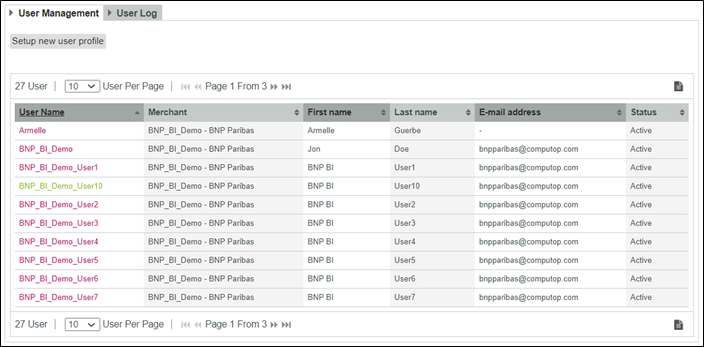
Consult the list of users:
Simply go to the “user management” tab to view the complete list of users. By clicking on a user’s username, you will find details about that user and their access rights. You can also download this information as a CSV document.
Consult the Activity log
For safety measures, Visa and MasterCard ask to track the activity of each user who accesses sensitive data. The archived information concerns all the details of each user’s activity in the Back Office.
Key management
This section explains how to view, renew and revoke the keys used for the technical integration with Axepta Online from the Merchant Portal.
Key management allows the merchant or technical integrator to secure exchanges between their system and the Axepta Online platform, especially for REST API calls, server-to-server notifications and, depending on the integration mode, exchanges using HMAC keys or the encryption password.
Regular key renewal is recommended for security reasons. A controlled key rotation allows old keys to be replaced without service interruption.
Overview of Key management

Available access data
The Access data section contains the technical elements required for the integration.
Depending on the account configuration, the following items may be displayed :
Item | Description | Main usage |
Encryption password | Password used in some legacy or specific integration modes | Encryption or securing of specific exchanges |
Primary HMAC key | Main active HMAC key | Message signing or verification |
Primary REST API key | Main key used for REST API calls | REST API calls in test or production |
Secondary HMAC key | Secondary HMAC key | Key rotation or double run |
Secondary REST API key | Secondary key used for REST API calls | Key rotation or double run |
Key values are hidden by default. A display icon allows the key to be temporarily shown if your user profile is authorized. A copy icon is also available to copy the value to the clipboard.
- Display icon
 : temporarily reveals the hidden value of the key.
- Copy icon
 : copies the key to the clipboard for immediate use.
- Action button
 : action menu on the keys.
Available actions
Each key line includes an action menu available from the icon on the right side of the relevant field.
Available actions may include :
Action | Description | Effect |
Create | Generates a key when the field is empty | The new key can be used immediately |
Renew | Generates a new value for an existing key | The previous value is replaced |
Revoke | Disables and deletes the key | The key can no longer be used |
Warning
Key revocation is immediate. Once revoked, the key must no longer be considered usable by your system.
Renewing a primary REST API key
Use this procedure when you need to replace the primary REST API key.
Steps
- Log in to the Axepta Online Merchant Portal.
- Open the Key Management section.
- Make sure the correct Merchant is selected.
- In the Access data section, identify the Primary REST API key line.
- Click the action menu on the right side of the key.
- Select Renew primary REST API key.
- Confirm the action when a confirmation message is displayed.
- Display or copy the new key.
- Update your configuration.
- Test REST API calls with the new key.
- Check that the expected transactions or technical operations work correctly.
Zero-downtime rotation with secondary keys
For REST API integrations, Axepta Online may allow two sets of keys to be used in parallel : a primary key and a secondary key.
This feature is especially useful for rotating keys without service interruption.
Principle
The primary key remains used by the existing system while the secondary key is created or renewed.
The integrator then updates the application to use the new secondary key.
Once the new key has been validated, the old key can be revoked or renewed according to the defined strategy.
Recommended procedure
- Check which key is currently used by your system.
- Create or renew the secondary key.
- Configure your system to use this new key.
- Deploy the configuration.
- Perform technical tests:
- simple REST API call;
- transaction creation or retrieval;
- notification or webhook validation, if applicable;
- application log review.
- Monitor transactions.
- Once the new key is confirmed as operational, revoke the old key that is no longer required.
This approach reduces the risk of interruption because the old key remains available during the switch-over phase.
Revoking a REST API key
Revocation disables an existing key. It should only be used when you are sure the key is no longer used, or when compromise is suspected.
Steps
- Log in to the Axepta Online Merchant Portal.
- Open Key Management.
- Select the correct Merchant.
- Identify the key to revoke.
- Click the key action menu.
- Select Revoke.
- Confirm the operation.
- Check the activity history to confirm that the action was recorded.
- Make sure your system no longer use this key.
Important: a revoked key must no longer be used in your system. If the system continues to use a revoked key, the related API calls may fail.
Renewing an HMAC key
The HMAC key is used to sign or verify certain technical exchanges, especially when the integration relies on signature mechanisms.
Steps
- Open the Key Management section.
- Identify the Primary HMAC key or Secondary HMAC key.
- Open the action menu.
- Select the renewal action.
- Update your application configuration.
- Check that signatures generated or verified by your system remain valid.
- Review application logs and any authentication errors.
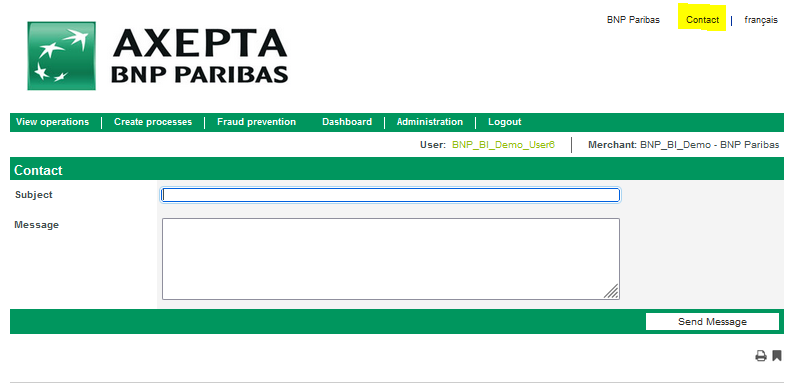
Contact the technical Support
If you have a problem related to a specific transaction (transaction failed for some reason.), You can click on the contact icon in the popup of a transaction detail, at the bottom right, then you will be redirected directly to your email tool by including the transaction number in the subject line. The transaction number is an essential data for the Technical Support to perform an analysis on the failure of a transaction.

