
Summary
| Table of Contents |
|---|
Introduction
Welcome to the documentation for the AXEPTA BNP Paribas module for Magento 2.
This free module allows you to easily integrate our online payment solution into your e-commerce store.
This documentation guides you step by step through the installation, configuration, and use of the module to ensure a simple, reliable, and tailored integration to your needs.
This module is freely available at the following address: https://github.com/AxeptaBNPParibas
Our goal is to support you so that the implementation of our AXEPTA BNP Paribas solution is quick, intuitive, and fully functional in your Magento 2 environment.
Plugin Setup
The installation of the module proceeds as follows:
Download the module zip file and then unzip it
Go to the root directory of your site
Create the following folders:
app/code/Bnpparibas
app/code/AxeptaBnpparibas/Online
Copy all the contents of the unzipped module into the directory “app/code/Bnpparibas/Axepta”
Return to the root of your site and run the following commands:
php bin/magento setup:upgrade
php bin/magento cache:clean
php bin/magento cache:flush
Update Plugin
UpdateUninstall the Axepta Online module completely
Before installing the new version of your module, we invite you to properly uninstall your current Axepta Online module, clear your CMS cache, and verify the removal of the Axepta Online payment module, ensuring that the module installation directory is deleted from your FTP server.
Install the latest update that you have downloaded
| Info |
|---|
Quote Notice: The library is automatically updated with the Magento 2 update. |
Back Office
Please remember to re-enter the Axepta Online configuration settings in each tab of the module. You will need to re-enter your MID and activation key to put your module back into production.
Plugin Global
Module ConfigurationSettings
The different features of the tool are available in the left-hand menu of the page. To start configuring the module, you need to click on "AXEPTA". The configuration page displays several buttons at the top.
Axepta BNP Paribas Documentation: When clicked, the user is redirected to the official documentation hosted by BNP Paribas.
Contact Support: Opens a form to send an email to support. The server, CMS, and module versions are automatically included in the email.
Test Configuration: Allows you to display and verify in a window that the server configuration is compatible with the installed module.

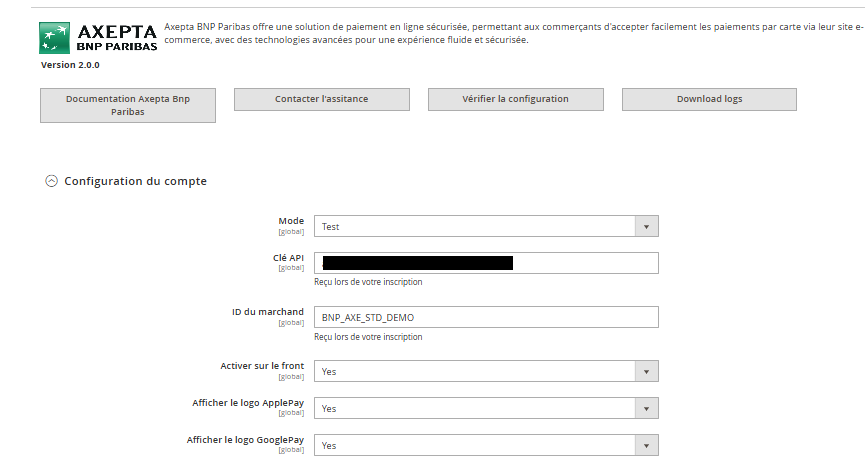
Account Settings
To activate online payments, you need to configure both the production mode and the test mode
is required to activate online payments. The demonstration.
- Démonstration mode ("DEMO") allows you to test the module without configuring a MID.
- Production mode, it is necessary to provide the MID and private key.
- Test mode, it is necessary to provide only the private key. The production MID is used with the addition of a parameter (_t).
Select the mode you wish to configure to see the appropriate fields appear.
To use the module, it is necessary to fill in the following parameters in the form:
Production mode:
- MID (provided by BNP Paribas)
- Private key (provided by BNP Paribas)
Test mode:
- The production MID is used by default with the addition of a string.
- Private key (provided by BNP Paribas)
Demo mode
- This mode allows the display of a banner on the site to inform.
- A specific MID is pre-configured.
Front-end activation
Required to display the module on the checkout page regardless of the mode activated.
Display the ApplePay logo:
ApplePay is currently embedded in the payment page. This option only displays the logo with the payment methods.
Les éléments ne sont sauvegardé que lorsque l’utilisateur clique sur le bouton de sauvegarde
Configuration des moyens de paiement
Vous pouvez maintenant choisir les différents moyens de paiement à activer sur votre boutique.
Un onglet “Configuration des moyens de paiement” apparait sur la gauche de l’écran au dessous de "Configuration du compte" :
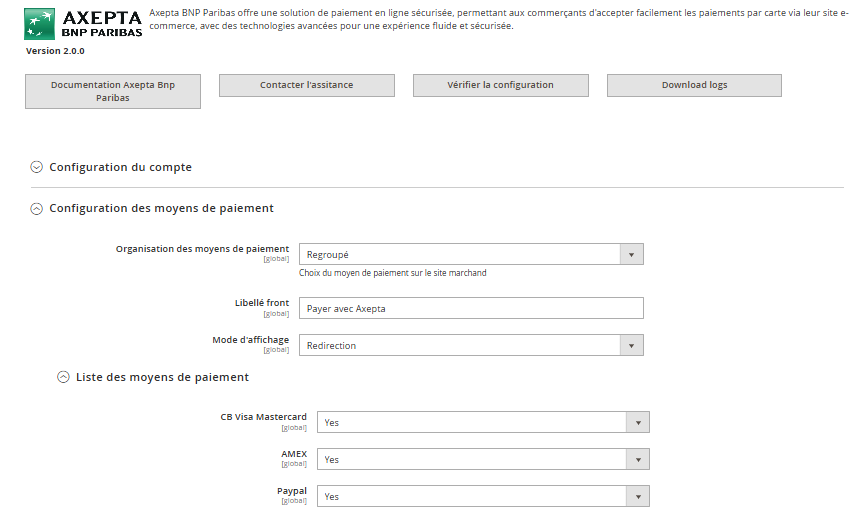
Tous les moyens de paiement intégrés à la librairie sont présentés ici. Il appartient au marchand de sélectionner les moyens de paiement qui l’a souscrit.
La clé d’activation ne permet plus de définir les moyens de paiement.
- Organisation des paiements. Il s’agit de l’affichage des paiements qui a été décidé sur le checkout
- Regroupé : Les bloc de paiement apparaissent. Il est possible de paramétrer les paiement en redirection et en iframe
- HPP : Seule la redirection est possible avec tous les moyen de paiement regroupé en un seul bouton. Affichage d’un bloc complet par de différenciation entre les cartes et les autre méthodes de paiement.
- Méthode d’affichage
- Redirection : lors de la phase de paiement, l’utilisateur est renvoyé vers une page en fonction du moyen de paiement sélectionné
- Iframe: lors de la phase de paiement, le formulaire est affiché en bas de la page de checkout en fonction du moyen de paiement sélectionné
- Label : Texte à afficher sur le bloc
- Liste des moyens de paiement.
Sélectionner les moyens de paiement à afficher en checkout.
Si CB- Visa-MasterCard est activé, le logo CB apparaîtra seulement si le pays de livraison de la commande est la France
Méthode de capture
Cette option vous permet de choisir la méthode de capture du paiement :
- Automatique (J) => La capture se fera automatiquement à minuit.
- Différée (J+x) => Vous pouvez choisir le délai avant la capture (délai en heures : nombre entier compris en 1 et 696. Exemple pour 2 jours: saisissez 48)
- Capture Manuelle => La capture manuelle est effectuée manuellement par le marchand grâce à une configuration au niveau du back-office.

Activation de la capture Automatique :
Lors de la sélection capture automatique, les flux de paiement sont automatiquement

Aucune action n’est nécessaire par le marchand pour réalisée la capture. Elle est confirmée par un flux retour (IPN).
Activation de la capture Manuelle :
Dans le menu de configuration du marchand, descendre jusqu’au champ « Capture » et sélectionner « Manual Capture ».

| Warning |
|---|
Attention : Sans action du commerçant, la transaction ne sera pas remise en banque. La capture d’une transaction au-delà du 7ème jour entraîne la perte de garantie associée au 3DSecure. Au-delà du 29ème jour l’autorisation accordée par l’émetteur ne sera plus valide. Il est donc préférable de capturer les opérations avant ces échéances. |
Theese elements are only saved when the user clicks on the save button.
Payment Method Configuration
You can now choose the different payment methods to activate on your store.
A tab labeled « Payment Methods Configuration » appears just below « Account Configuration ». Click on it to open the section and configure your payment methods:
All payment methods integrated into the library are presented here. The merchant must select the payment methods they have subscribed to.
The activation key no longer defines the payment methods.
Payment Organization. This refers to the display of payments decided on the checkout.
Grouped : The payment blocks appear. It is possible to configure payments in redirection and iframe.
- HPP (Hosted Payment Page) : Only redirection is possible with all payment methods grouped into a single button. A complete block is displayed, with no differentiation between cards and other payment methods.
Display Method
Redirection : During the payment phase, the user is redirected to a page based on the selected payment method.
Iframe : During the payment phase, the form is displayed at the bottom of the checkout page based on the selected payment method.
Label: Text to display on the block
List of Payment Methods: Select the payment methods to display during the checkout.
| Info |
|---|
Notice: If CB-Visa-MasterCard is enabled, the CB logo will only appear if the order's delivery country is France. |
Capture Method
This option allows you to choose the payment capture method:
Automatic (J) => The capture will be automatically processed at midnight.
Deferred (J+x) => You can choose the delay before the capture (delay in hours: integer between 1 and 696. Example for 2 days: enter 48)
Manual Capture => Manual capture is performed manually by the merchant through a configuration in the back-office.
Activation of Automatic Capture:
When automatic capture is selected, the payment flows are automatically configured for capture to be performed at midnight.
No action is required by the merchant to perform the capture. It is confirmed by a return flow (IPN).
Activation of Manual Capture:
In the merchant configuration menu, scroll down to the "Capture" field and select "Manual Capture."
| Warning |
|---|
Warning : Without action from the merchant, the transaction will not be settled. Capturing a transaction beyond the 7th day results in the loss of the 3D Secure guarantee. Beyond the 29th day, the authorization granted by the issuer will no longer be valid. It is therefore preferable to capture transactions before these deadlines. |
Manually Capture the Transaction :
To manually capture a payment, you need to invoice the order. Go to the page of an order to be invoiced, then click on "Invoice."

Next, select "Capture online" to manually capture the order upon invoice issuance.

Capture online: The online capture performed from the Magento 2 back-office will connect to the Axepta back-office. The transaction status is automatically synchronized between the two back-offices.
Capture offline: The offline capture will simply generate the invoice and mark the order as being processed, indicating that the amount has been received manually.
Partial Capture: It is possible to capture only part of the order if it contains multiple items by modifying the quantities in the column. In this case, shipping fees will always be captured on the first invoice. For subsequent payments on the same order, shipping fees will not be included.
Alert Messages: If you attempt to invoice an order whose payment has already been captured, an alert message "The order has already been captured" will appear at the top of the page as follows:

Notifications have also been added when the capture has already been performed, as well as when a payment has not been captured for more than 7 days. The update occurs once a day.

These notifications are visible by clicking on the icon in the top right corner of the screen:
Payment Method Customization
Allows the configuration of the fields sent in the payment form during redirection.
Dashboard
Two columns have been added to the order table: one to indicate the type of capture used for the order (automatic, manual, or deferred), and another to indicate whether the payment has been captured from the Magento back-office. A capture performed on the Axepta back-office does not update this order table, but an alert is provided if an attempt is made on an already captured transaction (see alert notifications).

Deferred captures are indicated as "Capture: timed" followed by the date and time when the capture was performed.
Refund / Cancellation
To perform a refund or cancellation (where possible), go to the Sales > Orders tab to view the details of an order.
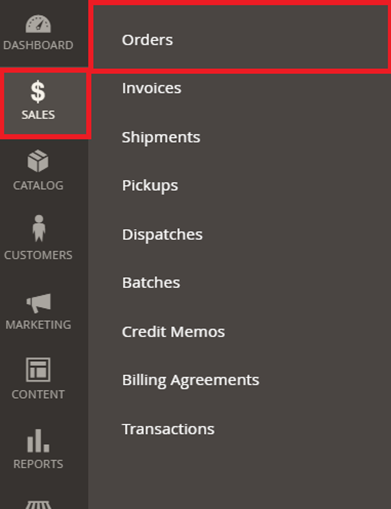
1) Select an order from the list, then click "View" to see the order details.

2) Go to "Invoices" and then select the invoice that was automatically created for the order.

3) Select "Credit Memo." You will then have all the information regarding the order, and at the bottom of the page, the fields to fill out in case of a refund

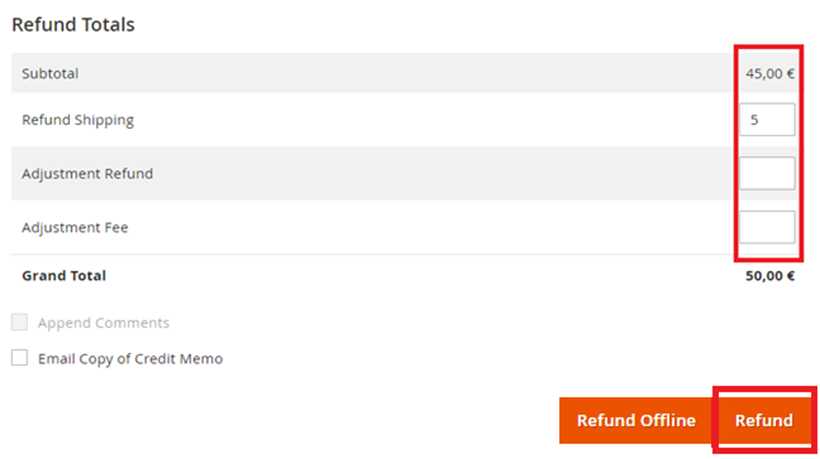
Full Refund
For a full refund, the amount (subtotal) is displayed, and you just need to leave the predefined values blank and validate (Refund Offline).
Partial Refund
For a partial refund, you need to adjust the field values. The "Adjustment Fee" field allows you to modify the amount to be deducted from the refund.
For example: Subtotal = 45, Adjustment Fee = 15, by clicking on “Update Totals” you get 30 as a refund for the buyer.
Cancellation
If the transaction has not yet been settled (status "processing" when clicking on the orderID), a cancellation is therefore possible.
To check if the transaction has been canceled or fully refunded, go to "Axepta" > "Transaction" to view the list of transactions:
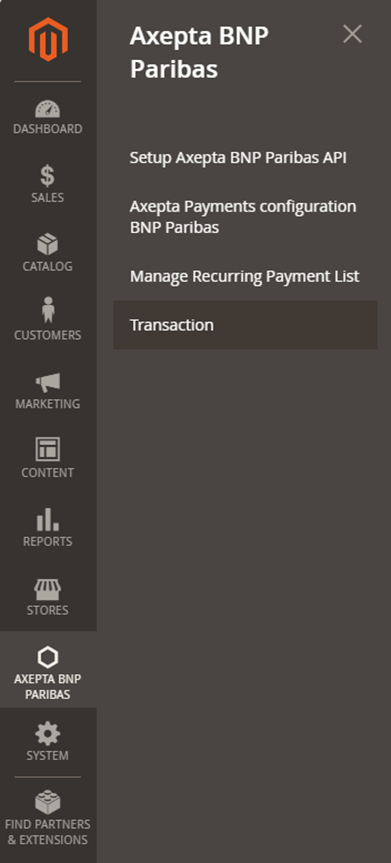
In the "Type" column, it will be indicated as "Cancellation" for a cancellation or "refund" for a refund.

Logs
Logs are always enabled. You can download them using the button at the top of the configuration screen.
Front Office
Checkout Page Display
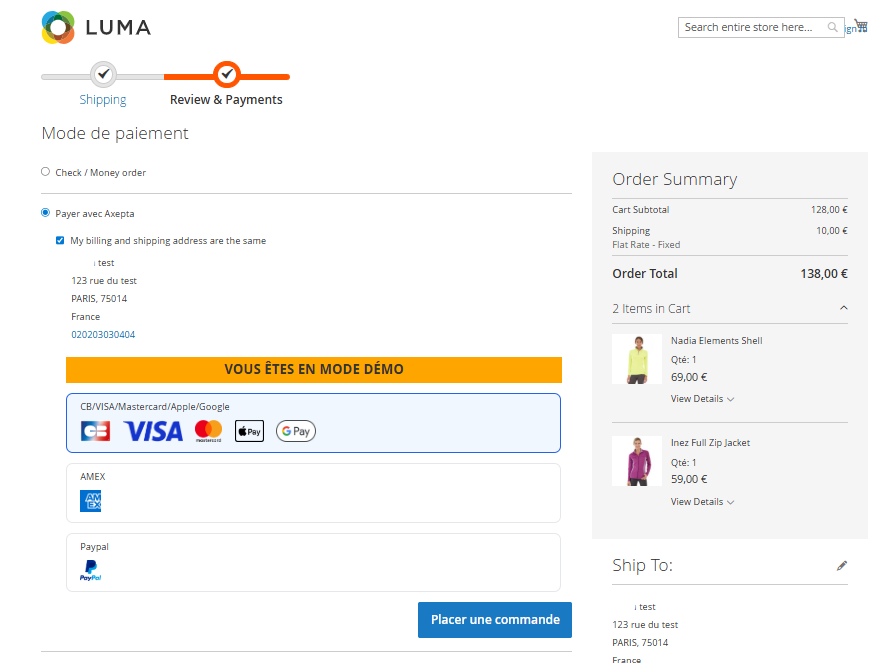
Payment methods are displayed in a designated frame per block.
Additional payment methods are accessible by selecting "More payment options," which only appears if applicable.
Checkout Page Display in Redirection Mode

Confirmation Page display

| Info |
|---|
Notice : In demo mode, an orange banner appears with the label "DEMO". |
Customer Account
Orders display an Axepta block in the customer account
Personnalisation des moyens de paiement
Permet le paramétrage des champs envoyés dans le formulaire de paiement lors de la redirection.
Tableau des commandes
Deux colonnes ont été ajoutées dans le tableau de commandes : une pour savoir quel type de capture a été employé pour la commande (automatique, manuelle ou différée), et une autre pour savoir si le paiement a été capturé depuis le back-office de Magento. Une capture réalisée sur le back-office Axepta n’entraîne pas l’actualisation de ce tableau de commande mais une alerte est proposée en cas de tentative sur une transaction déjà capturée (voir notification des alertes).
Les captures différées sont indiquées « Capture : timed » suivi de la date et heure à laquelle la capture a été effectuée
Capture manuelle
Capturer Manuellement la transaction
Pour capturer manuellement un paiement, il faut facturer la commande. Aller sur la page d’une commande à facturer, puis cliquer sur « Invoice ».
Sélectionner ensuite « Capture online » pour capturer manuellement la commande à l’émission de la facture.
Capture online : La capture online effectuée depuis le back-office Magento 2 se connectera au back-office axepta. Le statut de la transaction est synchronisé automatiquement entre les deux back-office.
Capture offline : La capture Offline va simplement générer la facture et marquer la commande en cours de traitement, ce qui signifie que le montant a été reçu manuellement.
Capture Partielle :
Il est possible de capturer une partie seulement de la commande si cette dernière comporte plusieurs articles en modifiant les quantités dans la colonne. Dans ce cas, les frais de livraison seront toujours capturés à la première facture. Pour les prochaines captures de paiement de cette même commande, les frais de livraisons ne seront pas comptabilisés.
Messages d'alertes :
Si l’on tente de facturer une commande dont le paiement a déjà été capturé, un message d’alerte « La commande a déjà été capturée » s’affichera en haut de la page comme ceci :
Des notifications ont également été ajoutées quand la capture a déjà été effectuée, ainsi que lorsqu’un paiement n’a pas été capturé depuis plus de 7 jours. L’actualisation se fait une fois par jour.
Ces notifications sont visibles en cliquant sur l’icône en haut à droite de l’écran :
Logs
Les logs sont constamment activés. Il est possible de les télécharger par le bouton en haut de l’écran de paramétrage
Remboursement / Annulation
Pour effectuer un remboursement ou une annulation (dans la mesure du possible), il faut se diriger vers l'onglet Ventes > Commandes pour visualiser les détails d'une commande.
1) Sélectionnez une commande parmi la liste puis cliquez sur “voir” pour visualiser les détails d’une commande
2) Allez dans “Invoices” puis sélectionner la facture qui a été créée automatiquement pour la commande.
3) Sélectionner « Crédit Memo ». Vous aurez alors toutes les informations concernant la commande et tout en bas de la page les champs à remplir en cas de remboursement.
Remboursement total
Pour un remboursement total, le montant (subtotal) est affiché et il suffit de laisser les valeurs prédéfinies vides et de valider (Refund Offline).
Remboursement partiel
Pour un remboursement partiel, il faut ajuster les valeurs des champs. Le champ "Ajustement Fee" permet de modifier la somme à retirer du remboursement.
Par exemple : Subtotal = 45, Ajustement Fee = 15, en cliquant sur “Update Totals” on obtient 30 comme remboursement pour l’acheteur.
Annulation
Si la transaction n'a pas encore été remise en banque (status "processing" en cliquant sur l'orderID), une annulation est donc possible.
Pour savoir si la transaction a été annulée ou remboursée totalement, il faut se rendre dans "Axepta" >"Transaction" pour voir la liste des transactions :
Dans la colonne "Type", il sera indiqué « Cancellation » pour une annulation ou « refund » pour un remboursement.
Front Office
Rendu sur la page de checkout
Les moyens de paiement sont affichés sur un cadre prévu par bloc.
Les moyens de paiement supplémentaires sont accessibles en sélectionnant "Plus d'options de paiement", qui n’apparaît que le cas échéant.
Rendu de la page de paiement en redirection
Rendu de la page de Confirmation de Paiement
Espace client
Les commandes affichent un bloc Axepta sur l’espace client.