
...
Display FLOA in the Checkout
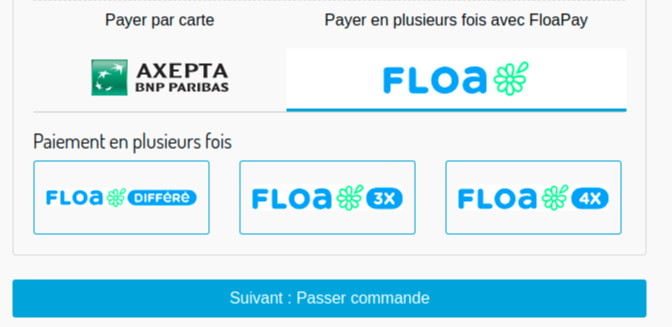
Place an order with FLOA 3x
1. Click on the FLOA 3x logo and then click the next button. You will be redirected to the Place-Order page.
...
5. Click the Pay for an order button. You will be redirected to the SalesForce confirmation page.
PAYPAL
...
General Information
PayPal is one of the world’s leading eWallets for e- and m-Commerce. Around 179 million active members in over 200 countries pay for their online orders with PayPal. Customers can pay via direct debit, giropay or card (American Express, Diners Club, Discover, MasterCard, Visa). Along with the above payment methods, PayPal PLUS offers purchase on account and purchase by instalment.
Members log into their PayPal account with their email address and a password during checkout and choose the preferred payment method (direct debit, PayPal credit, card and, if applicable purchase on account or by instalment). The amount payable is then immediately credited to their own PayPal account. The usual direct debit periods for transfers or the delay resulting from distribution to collecting services do not apply. This allows real-time payments processing on the Internet.
Account Configuration
Go to Merchant tools > AXEPTA BNP PARIBAS Module > Accounts Configuration > EUR and activate Paypal payment method.
Payment method
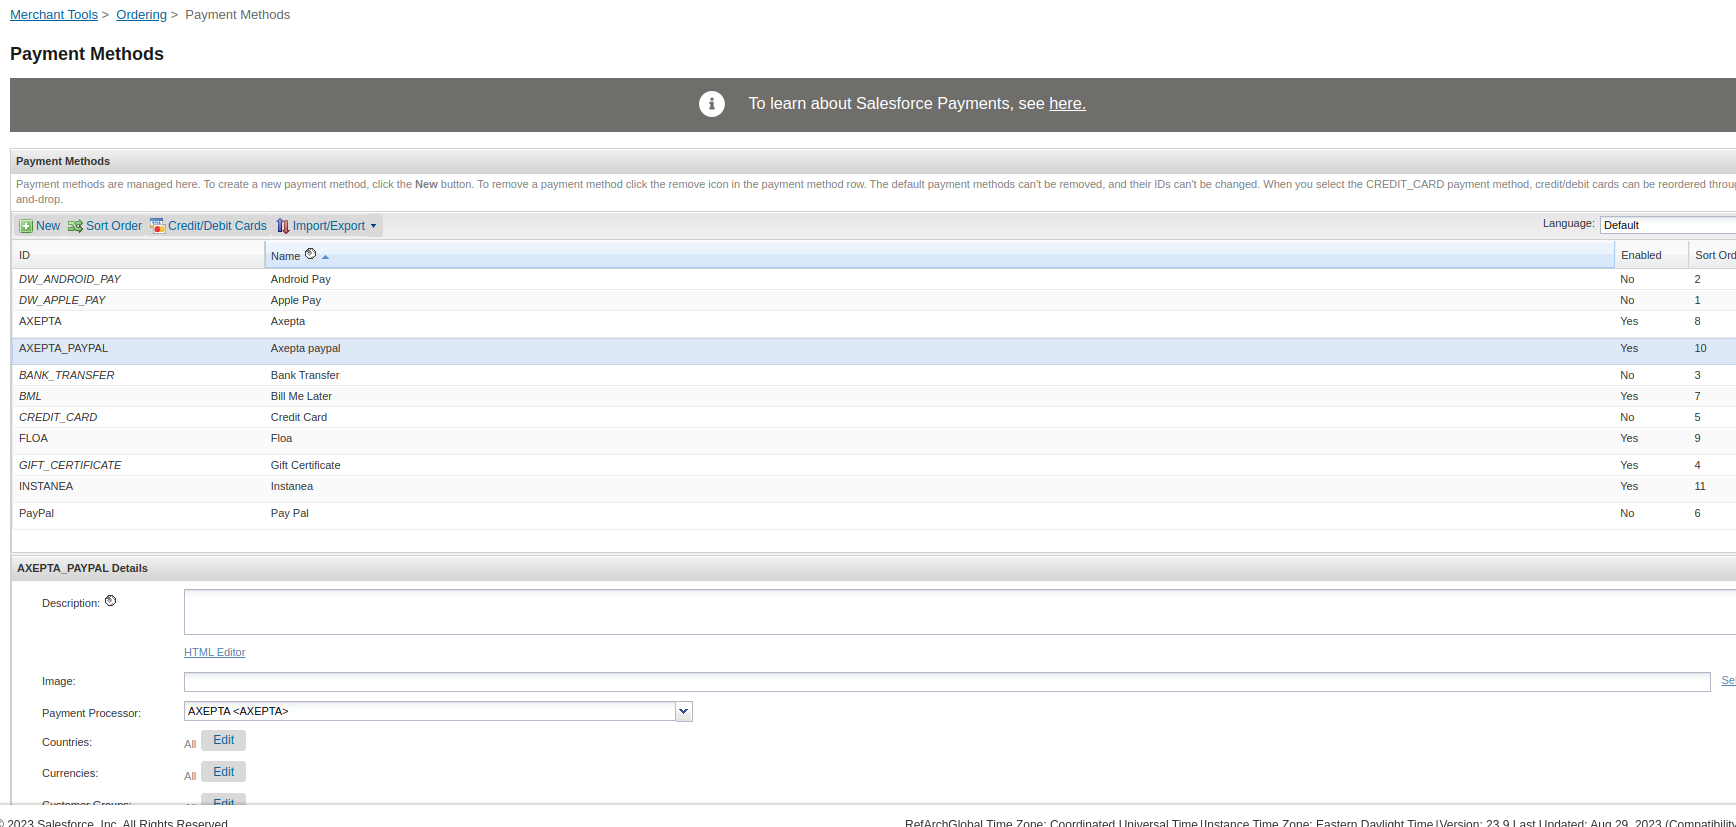
Go to Merchant tools > Ordering > Payment Methods and add the AXEPTA_PAYPAL payment method. You can also import the payment-methods.xml file.
Custom Preferences
Import the system-objecttype-extensions.xml file. 1 new preference group should appear in Merchant tools > Site preferences : Axepta Paypal axpPaypalUrl : URL to initiate a PayPal payment in the Payment platform (default : https://paymentpage.axepta.bnpparibas/paypal.aspx)
Storefront Functionality
Display PayPal in the Checkout
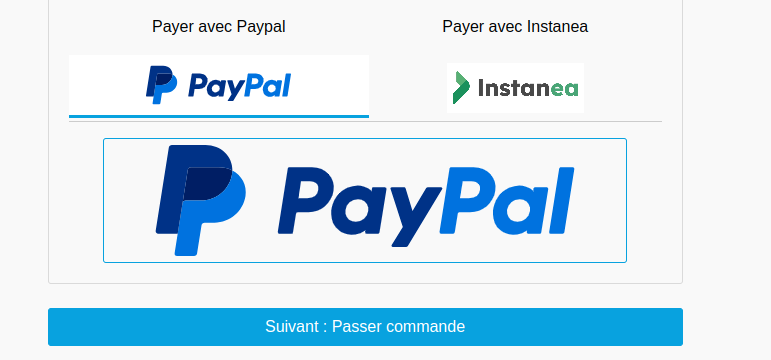
Place an order with Paypal
1. Click on the Paypal logo and then click to the next button. You will be redirect to the Place-Order page.
...
Cartridge Installation-SFRA
Installation
Under SFRA, 3 of the cartridges will be used :
...
- bm_axepta:int_axepta_core: for the Business Manager
Installation of dependencies
Run the npm install command in order to install all the modules required for the operation of the cartridge.
Code compilation (JS / SCSS)
In order to generate the appropriate Javascript for the different stages of the checkout, run the npm run compile:js
command. The compiled code will be found in the int_axepta_sfra/cartridge/static/ folder.
Import of metadata
The necessary configuration data can be found in the metadata folder. Before importing, replace the name of the RefArch folder in the metadata> sites folder with the ID of your site.
You can now compress the “metadata” folder and import it into Administration> Site development> Site Import & Export. This import will add the configuration elements, as well as the various jobs, services and extensions of
system-object.
Business Manager module
The permissions for the BM module must be set for every role you want to give access. This is done in Administration > Roles & Permissions > [your role] > Business Manager Module : select the Axepta module
Cartridge Installation-Site Genesis
Installation
Under SiteGenesis, 3 of the cartridges will be used :
...
- bm_axepta:int_axepta_core : for the Business Manager
Installation
We consider that you have a Sitegenesis cloned in the same root folder as Axepta cartridge. Before installing anything on sitegenesis folder, you can change Gruntfile.js in sitegenesis folder first:
...
This will copy client JS and run grunt build. Please check the file package.json for more info.
Import of metadata
The necessary configuration data can be found in the metadata/ folder . Before importing, replace the name of the SiteGenesis folder in the metadata> sites folder with the ID of your site. You can now compress the metadata/ folder, and import it into Administration> Site development> Site Import & Export .
...
- SFCC API version up to 22.10
Unit tests
A set of unit tests is available for the different helpers used. They are written with the chai plugin. In order to run the tests, you have to run the npm run test command : npm run test:integration --baseUrl {{yourDomainUrl}}
...
The result must be 15 passing
Integration tests
In addition to unit tests, a set of integration tests are also present on the SFRA and SiteGenesis cartridge. These are based on the codeceptjs plugin with its TestCafe driver
Configuration
To be able to run the different tests, it is necessary to configure a sandbox on which to run the tests.
To do this, open the int_axepta_sfra / test / integration / config.js file :
In this file, modify the following lines:
Storefront: {
url: '<https://YOURSANDBOX/s/RefArch/home?lang=fr_FR',>
baseUrl: '<https://YOURSANDBOX',> // BASE URL
login: '/on/demandware.store/Sites-RefArch-Site/fr_FR/Checkout-Login' // Checkout
login page,
},
Customer: {
email: '', // YOUR TEST CUSTOMER EMAIL
password: '' // YOUR TEST CUSTOMER PASSWORD
}
With SiteGenesis, open int_axepta_sitegenesis / test / integration / config.js file :
Storefront: {
baseUrl: 'YOUR-SANDBOX-URL/on/demandware.store/Sites-SiteGenesis-Site/'
},
Customer: {
email: 'TEST-EMAIL',
password: 'PASSWORD'
},
Launch of tests
Then, 2 commands are available, each for a different integration mode.
...
The tests for this mode are available in the file int_axepta_sfra/test/integration/tests/Checkout_Iframe_test.js or int_axepta_sitegenesis/test/integration/tests/Checkout_Iframe_test.js
Operations, Maintenance
Data Storage
Custom Objects
This cartridge adds one custom object axpAccountsConfiguration, needed to store informations about accounts. It contains information defined in Merchant Tools> Axepta Module> Accounts Configuration.
Orders
Axepta will store communication results in order notes like :
...
- axpTransID : The Transaction ID from Axepta
Services
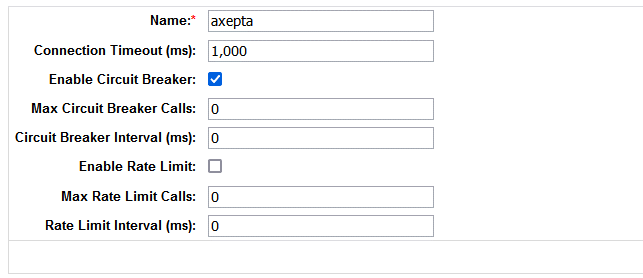
The Axepta integration uses the below services
...
All services are using the below Profile configuration. It can be easily changed for different merchants. A different/ a separate Profile can be added for each service
Availability
Every error related to Axepta is reported to the Axepta API endpoint. The request payload contains error description, order ID and stack trace payload in JSON format. The order will be failed and will contain an ‘Error’ within the Order Notes (BM – Order Management). Also, in the error logs, this situation will be added, with specific details. The end user will receive a generic technical error with the message: “We're sorry that your order could not be placed. This probably happened due to a high order volume or temporary connection errors. Please wait a few minutes and resubmit your order. We won't process your payment until you successfully place your order. If you have further questions, please contact us .”
Failover
In case of unavailability of Axepta service, the content of the iframe or the redirection is broken.
...
The customer must close the popin or click on the back button on the browser to switch back to e-commerce website and chose another payment method.
Support
In the event of problems with the integration, missing features, etc. please contact the Axepta Team at https://axepta.bnpparibas/contact-us/ or your Axepta account manager.
User Guide
Roles, Responsibilities
The store administrator is responsible for checking the configuration of the Axepta Merchant Account in the Axepta Extranet. Admins should regularly check all the payments received to ensure they contain the expected data (currency, amount, customer information, etc.).
Business Manager
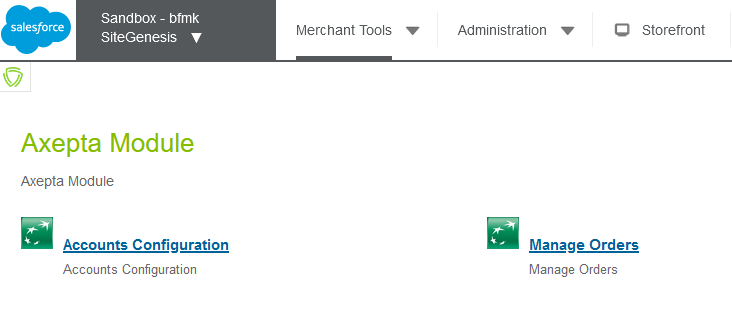
Axepta Module
Axepta Integration Module has been created. It used to configure the payment methods and payment options, as well as reviewing the order details and performing manual operations on each transaction.
Configuration
- Go to Administration > Organization > Roles > Administrator > Business manager Module
...
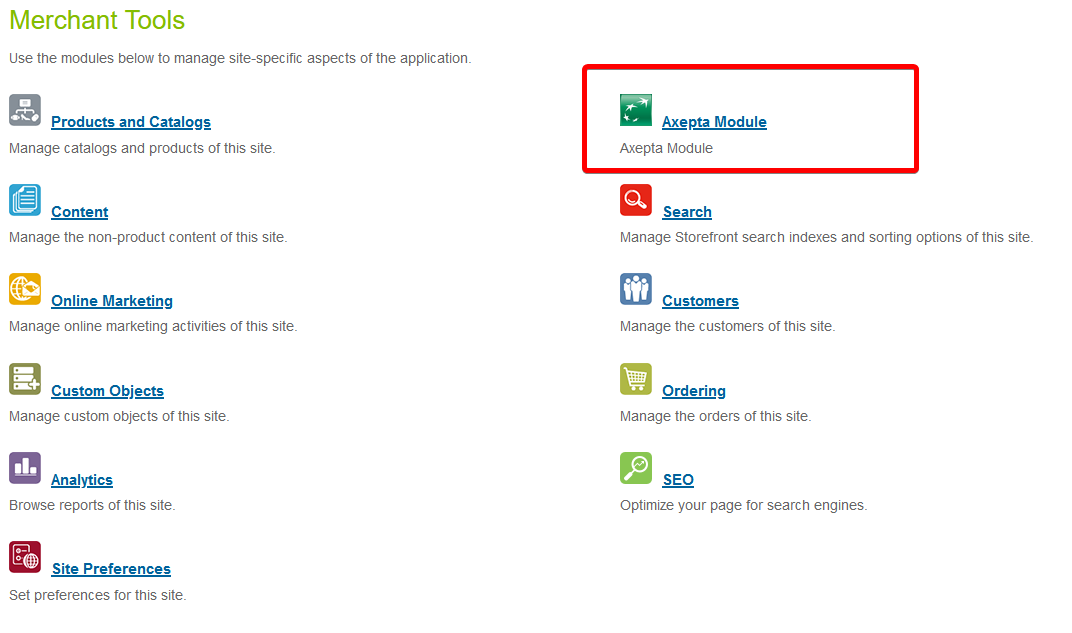
- The Axepta Module is displayed under Merchant Tools
Module configuration
This module has 2 entries in the "Merchant tools" menu.
Configuration of Axepta payment accounts - Accounts configuration
Account configurations depend on the currencies activated on the site. After activating one / more currencies on the site, it is possible to create the necessary configurations. For this, a custom interface is available in : Merchant Tools> Axepta Module> Accounts Configuration.
...
In this interface, the activated currencies are listed, with the possibility of modifying / creating these configurations.
Create a payment account
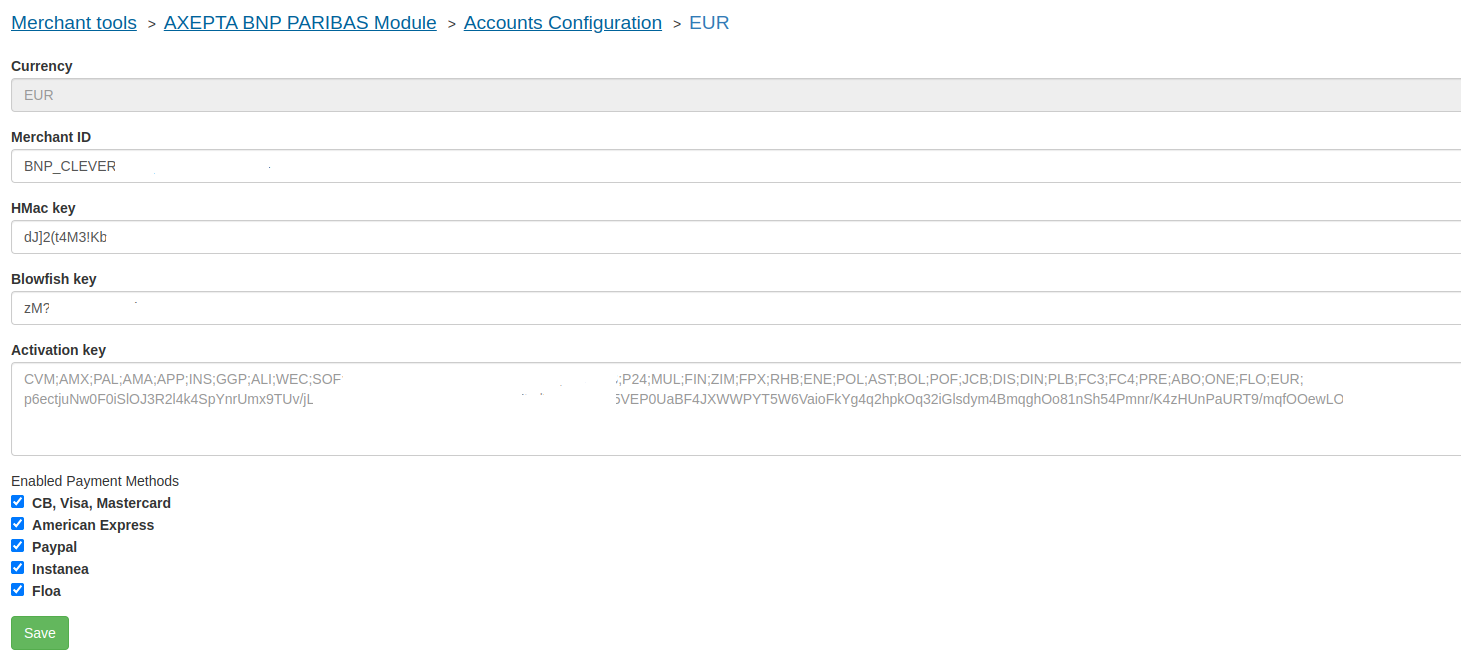
When entering a new payment account, you must enter the following 4 pieces of information that will have been sent to you by Axepta :
...
The list of payment methods displayed depends on your contract with Axepta.
Modification of a payment account
When modifying an existing payment account, the following 3 pieces of information must be entered, as provided by Axepta :
...
- Activation Key: the account activation key, which allows you to define the different payment methods available
Transaction management
Transaction list
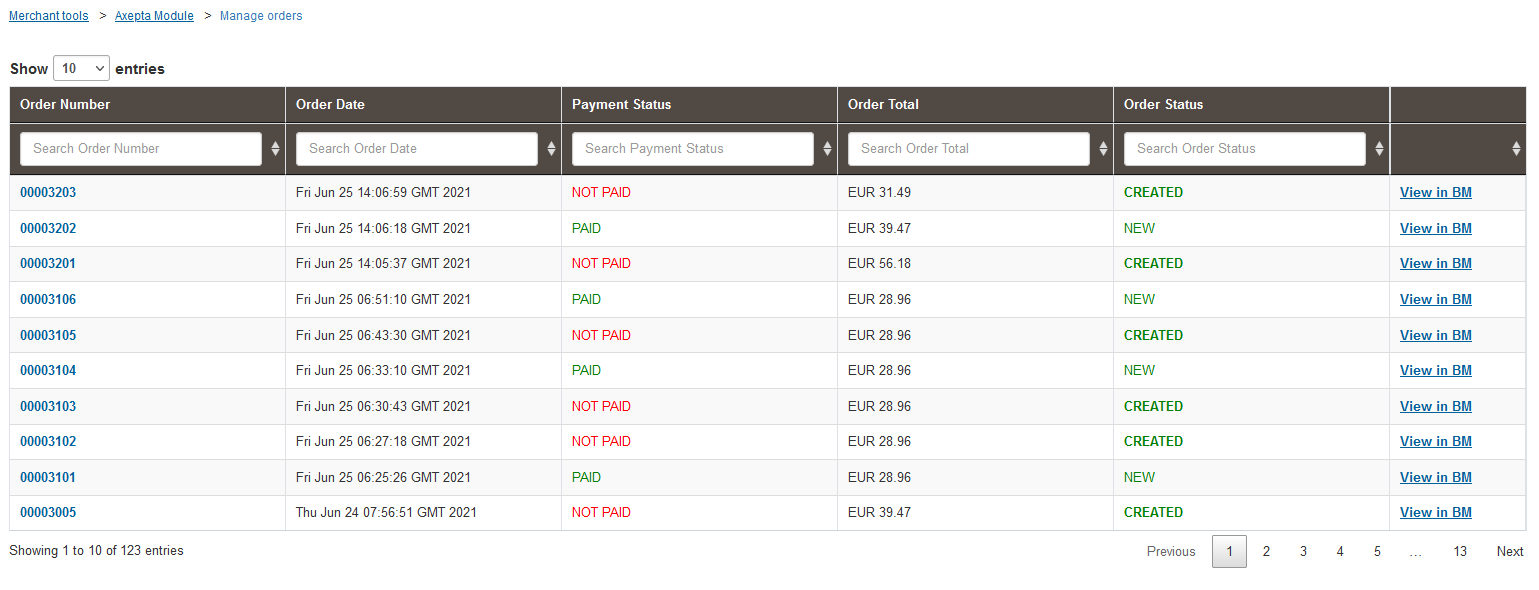
With the cartridge, you have an interface for managing Axepta transactions. It can be found in Merchant Tools > Axepta Module > Manage Orders. On this page, the orders with the "Is Axepta" flag are listed. The status and general information are also listed. When you click on the order ID, you will find the details of this order and the related Axepta transaction.
Transactions detail
On this page, the general information of the order and the payment with Axepta are displayed.
...
On the left side Order payment operations, you can find the list of calls, with the type of call made, and the status. So we have the PAYMENT, CAPTURE, REFUND, CANCEL operations...On the right side, we find the details of the service call returns (so all the details of the transaction made). From this page, it is also possible to cancel or refund the payment.
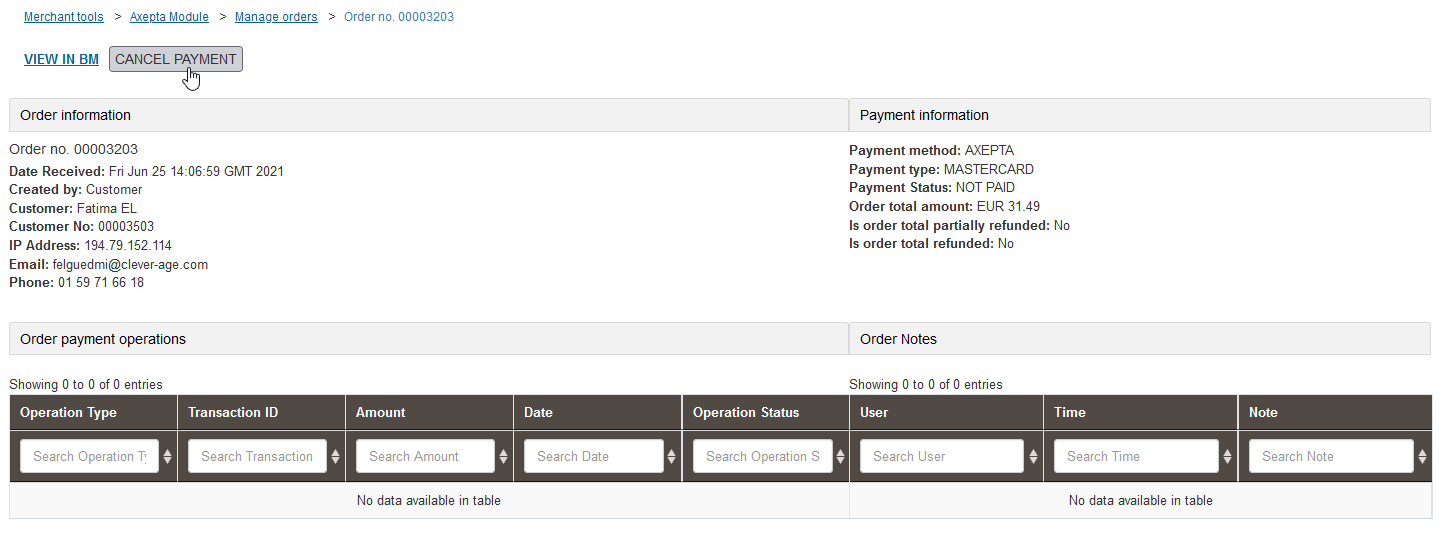
Cancellation
To perform a cancellation, the order must meet the following criteria:
...
If the order respects these criteria, a "REFUND PAYMENT" button is available on the top of the page. When this button is clicked, a first call verifies that the order has no capture (via the axepta.inquire service), then a call is made to the axepta.reverse service, which will close the payment, and cancel the order. A "CANCEL" transaction line will then be added to the list.
Refund
To perform one/several refunds, the order must meet these criteria:
...
If it respects these criteria, a field and a button are added on the top of the page. By default the value is the total of the order. You can enter a partial refund (i.e. a lower amount) if necessary. At the validation, a call to the axepta.capture service is made, and a transaction line is added. It will be either "PARTIAL REFUND" or "REFUND" depending on the amount.
Capture mode
As previously mentioned, 3 capture modes are available.
...
This capture mode requires a call to the capture endpoint. These calls are managed by the Axepta - Capture Orders job. This job runs on Axepta orders with a status of "SHIPPED", and not captured. It then makes a call to the axepta.capture service on these orders. If the return is positive, the order is marked as Captured and PAID.
Jobs configuration
There are 2 jobs created to manage transactions with Axepta :
...
- Axepta - Update Delayed Captures: to retrieve the status of the payment in the "With Delay" mode. This job uses the "axpCaptureDelay" parameter In order for the capture jobs to function correctly, it will be necessary to define one / more execution sites for them via the context of the steps.
Configuring Axepta Site Preferences
General configuration items can be found in Site Preferences ( Merchant Tools> Custom Preferences> Axepta Configurations ).
...
- Capture delay (in hours) : Only for “With delay” (Avec délai) mode. Set the desired time for the capture delay.
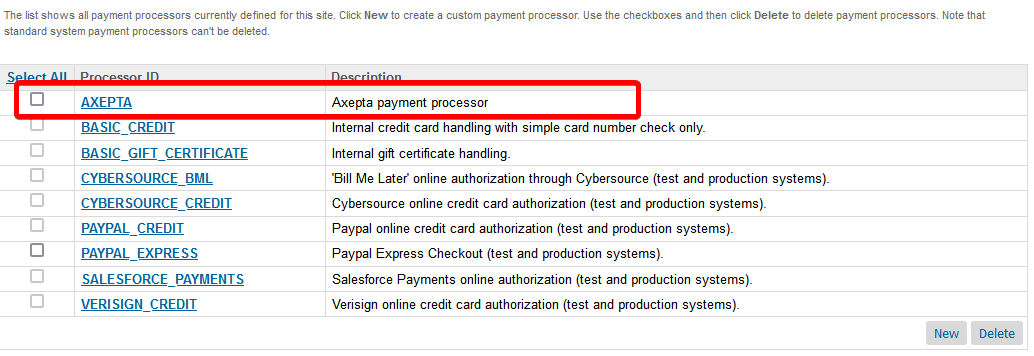
Payment processors
There is only one payment processor added for Axepta Implementation: AXEPTA. Go to: Merchant Tools > Ordering > Payment Processors
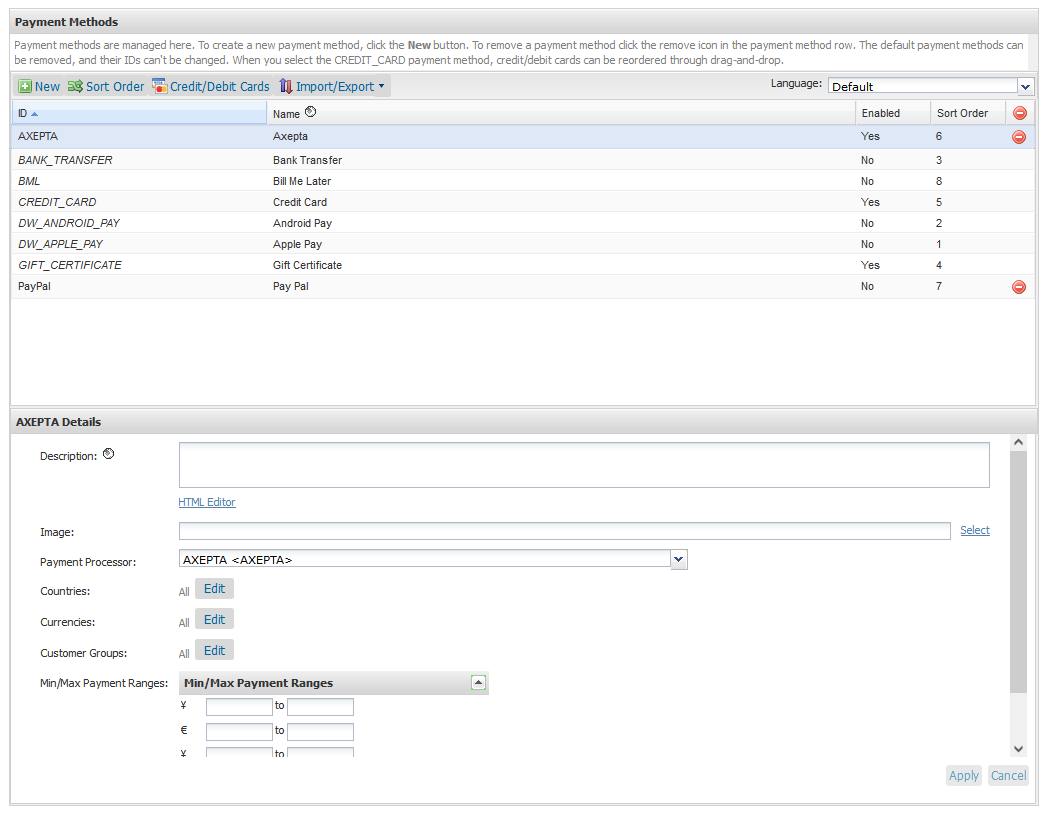
Payment Methods
There is only one payment method added for Axepta Implementation: AXEPTA. Go to : Merchant Tools > Ordering > Payment Methods
Logs
Logs related to Axepta Implementation can be found in :
...
Select logs and enter you BM credentials if needed.
Notifications and redirect URL’s
In order to connect to Axepta back office, a configuration is required on each Axepta account to allow the communication between an instance of SFCC and Axepta. The link is done through URL’s, which are added in the Axepta Extranet platform for each account :
- Transaction notification URL https://*domain.name*/on/demandware.store/*site.name*/*locale*/Notifications-Start
- Chargeback notification URL *domain.name*/on/demandware.store/*site.name*/*locale*/Notifications-Chargeback
- Redirection URL after payment form cancelling *domain.name*/on/demandware.store/*site.name*/*locale*/Notifications-Cancel
Storefront Functionality
Payment mode
Display of the payment method in the checkout
After entering the delivery information, the payment information and the choice of payment method are displayed. The customer chooses their card type and validates the payment in the next step.
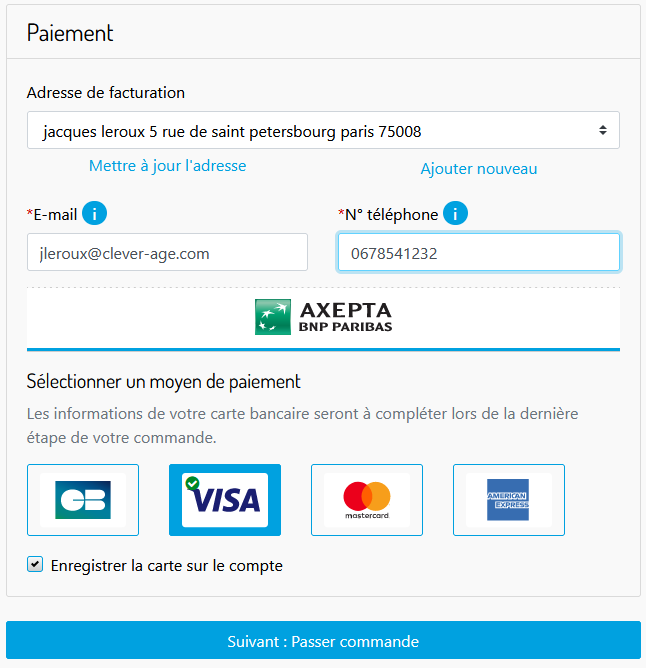
Payment by redirection
In this mode of payment, the customer is redirected to the Axepta website to enter his credit card information.
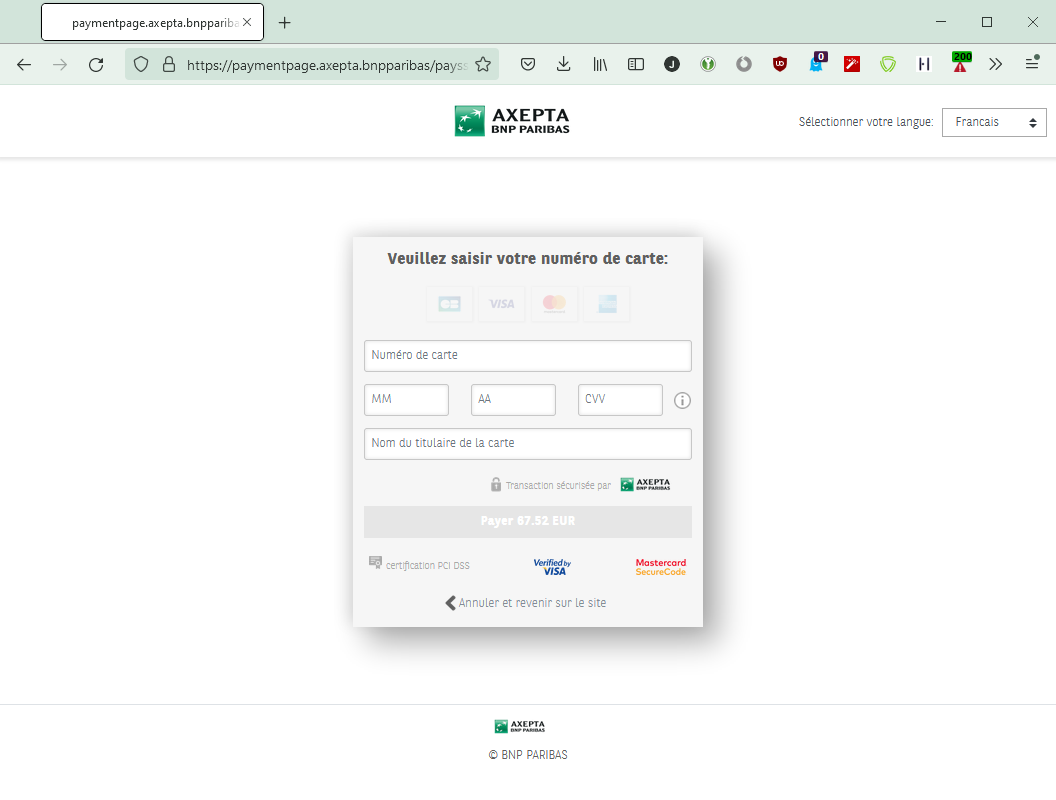
Payment by iframe
In this payment method, the customer remains on the e-commerce site. The payment method is entered in an iframe when clicking on the "Place order" button.
...