
...
- bm_axepta:int_axepta_core : for the Business Manager
Installation
Import of metadata
Configuration
Configuring Site Preferences
...
We consider that you have a Sitegenesis cloned in the same root folder as Axepta cartridge. Before installing anything on sitegenesis folder, you can change Gruntfile.js in sitegenesis folder first:
Add const sass = require('node-sass');
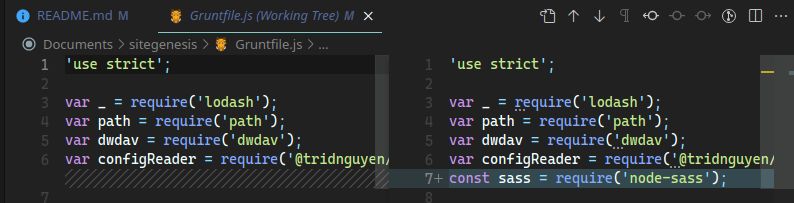
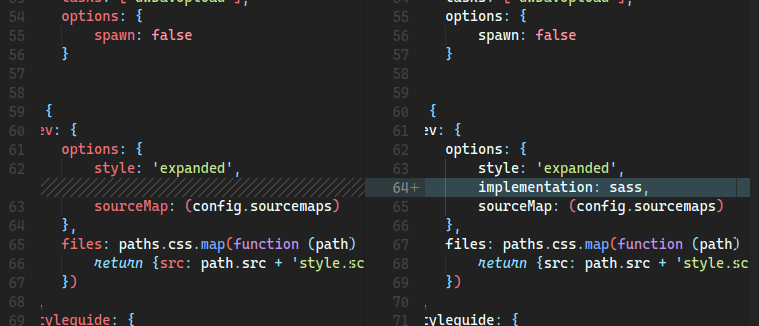
And implementation: sass,
Now cd into sitegenesis cartridge folder and run these commands in terminal:
npm install
npm run build
npm install -g grunt-cli
npm install grunt grunt-autoprefixer grunt-browserify grunt-cli grunt-sass sass
Now cd into Axepte cartridge folder and run these commands in terminal:
npm install
npm run buildsg
This will copy client JS and run grunt build. Please check the file package.json for more info.
Import of metadata
The necessary configuration data can be found in the metadata/ folder . Before importing, replace the name of the SiteGenesis folder in the metadata> sites folder with the ID of your site. You can now compress the metadata/ folder, and import it into Administration> Site development> Site Import & Export .
This import will add the configuration elements, as well as the various jobs, services and extensions of system-object.
Configuration
Configuring Site Preferences
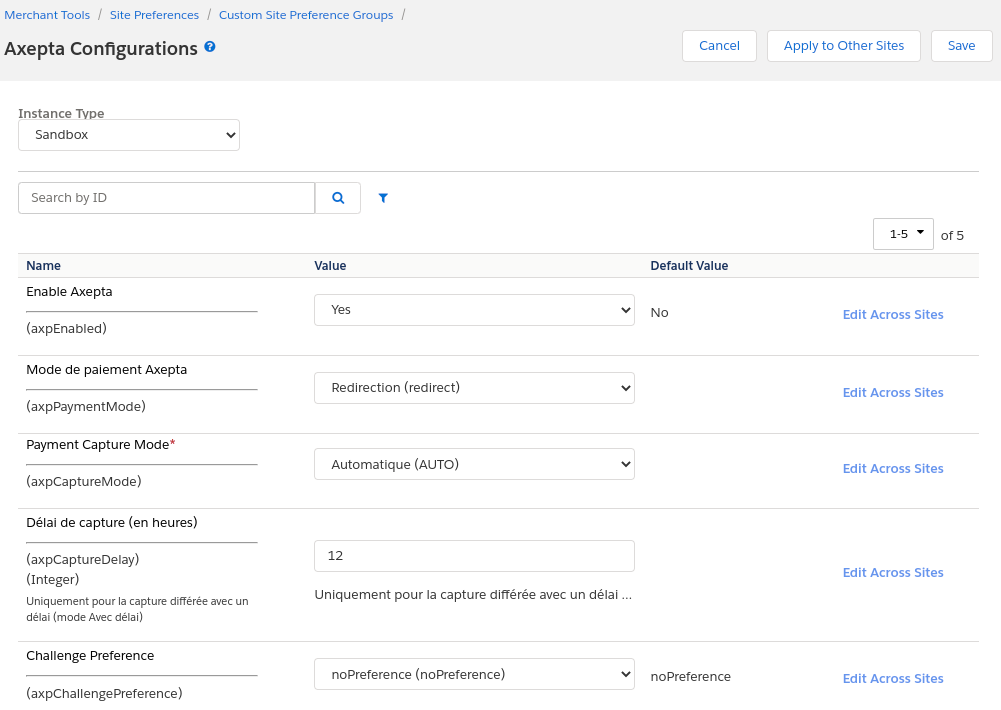
General configuration items can be found in Site Preferences (Merchant Tools> Custom Preferences> Axepta Configurations ). It contains the following elements:
- Axepta payment method : The chosen integration method (Redirection or Iframe)
- Payment Capture Mode: The capture mode chosen for payments :
- Manual: The capture is triggered by a job, on condition of being sent
- With delay: The capture is triggered automatically after a defined duration (in the Capture delay (in hours) field)
- Automatic: The capture is triggered immediately upon validation of the payment - Capture delay (in hours) : Only for “With delay” (Avec délai) mode. Set the desired time for the capture delay.
- Challenge preference :
- noPreference: The merchant takes no action : the choice of exemption is left to the issuer.
- noChallenge: The merchant requests an exemption of the strong authentication (no Challenge - Frictionless): The issuer will accept or not the merchant’s request according to the information he sent.
The merchant requires strong authentication (challenge) :
- mandateChallenge: Mandatory (mandate): the issuer must authenticate the buyer (e.g. for the first subscription transaction)
- requestChallenge: Preference (request): The merchant wishes to authenticate the buyer. The final choice remains with the issuer.
See 3DSV2 and frictionless for more information.
Configuring Custom Objects
Account configurations depend on the currencies activated on the site. After activating one / more currencies on the site, it is possible to create the necessary configurations. For this, a custom interface is available in: Merchant Tools> Axepta Module> Accounts Configuration . In this interface, the activated currencies are listed, with the possibility of modifying / creating these configurations.
You must configure the following :
- MerchantID : the Axepta payment account ID
- HMac key: The encryption key linked to the MerchantID
- Blowfish key : The Blowfish key for payment data
- Activation Key: the account activation key, which allows you to define the different payment methods available
Once the configuration has been created, it is possible to activate / deactivate the payment methods available via checkboxes.
Job configuration
In order for the capture jobs to function correctly, it will be necessary to define one / more execution sites for them via the context of the steps.
Transaction management
Details of transactions
...